Studio
Studio is where you build a zAppDev application: your whole application, in one workspace. It runs in your browser, so there is nothing to install, and it holds everything you need in one place: the editors for every kind of model, validation, building, running, testing, version control and deployment. It is also where AI works with you: zAI lives inside it, and your own agents can connect to it through MCP.
Everything else in zAppDev is described and checked here. The code of your application is produced from what you build in Studio.
What it is for
In Studio you do not write an application file by file. You describe it as an Intended Design made of models (business objects, forms, services, automation flows and more), and Studio keeps them connected, so every element knows what it is related to. When the models are valid, a build produces the application for the target you chose.
With Studio you can:
- Create or open an application, starting from an Empty project or the Web application template. See New Project.
- Add and edit models with an editor for each kind. See Editors.
- Write logic in the language wherever a model needs behaviour.
- Validate the whole application as you work, and see every error and warning in one place. See Validation.
- Build and run the application, and read its logs.
- Run unit tests for your logic.
- Work as a team through Git: update, commit and read the log from the Project Explorer.
- Deploy and export: deployment environments, downloading the models or the generated solution, a Postman collection and generated documentation. See Download and export.
- Work with AI: ask zAI to change the Intended Design, or connect another agent.
A tour of the workspace
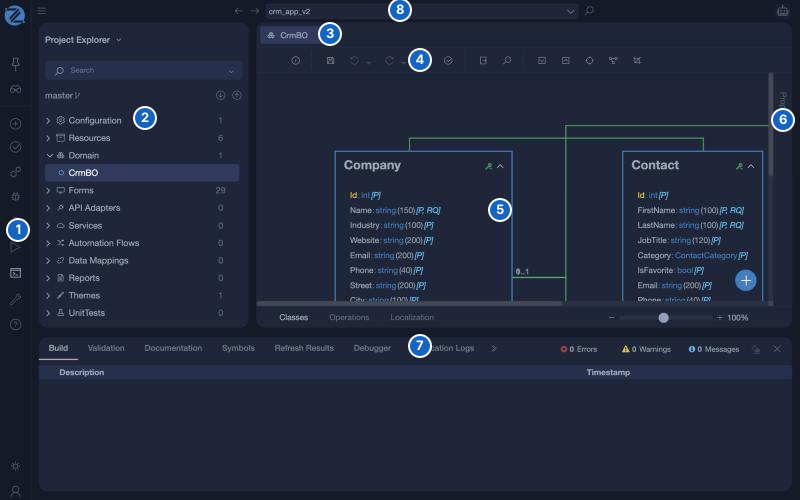
| # | Area | What it does |
|---|---|---|
| 1 | Taskbar | The narrow bar on the left. New model, Validate, Build, Run, Run Unit Tests, Global Search, Tools, Help and your account. See Taskbar. |
| 2 | Project Explorer | Every model of the application, grouped by type, with the number of models of each type, a search box and the Git controls. See Project Explorer. |
| 3 | Editor tabs | Each open model has its own tab. |
| 4 | Editor toolbar | The buttons of the open editor: Save, Undo, Redo, Refresh, Validate and the ones that model needs. See Top Ribbon. |
| 5 | Editor | Where you work on the open model: a diagram for business objects, a design view for forms, code for logic. |
| 6 | Properties | The settings of the selected element, next to the editor. Form editors also have Model, DataSets, Validation and Toolbox panels here. |
| 7 | Console | Messages, validation results, search results, documentation and the application logs. See Console. |
| 8 | Top bar | The application name, back and forward buttons for the models you opened, symbol search, and an indicator that AI features are enabled. |
The Welcome page and the Control Panel
When you sign in you see the Control Panel, the list of your applications, where you can create a new one. When you open an application, its Welcome page offers quick starts (a new entity, a new screen, a new workflow, or opening another project), your recent projects, learning material and what is new in this version of Studio. You can open the Welcome page again from your account menu.
See New Project and Project Management.
How you work
- Open or create an application.
- Add models with New. The Add new item window offers 22 templates.
- Edit each model in its editor, and write logic in the language where needed.
- Validate (Ctrl + Shift + E). Fix errors, which stop a build, and read warnings.
- Build (Ctrl + Shift + B) and Run (Alt + R).
- Commit your changes, and deploy when you are ready.
Because generated files are overwritten on every build, you change the application in Studio, never in the generated code. See The engine.
Making it yours
- Theme. Choose Dark, Gray or Blue from the taskbar.
- Help Center. Shortcuts, links to the documentation and the release notes. See Taskbar.
- Search. Symbol search (Ctrl + P) and global search (Ctrl + Shift + F).
In this section
-
Create applications, find them, and see your subscription. New Project, Project Management and Subscription.
-
The parts of the workspace: the Taskbar, the Project Explorer, Add new item and the Console.
-
Version control, code editors, validation, the engine, download and export and deployment.
-
Signing in, registering and resetting your password.
Where to start
- Create your first application with New Project.
- Learn the workspace with the tour above, then the Project Explorer and Add new item.
- Build something with the Hello World tutorial.
Related
- Editors: what you can describe.
- The language: for logic.
- Targets and AI: how the Intended Design becomes code, and how agents work with it.