Setting up a double-hop Kerberos Authentication with Constrained Delegation
Introduction
This article will present how to set up a 2-Tiered IIS Web Application using Kerberos authentication with delegation. Follow the steps provided whenever you are installing a Web Application consisting of more than 1 Tier (i.e. a Web Server and an Application Server) that run on different network elements (i.e. different servers).
Note that if both your IIS Applications (namely the Front-End and the Back-End Application) run on the same server, their configuration is much easier, even if they use Windows Authentication in a realm running under Kerberos. The tricky part is when the two parts run on different machines, thus creating a “double-hop” scenario. More so, if you wish your Web site to provide services outside your corporate domain, since Kerberos does not play well over the Internet.
Scenario
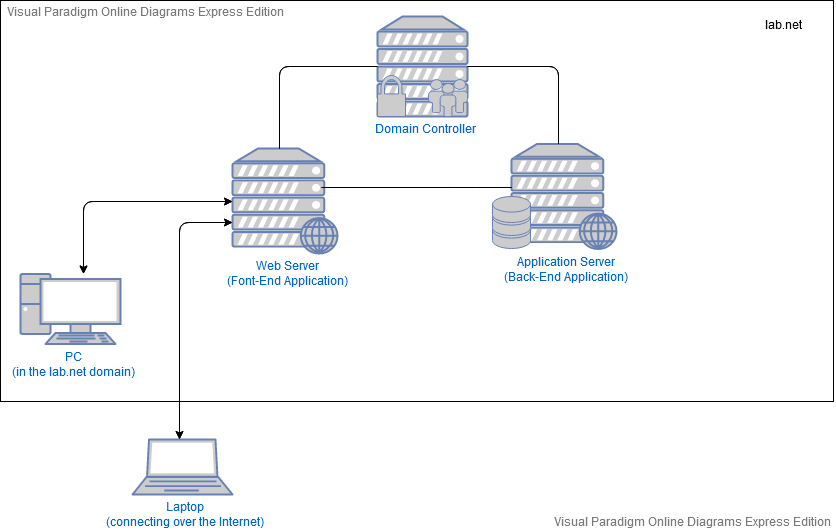
In this tutorial, we will follow the steps required for the successful installation and configuration of a 2-Tiered Web Application in a quite common (yet tricky) scenario where:
- The Front-End Application runs on a Web Server
- The Back-End Application runs on an Application Server, different from the Web Server
- The Web Application uses Windows Authentication to authenticate and authorize its users
- The “entry-point” is the Front-End Application that now, not only has to serve the content of the underlying application, but has an additional task to verify the end-to-end authentication by accepting requests from clients over the Internet, authenticate them against Kerberos and make subsequent requests to the Back-End Application on behalf of those clients, always keeping their Identities intact for the Business Processes of the Back-End Application to be able to differentiate between the various connected users.
Domain Example
Now, before we begin, let’s draw out the Domain that this tutorial will use, so that our examples make more sense. In the end, all you will have to do is to substitute the names (i.e. user names, domain names etc.) and the IP addresses, presented here, with your own.
Network
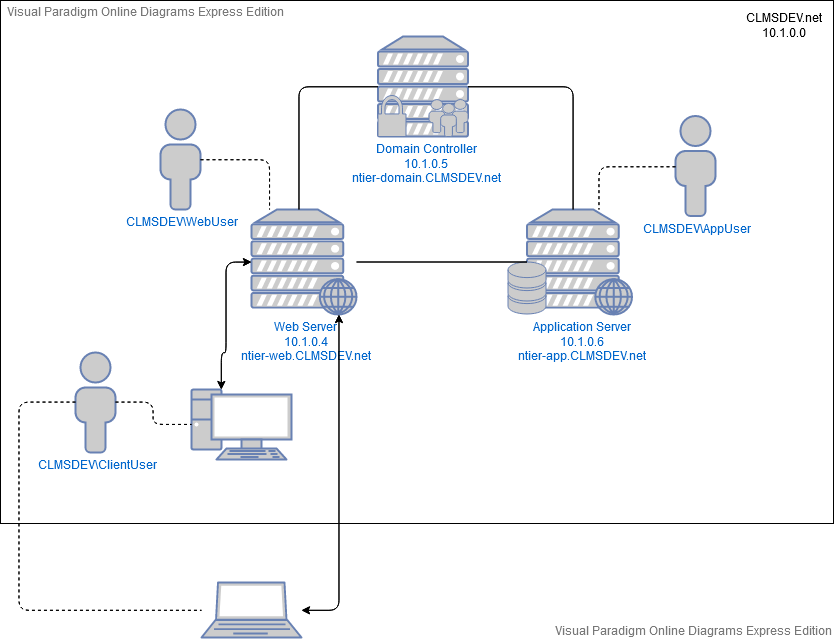
The example of this tutorial will run in a Domain named CLMSDEV.net that runs in a 10.1.0.0 subnetwork and consists of the following network elements:
- A Domain Controller, named ntier-domain, with a 10.1.0.5 IP Address that contains the Active Directory database used for the end-to-end authentication and authorization of the underlying elements and accounts. The Domain Controller is also host for a Kerberos instance, whose S4U2proxy and S4U2self extensions are enabled.
- A Web Server, named ntier-web, with a 10.1.0.4 IP Address containing the Front-End Application of our IIS Website, running with an Identity Application Pool whose user is CLMSDEV\WebUser
- An Application Server, named ntier-app, with a 10.1.0.6 IP Address containing the Back-End Application of our IIS website as well as its MS-SQL Database, running with an Identity Application Pool whose user is CLMSDEV\AppUser
User Accounts
Three user accounts will be used in this scenario: one for each of the Application Pools running our two tiers of the IIS Website and one that will represent the end-user connecting to the web site from anywhere within the Domain or externally via the Internet. In further detail,
- The AppUser account, residing within the CLMSDEV.net Domain, will be used as the Application Pool Identity of the Application Server
- The WebUser account, residing within the CLMSDEV.net Domain, will be used as the Application Pool Identity of the Web Server. This account’s role is the most important: this is the account that will grab the Identity of an external user, propagate it to Kerberos for authentication (since the external user cannot access the Kerberos itself) and then push it down the communication flow onto the Application Server, set up, authenticated and ready to be used as any other internal user.
- The ClientUser account, again created within the CLMSDEV.net Domain, will be used as the end-user’s account, available from any point within the Domain (authenticating via pure Windows Authentication procedures) as well as the Internet (authenticating with the help of WebUser that will help it deal with the challenge of accessing Kerberos)
Note that, usually, it is not desirable to grant corporate domain accounts to external clients. Additionally, Kerberos does not function well over the internet. However, there are ways to allow a domain account to be used outside the firewalls of the corporate domain and this is what will be shown in this tutorial.
Requirements
Topology Requirements
Before we continue, it is crucial that our network topology is correctly configured to enable both an inter and an intra-Domain authentication/authorization with Windows and Kerberos.
So, first of, make sure that all your underlying servers can communicate with each other and that the Web Server is available via the Internet. In other words, create all the necessary Firewall rules (both inbound and outbound) so that:
- The Domain Controller can communicate with the App and the Web Servers
- The App Server can communicate with the Domain Controller and the Web Server
- The Web Server can communicate with the Domain Controller and the App Server
- The Web Server is available for HTTP(S) requests from an external point, via the internet
Finally, make sure that the DNS address of the App and Web Servers point to the Domain Controller of our subnet. To do that, follow the steps described:
- Find out the internal IP address of the Domain Controller (in our example this is 10.1.0.5)
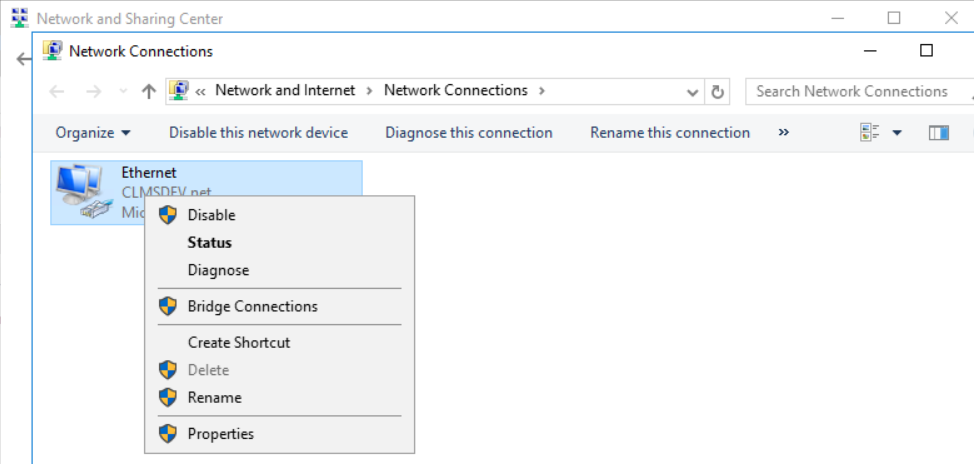
- Enter the Web Server and open its Network and Sharing Center configuration (Control Panel\Network and Internet\Network and Sharing Center)
- Click on Change adapter settings
-
Right-click on the adapter your server is using for its intra/internet communications and open its Properties
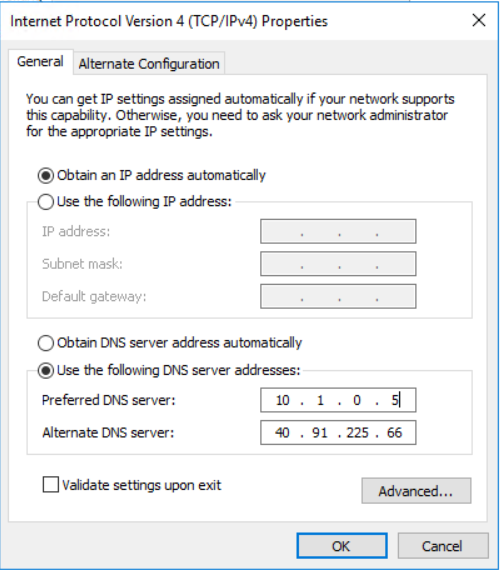
 5. Select the Internet Protocol Version 4 (TCP/IPv4) item and click the Properties button
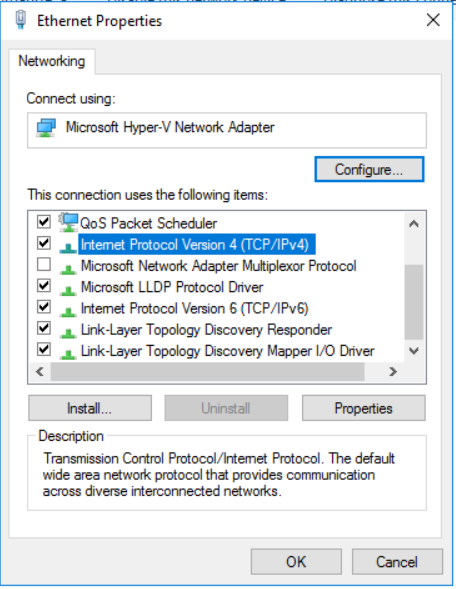
-
Change the DNS server address to the IP Address of your Domain Controller. (In the example shown, I entered both the internal and the public IP of my Domain Controller just as an example. Normally, just the public IP is more than enough)
Do the same for the App Server as well. Both should point to your Domain Controller as their DNS.
System Requirements
As far as the actual installation of the Web page is concerned, the following system requirements should be met in the servers that will run the Front and the Back Ends of the Application:
Minimum
| Category | Product |
|---|---|
| Operating System | Microsoft Windows Server 2012 |
| Web Server | Microsoft IIS Server 7.5 |
| Database Server | Microsoft SQL Server 2008 R2 |
| Microsoft .NET Framework | 4.7.2 |
Recommended
| Category | Product |
|---|---|
| Operating System | Microsoft Windows Server 2016 |
| Web Server | Microsoft IIS Server 1 |
| Database Server | Microsoft SQL Server 2016 |
| Microsoft .NET Framework | 4.7.2 |
Web & Application Servers Preparation
Before we continue with the actual installation and configuration of our 2-Tiered Application, let's prepare the two Servers that will run the Front and the Back Ends of our Application.
Install Microsoft .NET Framework
Location
Both Web and Application Servers
Note
You can either follow the steps described or jump here to be done with this.
First, you will need to install the .NET Framework on both machines running the two Ends of the Application.
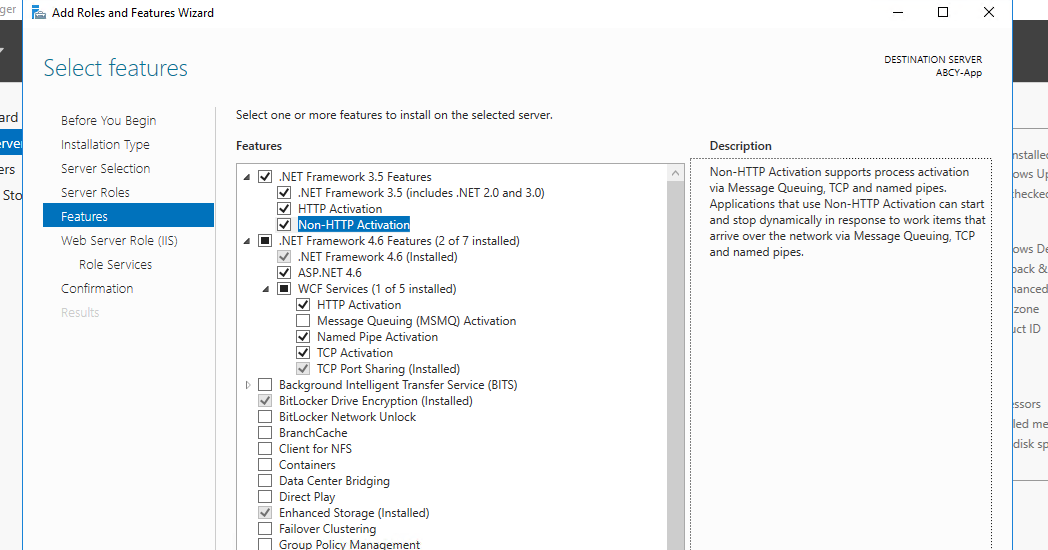
Install .NET Framework
- Open the Server Manager
- Click on the Manage option
- Select Add Roles and Features and skip the first page by clicking Next
- Select Role-based or feature-based installation and click Next
- Select your server from the Server Pool by clicking on it. Press Next
- Install the features depicted here:
Install IIS
Location
Both Web and Application Servers
Note
You can either follow the steps described or jump here to be done with this.
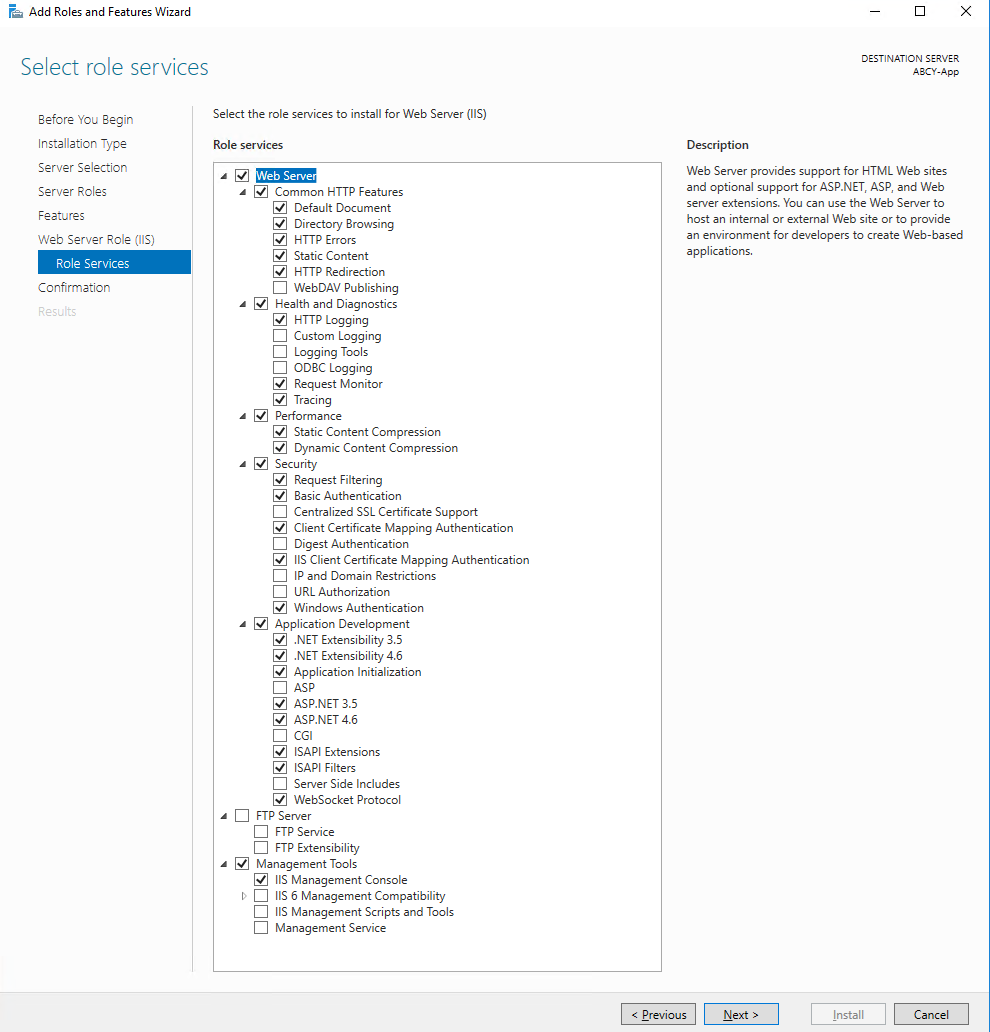
Next, while still in the Roles and Features configuration manager, install the Internet Information Services required to actually host our two applications:
Install IIS
- Select the Role Services item
- Select the role services depicted here:
Auto-Installer
Location
Both Web and Application Servers
If you wish, you can just download a script I've prepared that installs all the required features in a blink of an eye: Install-WinFeatures.ps1
This script runs an Install-WinFeatures command that can be ran in two ways:
Install-WinFeatures: will install only the missing featuresInstall-WinFeatures -ForceInstallation: will install all missing and re-install all installed features
Warning
Make sure to pay attention to the friendly messages that the script is printing. There are two things to check out:
-
If you see this message, then one or more features could not be installed! Follow the steps described in the previous sections and install them manually:

-
If you see this message, then make sure to reboot the machine you've been working on, prior to continuing with the Installation of the IIS Application

Create User Accounts
Location
Domain Controller running the Active Directory of your domain/realm
Before getting to the IIS part, let's first create our User Accounts. For now, the accounts will represent plain users with no delegation settings or any other, required by the Windows Kerberos, configuration. We will set everything up in the next sections.
At this point we will create three user accounts:
- One account that will run as the Identity of the Application Pool behind the Front-End Application (i.e. on the Web Server)
- One account that will run as the Identity of the Application Pool behind the Back-End Application (i.e. on the Application Server)
- One account that will be used by the end-user connecting to our 2-Tiered Application from any point in the Internet
To add a new User into the Active Directory, follow the steps described:
Adding a User
- Find the Windows Administrative Tools in your server
- Click on Active Directory Users and Computers
- Select Users from the tree presented on your left
- Right-click on an empty space on the panel that opens
- Select New → User

- Ensure that the domain selected in the window that opens is the domain you are working on (for example, I would see: CLMSDEV.net)
- Enter the First and Last name of your new User along with any other information you wish (Full name, Initials)
- Finally, enter the User logon name as the username of your newly created user.
For example, if you are creating the account running the Front-End's Application Pool, you would create a user named "WebUser" like so:

Following the steps described, create the three accounts required.
In the example used in this tutorial, I will create the following:
- CLMSDEV\WebUser (a.k.a. WebUser@CLMSDEV.net as the account running my Front-End Application App Pool, on the Web Server)
- CLMSDEV\AppUser (a.k.a. AppUser@CLMSDEV.net as the account running my Back-End Application App Pool, on the Application Server)
- CLMSDEV\ClientUser (a.k.a. ClientUser@CLMSDEV.net as the end-user's account that will, finally, use the website)
Set Up Internet Information Services
Create the Websites
Location
Web and Application Servers
A few common issues might arise while setting up a new web application in IIS. This might happen because a new application inherits the configuration and settings from its parent web site, so some of the items we will need to change might have pre-designated values. Additionally, since IIS uses the web.config to read and write its settings, using a pre-created web.config while modifying settings via the IIS Manager, may reset the previously configured values. To tackle all of this issues at once and ensure that Kerberos will work when we finish, follow the steps described.
Create the Web Applications
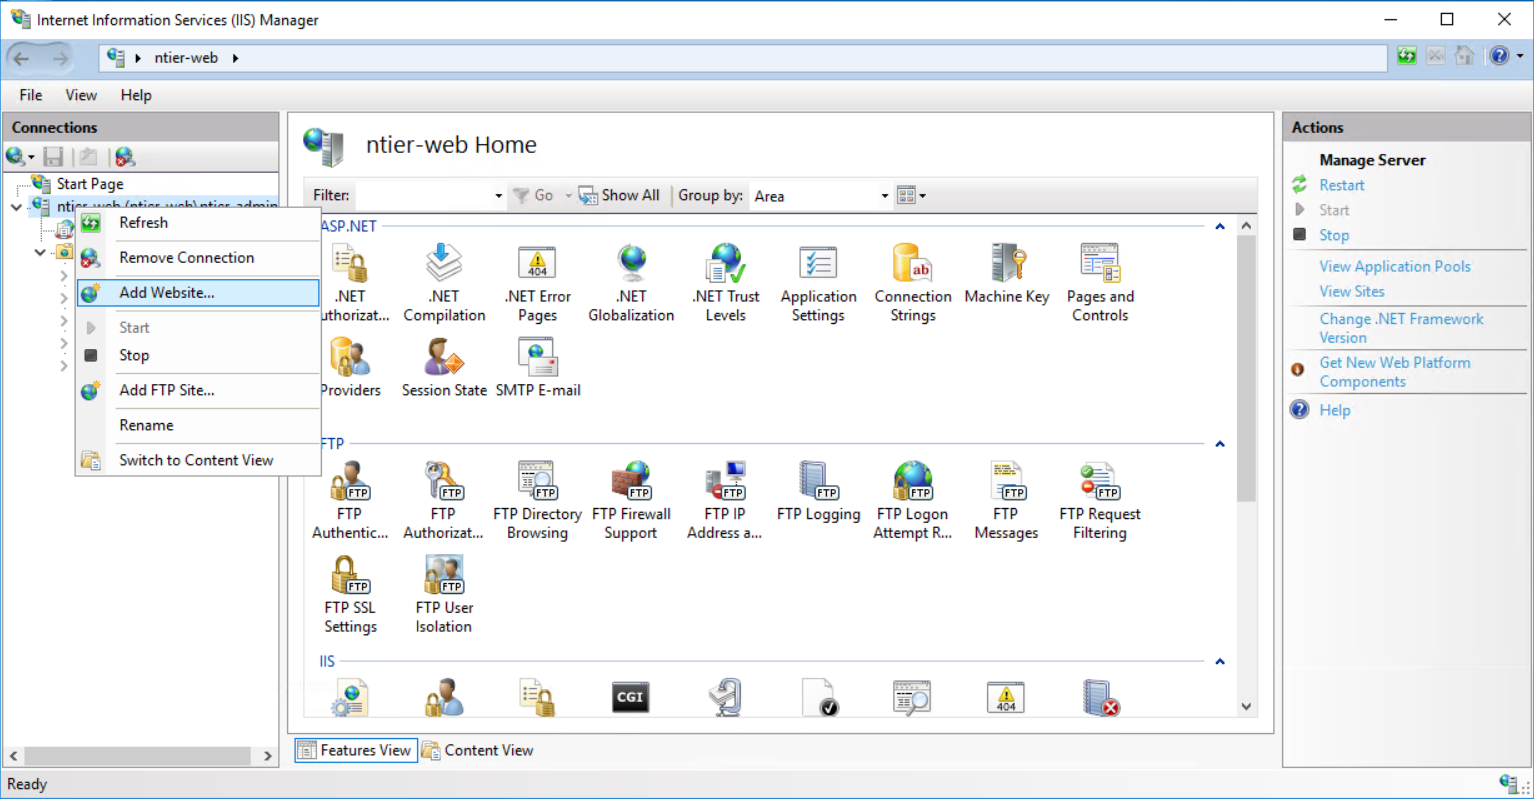
- Enter one of the two servers (you will need to repeat the steps for each application). For example, the Web Server, running the Front-End Application
- Open the Internet Information Services Manager (IIS Manager)
- Right-click on the root connection and click on Add Website
- Give it a Site name and point its Content Directory to the folder of your Web Application (in our example, the folder holding the Front-End Application)
- Write down the Application Pool assigned to it (should have the same name as the name you gave to the Website)
- Leave the IP address to its default value
-
Ensure that the Port is 80. This is very important if you want Kerberos to work perfectly, with no issues, from the first time.
Warning
Kerberos has a preference for default ports. The default port for HTTP is 80, so we will leave/enter 80
Tip
If you get a warning stating that your binding is assigned to another site, find that other site and change its binding
-
Finally, set the Host name of your site. This is one of the most important configurations, if you want Windows Kerberos to correctly locate your service. For this step, find the exact name of the machine on which this Application runs and write it in the Host name input. For example, my Front-End Application runs on a server named ntier-web.CLMSDEV.net . This shall be the Host name as well.
Warning
Make sure the Host name represents your server's name correctly: the correct name, domain name and cases.
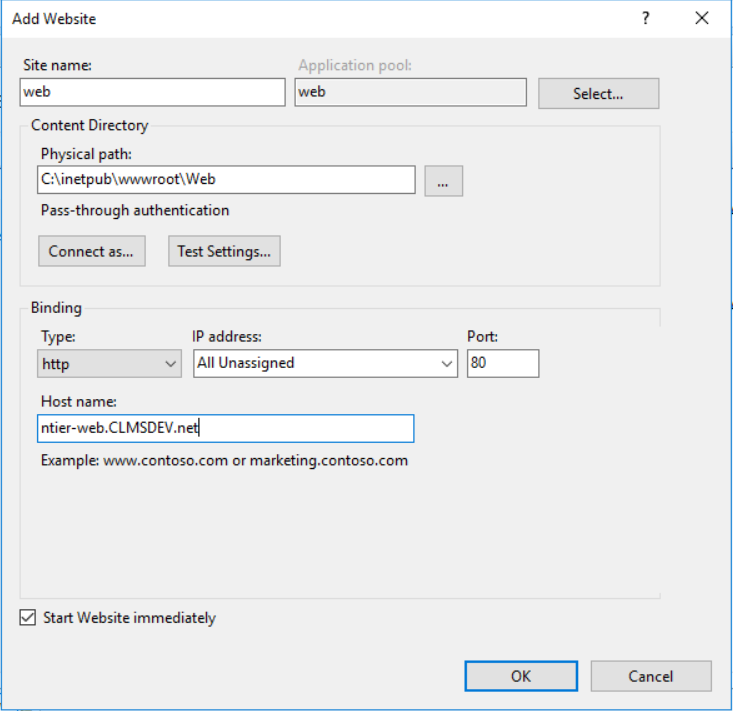
-
Press "OK" to store all your settings
Repeat the aforementioned steps for both websites: Front and Back-end. In the example used in this tutorial, I will create two websites:
- A "web" website with a "web" application pool, hosted on ntier-web.CLMSDEV.net:80 of my Web Server
- An "app" website with an "app" application pool, hosted on ntier-app.CLMSDEV.net:80 of my Application Server
Configure the Application Pools
Now that we have created our two websites, one for the Front and one for the Back-End of our Application, it is time to configure their Application Pools and ensure that they run
- Under Windows Kerberos Authentication
- Using the two User Accounts we created earlier
Let's start with the easy one: the Application Server's Application Pool
Application Server Application Pool (Back-End)
Location
Application Server
The Application Server (running our Back-End Application/Website) will use the Application Pool Identity we created earlier. In the example used in this tutorial, the "app" Application Pool will use the CLMSDEV\AppUser account. This account will be, then, used by Windows Kerberos for authentication, authorization and actual location of the running website (i.e. whenever a service asks "who's responsible for the Back-End Application?" the answer will be "the CLMSDEV\AppUser").
To assign the created user account to this Application Pool, follow the steps described:
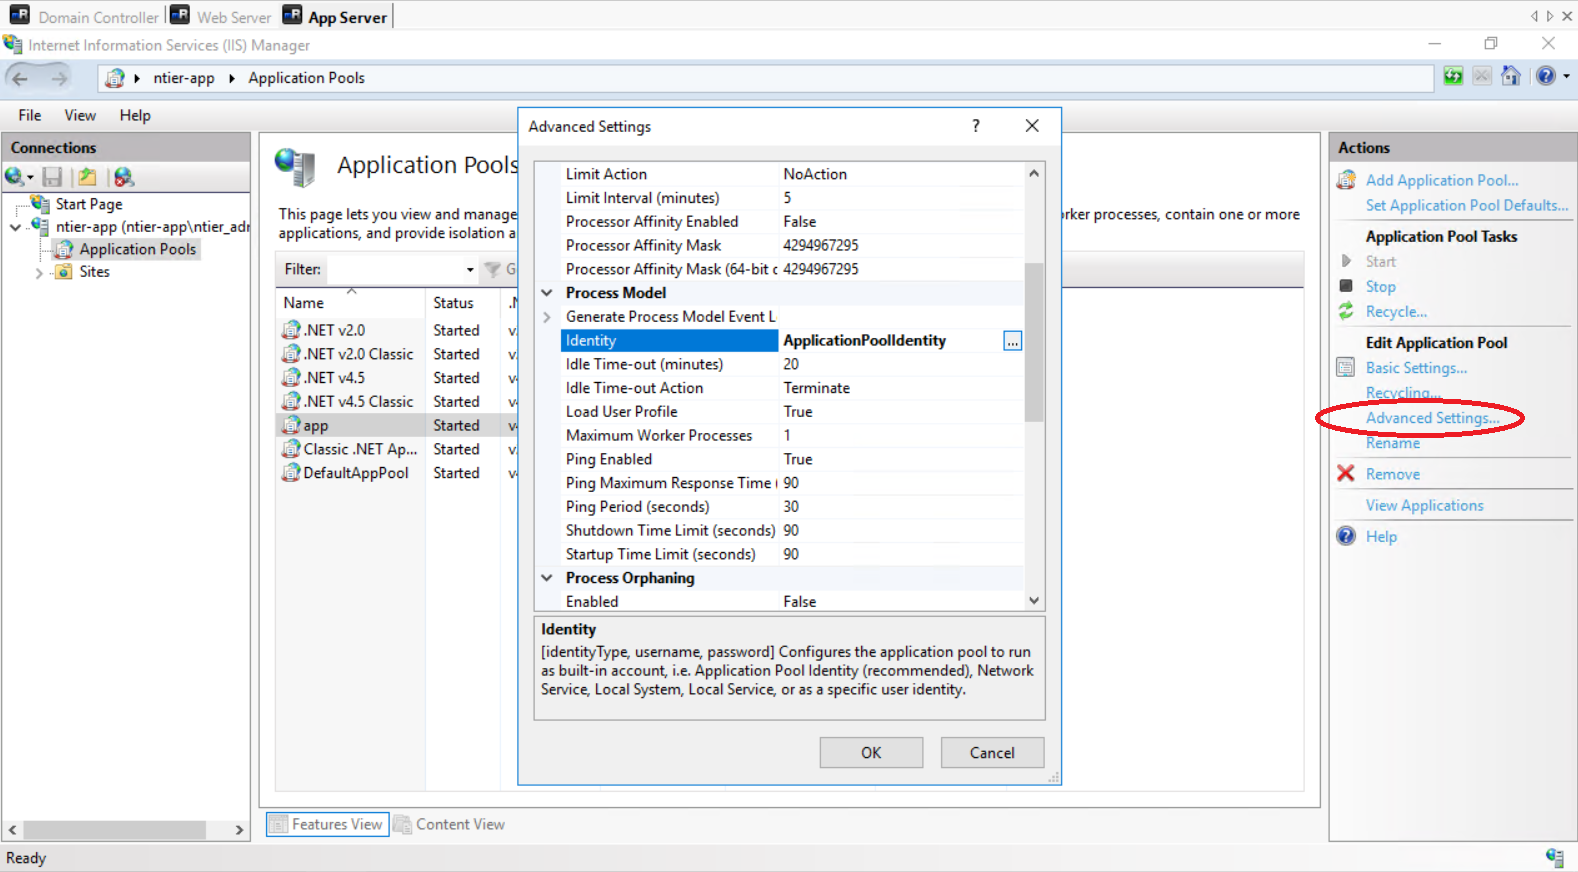
Assign the Application Pool User
- Click on the Application Pool ("app" for example) to select it
- Click on Advanced Settings... (alternatively, you can right-click on the Application Pool and then select "Advanced Settings..." from the drop-down menu
- Find the Identity item, under the Process Model items list
- Click on its value (it should be "ApplicationPoolIdentity" if you are configuring this Application Pool for the very first time)
-
Click on the ... button that will appear, to open the editor of the Identity item
-
In the Application Pool Identity Editor that will appear, select the Custom account radio-button and click on the Set... button
- Enter the complete username of this Application's Pool User Account (domain_name\username) and its correct Password repeated twice for validation
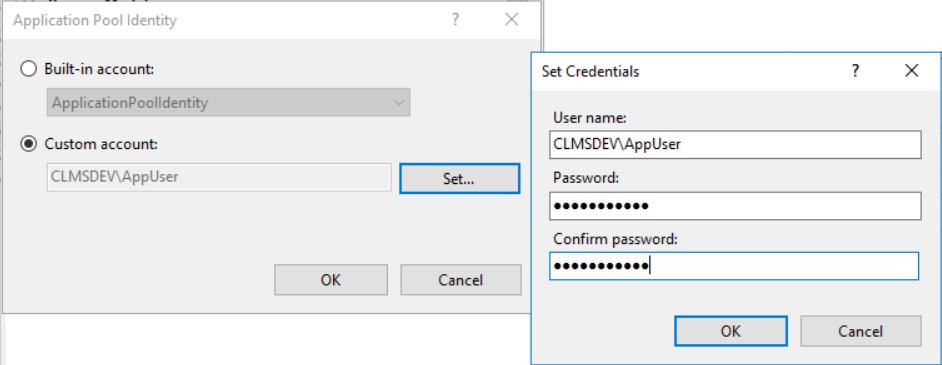
- Click on OK to store the user account selected
- Click on OK on the Advanced Settings editor to save the configuration
Web Server Application Pool (Front-End)
Location
Web Server
The Application Server (running our Front-End Application/Website) will use the Application Pool Identity we created earlier. In the example used in this tutorial, the "web" Application Pool will use the CLMSDEV\WebUser account. This account will be, then, used by Windows Kerberos for authentication, authorization and actual location of the running website (i.e. whenever a service asks "who's responsible for the Front-End Application?" the answer will be "the CLMSDEV\WebUser").
Assign the Application Pool User
Repeat all the steps shown earlier, during the association of the Application Pool User with the Back-End's Application Pool. Use the correct Application Pool user as it's Identity.
Configure the Authentication Methods
At this point we have the following, set up and ready, in our topology:
- Two Websites representing the two ends (Front and Back-End) of our Application...
- ... running on server_name.domain (i.e. "ntier-web.CLMSDEV.net", "ntier-app.CLMSDEV.net")
- ... associated with two User Accounts domain\user_name (i.e. "CLMSDEV\WebUser", "CLMSDEV\AppUser" respectively) using an Identity Application Pool
Now that we have created our two websites, one for the Front and one for the Back-End of our Application, it is time to configure their Application Pools and ensure that they run
- Under Windows Kerberos Authentication
- Using the two User Accounts we created earlier
Again, let's start with the easy one: the Application Server's Authentication
Application Server's Authentication (Back-End)
Location
Application Server
Enter the Server hosting the Back-End Application (Application Server) and open the IIS Manager. Next, follow the steps described:
Configure the Authentication of the Back-End Application
- Click on the website to select it
- In the Home panel that will open, double-click on the Authentication item to open its configuration
- Disable all the Authentication Items (e.g. Anonymous, Basic, Forms)
- Enable the Windows Authentication
- Select the enabled Windows Authentication to preview its Actions on the right-hand side of the window
- Click on Advanced Settings
- Make sure that the Extended Protection is set to Off
- Make sure that the Kernel-mode authentication is enabled
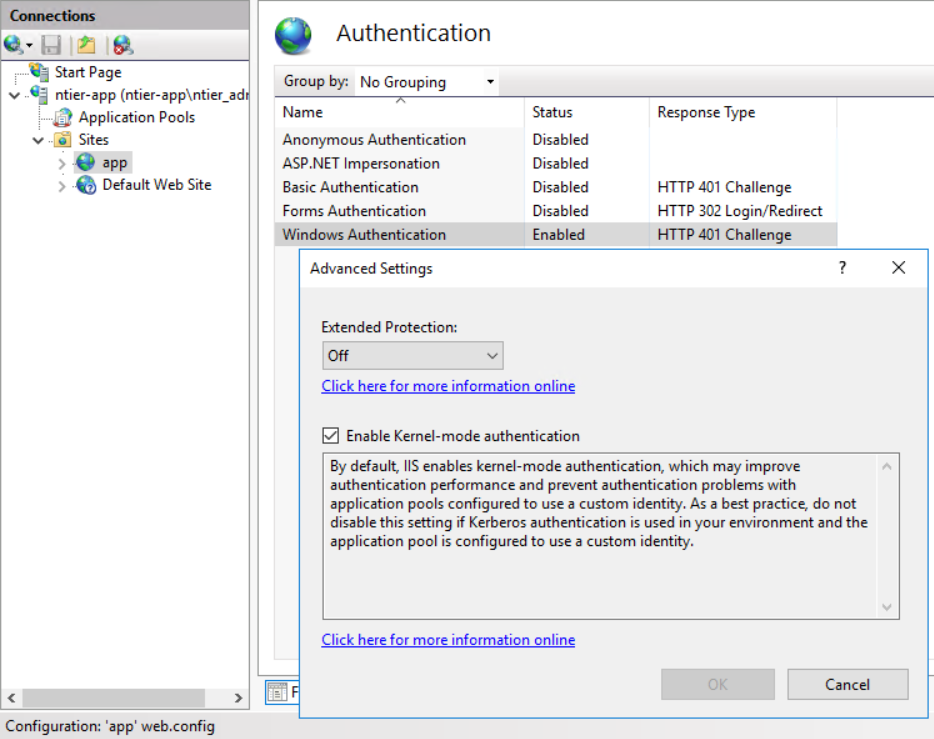
- Next, click on Providers
- Make sure that the only enabled provider is the Negotiate one (Remove all others and/or add the "Negotiate" item located in the Available Providers if not added)
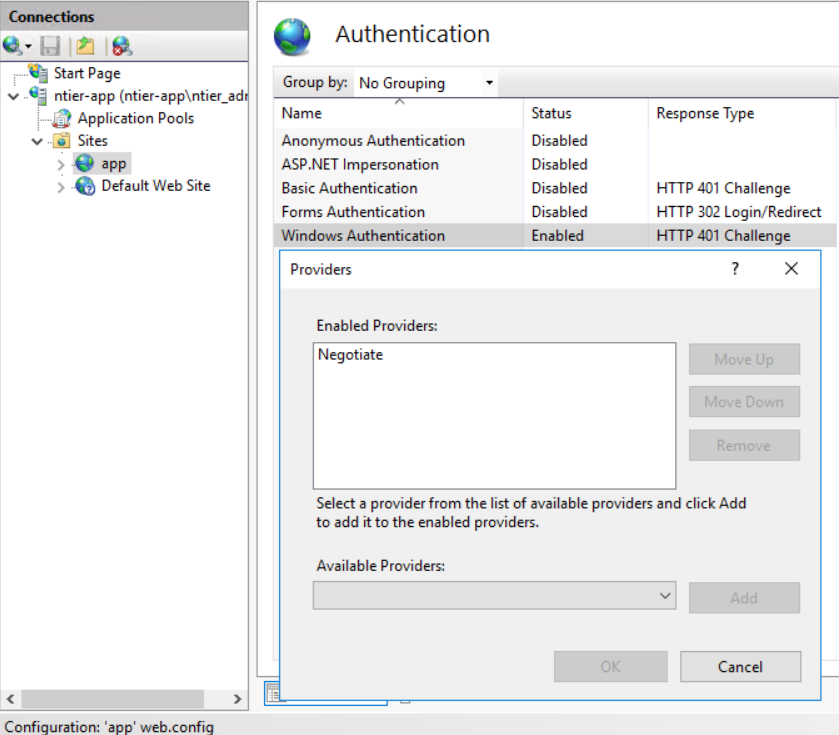
What we did here is that we enabled Windows Authentication, using Negotiate as its preferred and only method. This setting will add a WWW-Authenticate:Negotiate header to the HTTP packets telling the underlying components that the Authentication mechanism to be used is Microsoft Windows authentication with Kerberos. No other methods to fall-back on will be present, ensuring that Kerberos is the sole responsible for authentication. Anyone that receives such a header will be redirected to the Key Distribution Center (KDC) of Kerberos, using their Windows Credentials, in order to request a ticket that will be then used in the rest of the communication.
Furthermore, by enabling Kernel-mode authentication we allow the http.sys kernel mode driver to decrypt Kerberos' tickets. At this location this is just fine, since:
- This is our Back-End Service, last in the flow, and it can use the machine's credentials to decrypt Kerberos' tickets just as well
- The host address of the service matches the name of the computer
Web Server's Authentication (Front-End)
Location
Web Server
Enter the Server hosting the Front-End Application (Application Server) and open the IIS Manager. The configuration here will be a lot different than the one set for the Application Server, since the Web Server will not only serve the web content, but it will also
- authenticate the end-user with Kerberos (whenever the user is running outside of the local Domain)
- request tickets on behalf of the user from Kerberos
- forward the authenticated requests of the end-user up to the Application Server, whilst keeping that user's identity intact for authorization purposes
In other words, the Web Server will impersonate the end-user's account to all other elements (i.e. will run on its behalf): Kerberos and Application Server. Which .. is the actual tricky part.
Configure the Authentication of the Front-End Application
- Click on the website to select it
- In the Home panel that will open, double-click on the Authentication item to open its configuration
- Disable all the Authentication Items (e.g. Anonymous, Basic, Forms)
- Enable the Windows Authentication to ensure that the authentication used will request for Active Directory username, password and domain
- Enable the ASP.NET Impersonation to allow the Front-End website to "assume the identity of any end-user", a.k.a. impersonate it. With this enabled, what will happen is that the account running behind the Application Pool Identity (in our example's case, its the CLMSDEV\WebUser) will impersonate the end-user (e.g. the CLMSDEV\ClientUser) before Kerberos and the Application Server. So, any time that the CLMSDEV\ClientUser needs to be authenticated with Kerberos, it will be done for it, by CLMSDEV\WebUser acting on its behalf and authenticating with Kerberos. Then, any time that the CLMSDEV\ClientUser needs to access the Back-End Service, it will be actually accessed by the CLMSDEV\WebUser, impersonating the ClientUser for the Back-End's sake, allowing the latter to ensure any authorization checks and provide access to all other actions and/or underlying components (e.g. the database)
Ensure that the App Pool User is impersonating the logged-in user, whoever that might be
- Click on ASP.NET Impersonation to select it
- Make sure that the Authenticated user option is selected
- Save your changes (if any)
Ensure that the Windows Authentication will use Kerberos, by impersonating the end-user
- Click on Windows Authentication to select it
- Click on Advanced Settings
- Make sure that the Extended Protection is set to Off
- Make sure that the Kernel-mode authentication is disabled
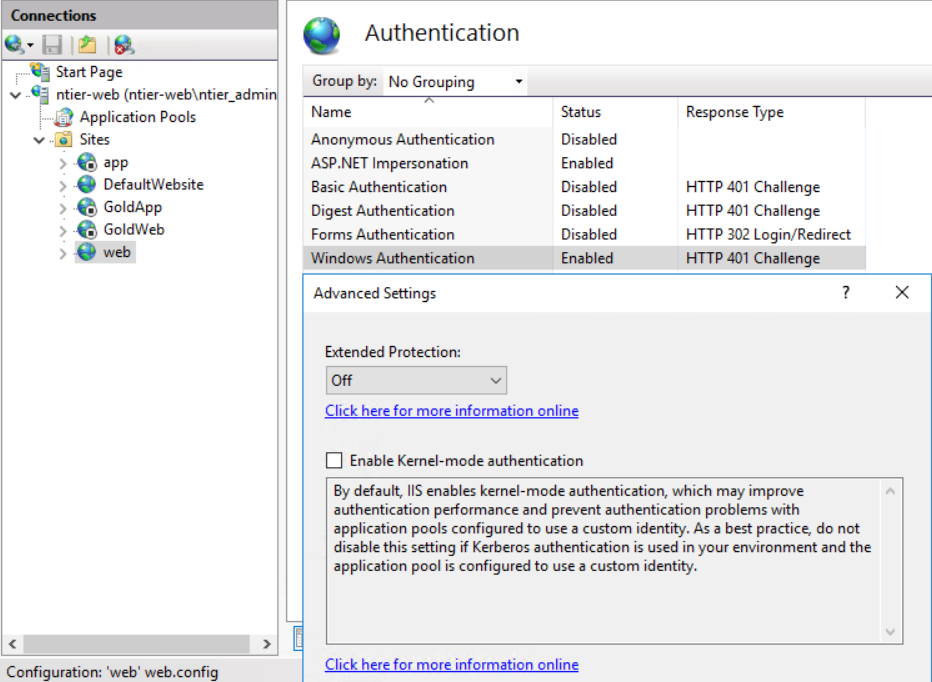
- Next, click on Providers
- Make sure that the only enabled provider is the Negotiate one (Remove all others and/or add the "Negotiate" item located in the "Available Providers" if not added)
What we did here is that we enabled Windows Authentication, using Negotiate as its preferred and only method. This setting will add a WWW-Authenticate:Negotiate header to the HTTP packets telling the underlying components that the Authentication mechanism to be used is Microsoft Windows authentication with Kerberos. No other methods to fall-back on will be present, ensuring that Kerberos is the sole responsible for authentication.
Furthermore, we disabled the Kernel-mode authentication. Kernel-mode authentication makes the http.sys kernel mode driver responsible for decrypting and caching Kerberos' tickets. With Kernel-mode authentication enabled, the decryption can only succeed when the host name (full computer name of the running website) and the DNS A record of the underlying service (i.e. the website) are identical, or if no DNS entry is present. Later on you will see that we will create a DNS A record for our service and we might opt to alter the binding of our website to something more appropriate than "ntier-web.CLMSDEV.net" (for example "contoso.net").
Furthermore, while the Back-End Service (being the last player on the flow) can decrypt its tickets using the machine's credentials, on the Front-End Service we need to use the client's credentials, because the client will be the one responsible for authenticating against the underlying topology. More specifically, it will be the Web Server's Application Pool Identity, impersonating the end-client, that must be responsible for decrypting the ticket.
By disabling the Kernel-mode Authentication we remove the responsibility of decrypting Kerberos' tickets from the http.sys that runs under machine credentials and move them to the Application Pool Identity, that will act on the user's behalf (which actually happens in our double-hop scenario).
Service Principal Names
Location
Domain Controller
At this point we have everything set up and ready in terms of IIS. It is time to bind all the components together.
Now, for Windows Kerberos to work, we need to register a Service Principal Name (SPN) for our app pool accounts. In other words, we need to create a one-to-many connection between the app pool account and its endpoints/services.
Remember that in the previous steps, when setting up the host address of our services, we chose to use the address (full computer name) of our servers within the domain. So, what we have is:
DNS Host Name of Server = Host Address / URL of service
Thus, all we have to do is to associate:
-
The CLMSDEV\WebUser Application Pool account with
- The ntier-web.CLMSDEV.net server (full name of the computer)
- The ntier-web.CLMSDEV.net host address running the Web Service
-
The CLMSDEV\AppUser Application Pool account with
- The ntier-app.CLMSDEV.net server (full name of the computer)
- The ntier-app.CLMSDEV.net host address running the Application Service
Since the server and the host address in both cases match, all we need to do is to associate our Application Pool users with their servers.
To do that, we will use the setspn command which is used for both querying and setting principals.
AppUser's SPN
To associate the Application Service's Application Pool account with our Back-End Service, what we want to do is to create a HTTP association (since we are running a web service) between our Application Pool Identity and:
- The server, denoted by just its name
- The server, denoted by its full name
- The server, written in all lowercases to cover the case-insensitivity
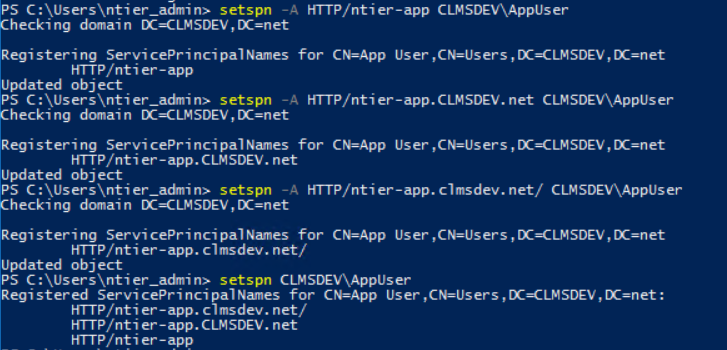
In our example's case, we would associate CLMSDEV\AppUser with:
- ntier-app
- ntier-app.CLMSDEV.net
- ntier-app.clmsdev.net
Todo
- Open a Powershell in your Domain Controller server
-
Run the
setspn domain_name\usernamecommand to query the assigned SPNs to your App User. A new user account should have no SPNs set. If it does, you can remove them with thesetspn -D spn_record domain_name\usernamecommand. (Example:
setspn -D HTTP/ntier-app CLMSDEV\AppUser)
-
Execute the following command:
setspn -A HTTP/<computer_name> <domain_name>\<username>substituting the placeholders with the correct values (Example:
setspn -A HTTP/ntier-app CLMSDEV\AppUser) -
Execute the following command:
setspn -A HTTP/<full_computer_name> <domain_name>\<username>substituting the placeholders with the correct values (Example:
setspn -A HTTP/ntier-app.CLMSDEV.net CLMSDEV\AppUser)Warning
The SPN records are case-sensitive in Kerberos' eyes! Make sure the computer names and domains are correct in terms of casing. In our examples, the Domain is named "CLMSDEV" (all caps). So we will keep those caps letters while creating the HTTP SPN record
-
Execute the previous command with all lower cases as the host_name, if any part of your address has capital letters
Example:
setspn -A HTTP/ntier-app.clmsdev.net/ CLMSDEV\AppUserAttention
Note the slash added at the end of this record. This is added because although the records are considered case-sensitive in our case, the
setspncommand is not. If you add aHTTP/ntier-app.clmsdev.netrecord, the command will confuse it with the previously addedHTTP/ntier-app.CLMSDEV.net. Now, since this is actually a host name (a.k.a. the URL that this service will be running on), we can fearlessly add a slash at the end and allow thesetspnto regard it as a completely new record.
WebUser's SPN
To associate the Web Service's Application Pool account with our Front-End Service, what we want to do is to create a HTTP association (since we are running a web service) between our Application Pool Identity and:
- The server, denoted by just its name
- The server, denoted by its full name
- The server, written in all lowercases to cover the case-insensitivity
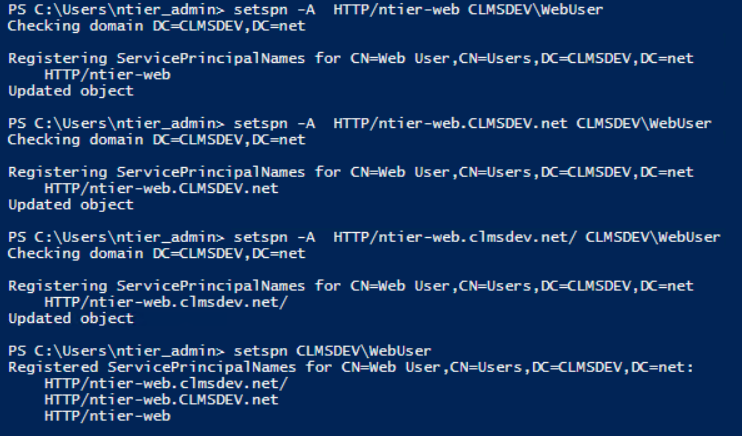
In our example's case, we would associate CLMSDEV\WebUser with:
- ntier-web
- ntier-web.CLMSDEV.net
- ntier-web.clmsdev.net
So, following the exact steps and commands shown in the previous section,
Todo
- Open a Powershell in your Domain Controller server
-
Run the
setspn domain_name\usernamecommand to query the assigned SPNs to your Web User. A new user account should have no SPNs set. If it does, you can remove them with the
setspn -D spn_record domain_name\usernamecommand. Example:setspn -D HTTP/ntier-web CLMSDEV\WebUser)
-
Execute the following command:
setspn -A HTTP/<computer_name> <domain_name>\<username>substituting the placeholders with the correct values (Example:
setspn -A HTTP/ntier-web CLMSDEV\WebUser) -
Execute the following command:
setspn -A HTTP/<full_computer_name> <domain_name>\<username>substituting the placeholders with the correct values (Example:
setspn -A HTTP/ntier-app.CLMSDEV.net CLMSDEV\WebUser)Warning
The SPN records will be considered case-sensitive in our case! Make sure the computer names and domains are correct in terms of casing. In our examples, the Domain is named "CLMSDEV" (all caps). So we will keep those caps letters while creating the HTTP SPN record
-
Execute the previous command with all lower cases as the host_name, if any part of your address has capital letters Example:
setspn -A HTTP/ntier-web.clmsdev.net/ CLMSDEV\WebUserAttention
Note the slash added at the end of this record. This is added because although the records are case-sensitive, the
setspncommand is not. If you add aHTTP/ntier-web.clmsdev.netrecord, the command will confuse it with the previously addedHTTP/ntier-web.CLMSDEV.net. Now, since this is actualy a host name (a.k.a. the URL that this service will be running on), we can fearlessly add a slash at the end and allow thesetspnto regard it as a completely new record.
Delegation
Location
Domain Controller
Now that we have associated our user accounts with our provided services, it is time to verify that the account running our Front-End Service (which is the entrance to our Application) can not only receive and process requests, but also delegate (i.e. call other services on the client's behalf) Kerberos tickets.
By default, no account is allowed to delegate client credentials, for security reasons. To enable our Web Application app pool account's delegation, one of two things can be done:
- Either enable delegation for any service, giving the ability to the account to forward authentication requests to Kerberos, for any service
- or enable delegation for specific services only, so that all other services remain protected from delegation.
The first type of delegation is named unconstrained delegation. The latter option is named constrained delegation and it is consider more secure in that any endpoint the account wishes to delegate, it must be explicitly listed.
For Kerberos to work in a double-hop scenario, the second option is the one we need. Just think of it this way: Kerberos is too strict and it demands that the services/endpoints to be available for delegation to be pre-defined. In other words, constrained delegation is the one and only option, whenever we have an intermediary service acting on behalf of a client (the two, thus, being two hops apart).
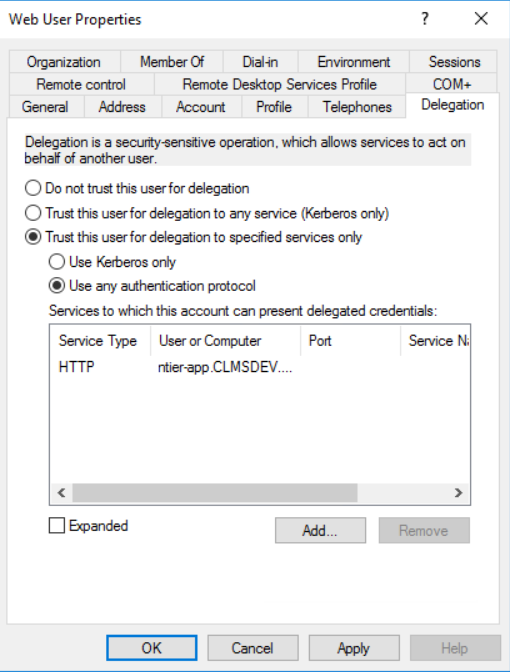
To enable constrained delegation for our intermediary service (in our example that is CLMSDEV\WebUser), follow the steps described:
Todo
- Open the Active Directory Users and Computers editor in your Domain Controller machine
- Open the Users folder
- Locate the app pool account used for the Front-End website (in our case, CLMSDEV\WebUser)
- Double-click on the account to open its configurations editor
- Navigate to the Delegation tab
- Check the Trust this user for delegation to specified services only radio-button
- Check the Use any authentication protocol radio-button
- Click on Add... to explicitly specify the services (in our case, servers) to which this account will be able to delegate
- In the new window that opens, click on Users or Computers... to select a user or a computer account
-
Type in the name of the user playing the role of our Back-End service. (In our example's case that would be AppUser).
Note
Remember that earlier we had associated the CLMSDEV\AppUser App Pool Account with its services (i.e. ntier-app.CLMSDEV.net etc). By allowing the WebUser to delegate to the AppUser, we are allowing the WebUser (Front-End) to propagate Kerberos tickets and requests to any service that AppUser is responsible for. Which is exactly what we need.
-
Click on Check Names so that the correct User Principal Name (UPN) is returned by the name checker and click on OK to select it (in our case, we will be adding AppUser@CLMSDEV.net)
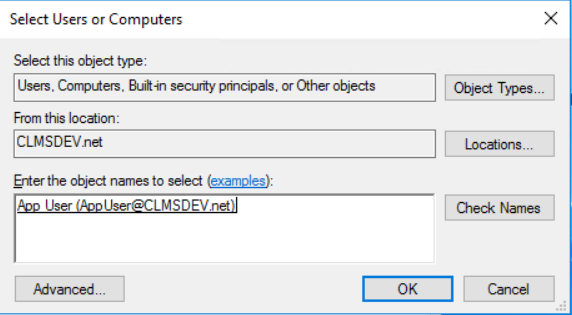
- Notice that the record that is actually added is not the user's account, but its associated service (being, the matching SPN we created earlier)
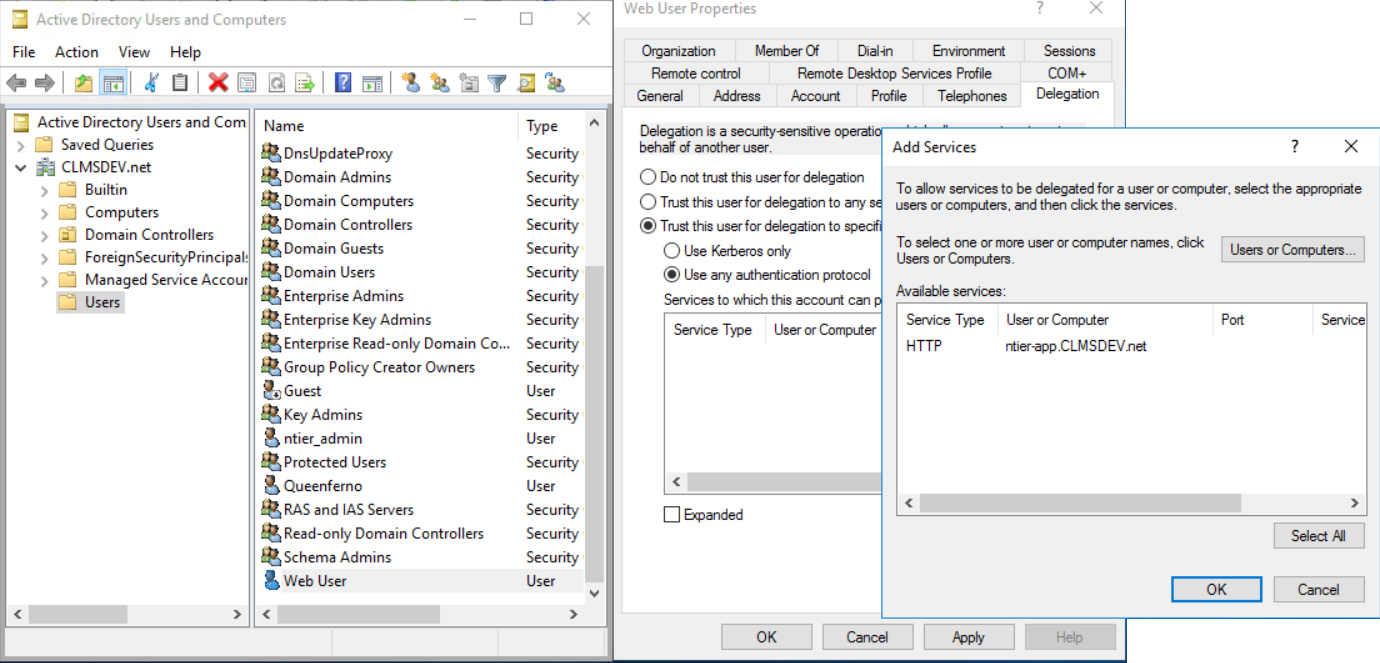
- Click on the new record in the Add Services window to select it for addition and click on OK.
- Click Apply and OK to save all changes.
With these steps, we enabled the WebUser account to act on another client's behalf towards AppUser's services (i.e. towards the Back-End). Thus, any time that the WebUser account is requesting tickets to access the Back-End on behalf of the client, Kerberos will first check: "is the Back-End service listed?" and if yes, it will grant it a ticket. Otherwise, it will return an Unauthorized response stating that the Front-End cannot obtain tickets on behalf of the client towards the Back-End for that specific service.
Domain names
Kerberos' Requirements
Location
Any
In Kerberos' protocol, the DNS can be seen as a locator mechanism - a service catalog, if you will. As we saw earlier, Kerberos works with SPNs in order to differentiate between services. The DNS, on the other hand, has DNS A records that point to the location of each service. So, by design, Windows Kerberos requires that an SPN is matched by a DNS A record.
If there is no match between an SPN and a DNS A record (for example, if we attempt to form an SPN with only a Computer Name defined), Kerberos will fail to resolve the host name and will be unable to query the TGS, resulting in a failed authentication.
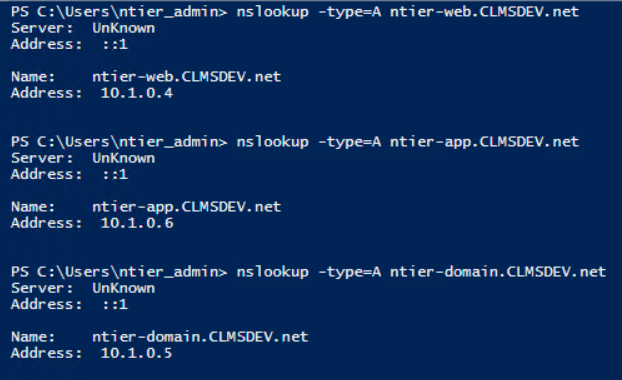
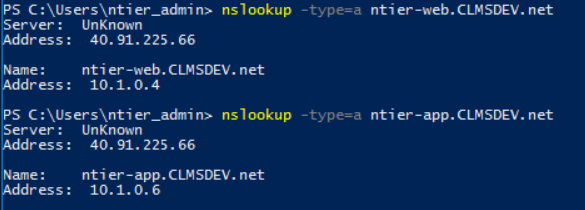
To verify the "SPN must match a DNS A record" requirement, the nslookup command can be used from any computer:
nslookup -type=a <full_computer_name>
Run it for all your computers:
- The Web Server
- The Application Server
- The Domain Controller
For example, by running the nslookup command from my Domain Controller looking up all my computers, the answers I get are:
Hint
The answer of nslookup provides information regarding:
- Who is answering you, a.k.a. who is your Domain Controller
- The DNS A record matching this computer
As you can see, for each computer, the nslookup returns a single host with its IP address being correctly resolved. This means that our Kerberos requirements are satisfied.
Another example of the nslookup, now ran from the Web Server computer is:
As you can see, again, our answer comes from 40.91.225.66 which is the public IP of my Domain Controller and each computer name is correctly matched by its DNS A record. Kerberos' requirements are, thus, fullfilled.
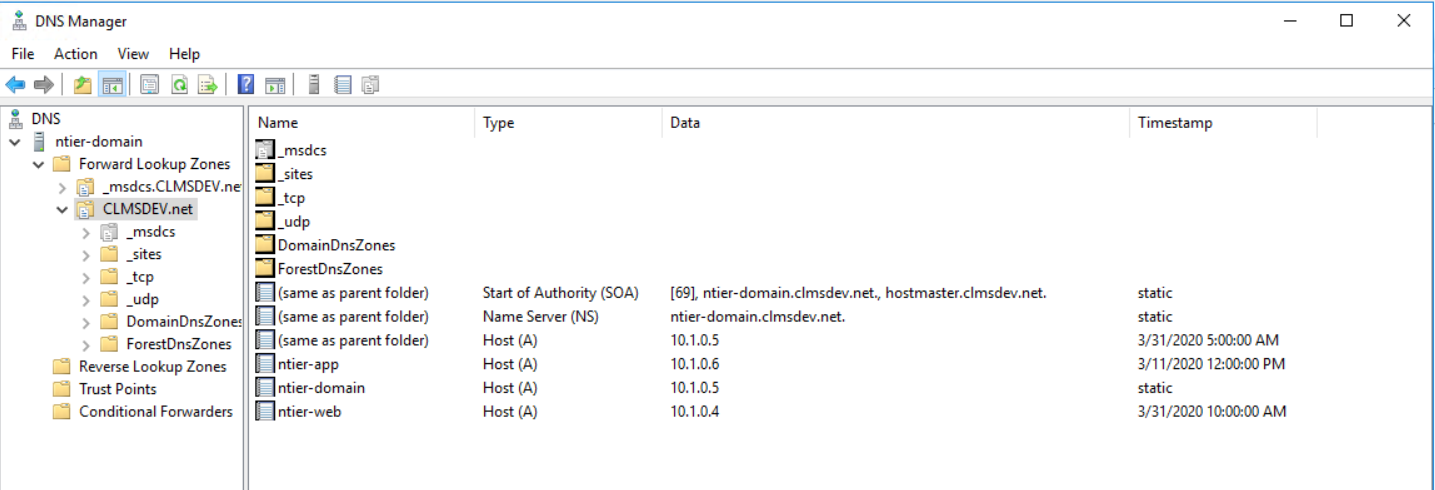
Adding a DNS A record
Location
Domain Controller
Now, if what we saw in the previous subsection was not the case, we would have to create a DNS A record ourselves. Otherwise, Kerberos' authentication flow would be disrupted by an not-found service. This can be done from the Domain Controller that, usually, controls the DNS records, like so:
Todo
- Open the DNS Manager (Windows Administrative Tools → DNS)
- Select the Forward Lookup Zones folder and expand it
- Double-click on your Domain to open its records
- Right-click on any white space to pop the drop-down menu up and select New Host (A or AAAA)
- Type the name of the missing (from the DNS A records) computer into the Name field
- Type the IP address of that computer into the IP address field
- Press OK to create the new A record
- Once the record is created, double-click it to open it
- Click on the Security tab. We will need to allow the Users created for this computer to access the record. For example, we will add the WebUser@CLMSDEV.net as permitted for full-control access to the web-user DNS A record. To do that...
- Click on the Add... button just under the allowed accounts list
- Find the account assigned as reponsible for this computer (in our case, WebUser)
- Add it to the list with full control permissions

After all DNS A record corrections, you should have a comprehensive list of records looking like this:
Access the Website and Enjoy
At this point, everything is set up and ready for our double-hop scenario under Windows Kerberos authentication using Delegation.
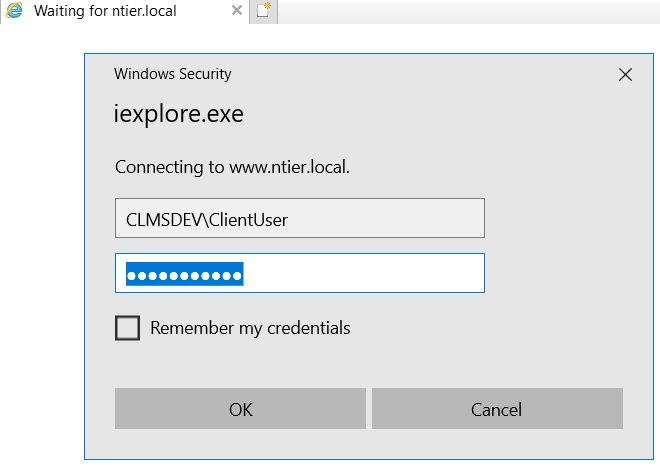
Open an Internet Explorer and type in the host address you gave to your Front-End website (e.g. http://ntier-web.CLMSDEV.net).
A prompt should appear asking your Windows Credentials. This is where you want to use the third user (actual end-user, CLMSDEV\ClientUser in our example's case). Enter this account's <domain_name>\<username> and its password and enjoy your 2-Tiered application!
Why Internet Explorer?
Browsers like Chrome come with a default limitation that does not allow them to call a service which may delegate credentials. Internet Explorer, however, does not.
To use Chrome, the service's URL must be explicitly whitelisted by modifying the registry or via a Group Policy Object (GPO) update. Otherwise, an HTTP 401 Unauthorized response will be returned when calling the service.
For further information, see: http://dev.chromium.org/administrators/policy-list-3#AuthNegotiateDelegateWhitelis
What will happen in the background (in an utterly high-level fashion; we will not dive into Kerberos Protocols details) is the following:
-
Your browser will hit the website from somewhere outside the Domain.
-
The website will inform it that Windows Kerberos Authentication is used (this is why we set Windows Authentication on both our websites and added only one provider: Negotiate). A prompt will be presented waiting for the user's credentials
-
When you type in your credentials (always using the correct domain name etc.) the Front-End (using the CLMSDEV\WebUser account) will catch them and, using the Kerberos S4U2self Extension, will obtain a Kerberos Ticket that will authenticate you with the Front-End itself (i.e. the front-end service, found by its SPN and located on the computer denoted by its relevant DNS A record)
Hint
Were you inside the Domain, no S4U2self Extensions would be used. You would be able to authenticate with Kerberos by yourself, against the Front-End service; no need for the Web Application Pool account to do that for you
-
Next, having authenticated against the Front-End, the latter will Impersonate you (in other words, play out the game as if CLMSDEV\WebUser was actually CLMSDEV\ClientUser) and send your request down the line, towards the Back-End ran on the Application Server by the App User.
-
The Back-End website will inform the Front-End that you (ClientUser, impersonated by WebUser) have to be authenticated against it ("it", being the Back-End website) via Windows Kerberos Authentication
-
The WebUser, whilst Impersonating you, will use the Kerberos S4U2proxy Extension and obtain a Kerberos Ticket that will authenticate you with the Back-End. Again, the Back-End service will be found by the Kerberos using its SPN, whilst its location will be obtained using the SPN TO DNS A Record match !!! hint Were the two ends, namely Front and Back-ends on the same computer, the S4U2proxy protocol Extension would not be used, as no credentials would have to be transmitted within the network. However, having the two ends on different computers, thus playing in a double-hop scenario, the S4U2proxy is called
-
Having the Kerberos Ticket, your request finally reaches the Back-End that does its magic (any Business Logic you might have or access to the database) and sends the response to the Front-End (all the way thinking that the Front-End, run by WebUser, is actually you, as WebUser is impersonating you)
-
Finally, the Front-End, via the WebUser account, will push the response down the line to you and you will see its output on your browser
Change the URL of your Website
As you noticed, we were using strictly computer names from the beginning up to the end of the configuration. Furthermore, we used the web server's computer name as the host address of our website (ntier-web.CLMSDEV.net in our case). This, was to showcase the actual configuration and shed light to what Kerberos is expecting. Everything had to be set up using only actual principal names.
At this point, however, we have finished our whole configuration. Everything is set up and running. We can now go and change the URL of our website to anything we want. So, if you wish, open the IIS on your web server and change the host name of your websites binding to anything other than the computer name we entered earlier. For example, at this step, I just changed it to www.ntier.local and that was it! No further configuration or settings required!
FAQ
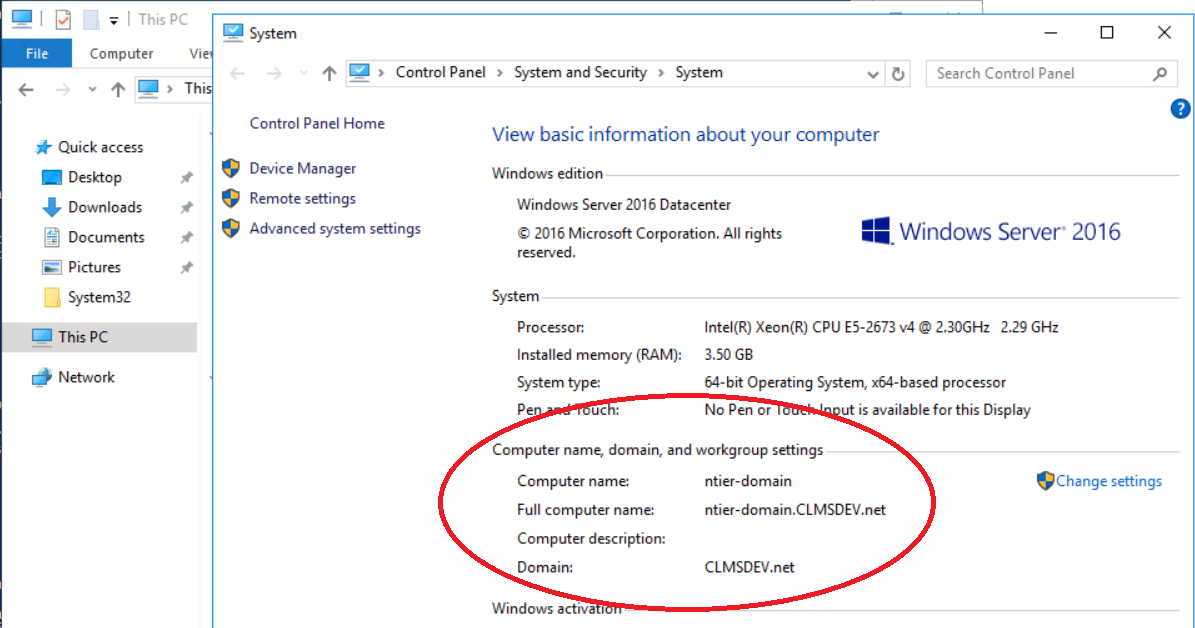
How to find the name of my Server?
Question
- Open the This PC item in your Server
- Right-click on any empty space (or on the "This PC" item itself) and select Properties
- The Computer name is the name of your Server
What is my Domain Name?
Question
- Enter your Domain Controller server
- Open Windows Powershell
- Run the
Get-ADDomaincommand to locate your Domain, if there are more than one in your topology - The Name of your Domain will be under the "Name" item
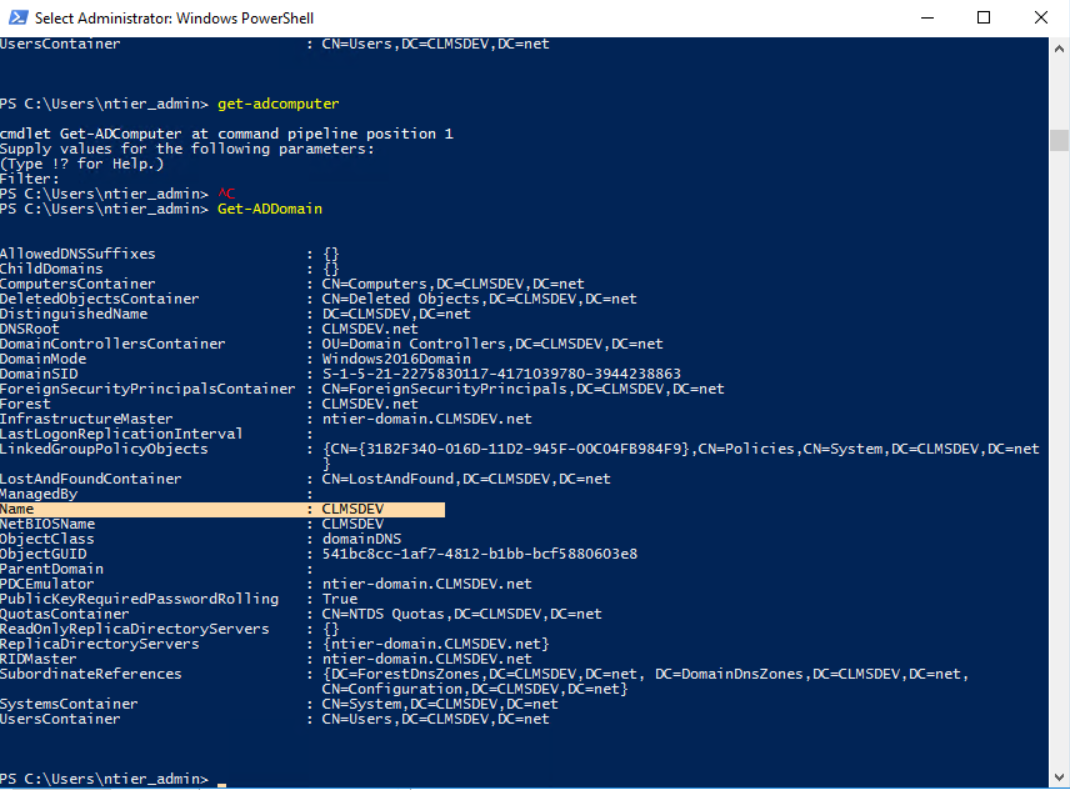
Hint
Alternatively, you can run the steps required to find the name of your Server and just write down the Domain item. The "Domain Name" will be the value you see, save for the very last container (e.g. ignore ".net" and keep the "CLMSDEV" part. "CLMSDEV.net" is your Domain, whereas "CLMSDEV" is the Domain Name)
What is a Principal?
Question
A principal is a generic term used for a user, a computer or a service. A service principal is uniquely identified by a Service Principal Name (SPN).
What is a Service Principal Name?
Question
A Service Principal Name (SPN) is the unique identifier for a service running on a particular server. The SPN is used by a client to locate a service.
I do not see a prompt when accessing my website. What to do?
Question
First of all, ensure that you have indeed enabled Windows Authentication in both your services (websites) with only one Provider selected: Negotiate.
Another thing you can do is to run WireShark on your client's end and examine the HTTP packets that the Front-End website is sending you. If they contain a WWW-Authenticate: Negotiate header everything is fine in terms of Authentication Method. All you have to do is to configure your browser. If you do not see such a header, then Windows Authentication is not enabled. Make sure to fix that by following the procedure described in this How-To.
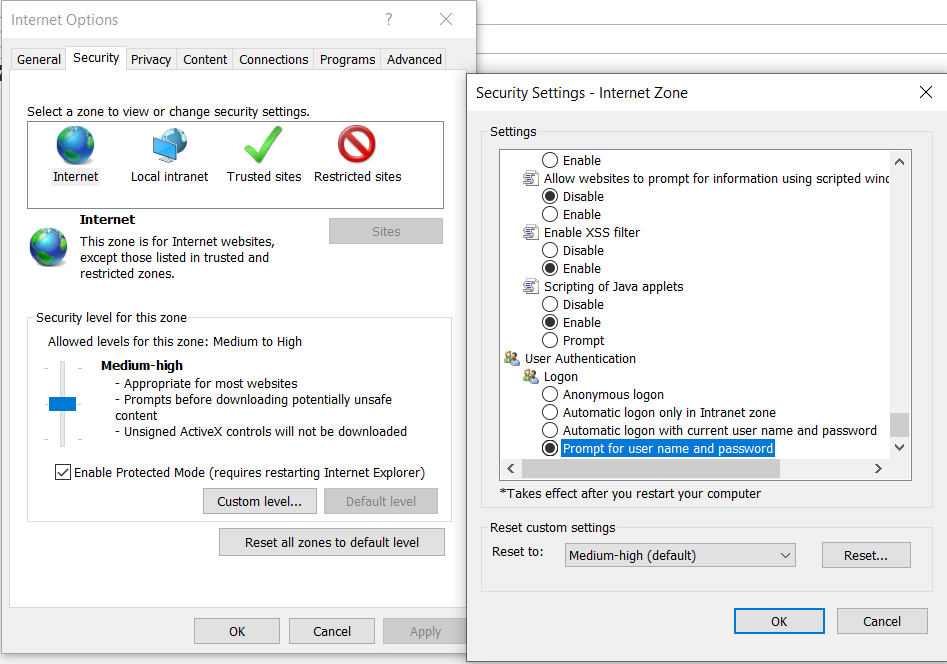
To make your browser demand user credentials whenever you are calling your website, follow these steps:
Todo
- Open the Internet Options of your Internet Explorer
- Navigate to the Security tab
- Select the Internet zone if you're accessing the website outside its domain (or Local Intranet if you are within the domain)
- Having it selected, click on the Custom level.. button
- A Security Settings - Internet Zone window will appear presenting a list of settings. Find the group setting named User Authentication (normally it's at the bottom of the list)
- Select the Prompt for user name and password option
I am receiving a KRB-ERR-BADOPTION packet. What to do?
Question
The BADOPTION error in Kerberos' protocol can mean quite a few things.
Invalid Attempt - use the next Provider
In the best case scenario, it means nothing at all. It's just the default response of the Kerberos Protocol whenever one Authentication Provider fails, so that the next one is tried out. For example: imagine we had two Authentication Providers in our Authentication methods: NTLM and Negotiate, set in this particular order. The client would try to use NTLM Authentication to authenticate with the service. Of course, having no such method implemented in our applications, this attempt would fail and Kerberos would send a BADOPTION packet back to the client. The client would receive that and re-try to authenticate using the second provider: Negotiate. This would authenticate the client using Windows Kerberos and, as we already know, succeed. So, in this scenario, the BADOPTION response is nothing to worry about in terms of Protocol.
However, it shows you that you might have a wrong Provider set in your service(s). Visit their IIS Managers and ensure that only Negotiate is present.
Invalid Target
The most common scenario for a BADOPTION response to be sent is a "not found target" in the authentication process between the Front and the Back-End Servers. In simpler words, Kerberos cannot locate the service you are talking about. So what you need to do is to ensure:
- That the computer running your Back-End is exposed and available via the internet (or intranet, depending on where you are). Create firewall rules to enable your client to access it, if it is not.
- That Kerberos cannot locate the service you are asking for (i.e. the Back-End website) in its catalogs. Ensure that you have all SPNs correctly set
- That Kerberos cannot locate the computer that runs the service you need. Ensure that you have correct DNS A records matching your service
Cannot Delegate
Another reason to receive such a packet is if the account used in the Kerberos Authentication communication does not have delegation rights. Make sure that:
- The Application Pool account running on your Front-End is enabled for delegation)
- That the delegation is enabled for specific services (explicitly listed)
- That the delegation is enabled for any protocol
Not Forwardable Ticket
In the S4U2proxy Extension, past tickets (of a previous hop) are kept and forwarded along the flow. For example, as soon as the flow reaches the Back-End, its Kerberos Ticket will not only contain information regarding the Authentication between the Client (impersonated by the Web Application's Application Pool Identity), but also the ticket collected during the Authentication between the client and the Front-End as well.
With that in mind, the communication that takes place between the Front-End service, Kerberos and the Back-End service, contains forwardable tickets. The packets in Kerberos' protocol have a flag denoting whether a ticket is in fact forwardable or not. If at that point you receive a BADOPTION response, check the ticket that was sent to the Domain Controller from the Front-End service towards the Back-End Service: do you see a Forwardable=1? If not, that's the issue. Make sure that you have followed all the steps, one by one, of this tutorial and that Kerberos' S4U2proxy and S4U2self Extensions are enabled (enabling them is out of scope of this document)