Working with Files and Images
Introduction
This How-To will explain how to use the FileData class to allow users to upload and store Files and Images.
But first, let's see what this class is.
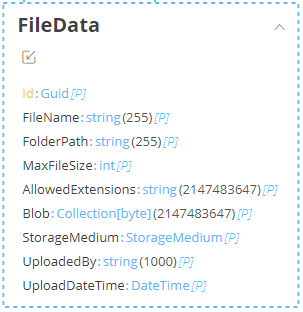
The FileData is a built-in system class that contains Attributes and Methods that will help you handle data stored in Files.
Attributes
| Name | Data Type | Description |
|---|---|---|
| Id | Guid | File Data Entity Key |
| FileName | string | The filename (name of the file with its extension e.g. MyFile.txt ) |
| FolderPath | string | The file's folder path, relative to your AppData/Uploads folder. Null if stored in DB |
| MaxFileSize | long | The maximum allowed file size in bytes. Zero if there is no limit |
| AllowedExtensions | string | The accepted extensions. Separated by ; character |
| Blob | Collection[byte] | The file content in binary. Null if stored in FileSystem |
| StorageMedium | enum | Defines the way a file is stored. FileSystem or Database |
| string | UploadedBy | The username of the uploader. Null if user was anonymous |
| DateTime | DateTime | The exact date and time the file was uploaded |
Methods
| Signature | Data Type | Description |
|---|---|---|
| GetAbsolutePath() | string | Returns the file's absolute path in the server |
| GetThumbnail(int width, int height) | Collection[byte] | Creates and returns an image thumbnail based on the provided dimensions |
Adding FileData Attributes to Domain Model Classes
To associate Files and/or Images with a Domain Model Class, follow these simple steps:
- Open your Business Object Model
- Load
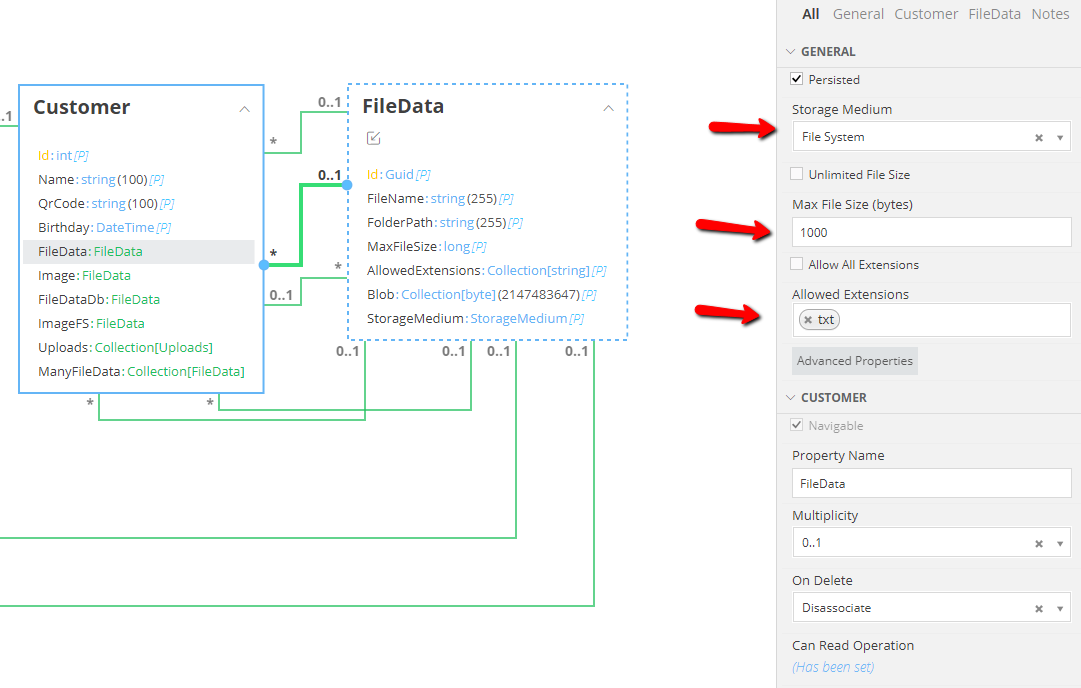
FileDataas a shadow class (right click on canvas -> New Shadow Class) - Create an association between your class and FileData
- From the association properties, set Storage Medium, Maximum File Size and Allowed Extensions for your file
To store multiple Files or Images use a Collection of FileData
To do so, set Multiplicity * from association properties
Apply security rules to your Files
To do so, define a Can Read method from association properties
Make sure that you don't add Navigable Attributes to FileData Class
If you do, you will get a validation error.
Make sure association is Persisted
A non persisted association cannot store the data your file requires!
Creating File Attachment Form Controls
File Attachment controls allow users to upload and store files to your application.
Create File Attachment using Model
The easiest way to create a File Attachment is by locating a FileData property in the Model tab, dragging it to your form and choosing File Attachment in the context menu that appears. This will create a File Attachment control and auto-fill all required properties.
If the FileData properties of a class are not present in your model, include them by using right click -> Add Related Classes
Create File Attachment using Toolbox
You may also create a File Attachment by dragging a File Attachment Control from Toolbox. It is located under Form category. In this case, you have to set Model Binding and Folder Path Function properties.
Important Properties
| Property | Description |
|---|---|
| Model Binding | Requires a FileData or a Collection[FileData] property |
| Folder Path Function | A function that defines the folder path of the uploaded file, relative to AppData/Uploads |
| Use Drag and Drop Box | Allow files to uploaded using drag n' drop |
| Don't display filename list | Toggles the visibility of the uploaded file(s) list |
| No Upload Success Message | Toggles upload success pop up message |
Class Identities in Set Folder Path Function
Please note that the usage of a Class Identity property with Auto Assigned flag turned on and Generator Type HiLo is not supported.
Creating Image Box Form Controls
Image Box controls are used to display and / or upload images. They are very similar to File Attachment controls.
Create Image Box using Model
The easiest way to create an Image Box is by locating a FileData property in the Model tab, dragging it to your form and choosing Image Box in the context menu that appears. This will create an Image Box control and auto-fill all required properties.
If the FileData properties of a class are not present in your model, include them by using right click -> Add Related Classes
Create Image Box using Toolbox
You may also create an Image Box by dragging an Image Control from Toolbox. It is located under Form category. In this case, you have to set Type, Model Binding, Folder Path Function properties.
Important Properties
| Property | Description |
|---|---|
| Type | Static or Bound. Use static for displaying a predefined image |
| Model Binding | Requires a FileData property (Bound mode only) |
| Folder Path Function | A function that defines the folder path of the uploaded image, relative to AppData/Uploads (Bound mode only) |
| Image Resource | The image to be displayed. It is selected from Binary Resources (Static mode only) |
| Default Image | The image used as placeholder when no image data is found. It is selected from Binary Resources |
| Width | Sets image width. Leave empty or set 0 to auto calculate it based on height and aspect ratio |
| Height | Sets image height. Leave empty or set 0 to auto calculate it based on width and aspect ratio |
| Show Full Scale Image On Click | If enabled, full size image will be displayed on click |
Displaying Images in Data List Control
Displaying a images alongside other data is a very common requirement. You may easily add images to a Data List Control by using FileData class, by following the three simple steps below:
- Add a new column to the your Data List (right click -> Insert Column To The Left / Right)
- Select the
FileDataproperty that contains the image asMemberfrom column properties, underGeneralsection - Select Item Type
ImageBoxfrom column properties, underFeaturessection
Important Properties
| Property | Description |
|---|---|
| Width | Sets image width. Leave empty or set 0 to auto calculate it based on height and aspect ratio |
| Height | Sets image height. Leave empty or set 0 to auto calculate it based on width and aspect ratio |
| Show Full Scale Image On Click | If enabled, full size image will be displayed on click |
Adjust column width
Don't forget to adjust Column Width to fit your image! To do so, use Column Properties -> Column Width.
Using Download Links in Data List Control
Providing a File Download Link is yet another common requirement for Data Lists. To allow users download files stored in FileData classes, just:
- Add a new column to the your Data List (right click -> Insert Column To The Left / Right)
- Select the
FileDataproperty that contains your file asMemberfrom column properties, underGeneralsection - Select Item Type
Downloadlinkfrom column properties, underFeaturessection
Sending Files to Client programmatically
This section will explain the various ways you can send files to the Client using Mamba code and SendFileToClient method.
SendFileToClient method is available in Controller Actions only
In case you use it in a different context, you will get a Validation error.
SendFileToClient overloads
| Signature | Usage |
|---|---|
| void SendFileToClient(string path) | Sends the file found to the specified server absolute path to the client |
| void SendFileToClient(Domain.FileData fileData) | Sends the file stored to a FileData instance to the client |
| void SendFileToClient(string fileName, Domain.FileData fileData) | Sends the file stored to a FileData instance to the client, using the provided file name |
| void SendFileToClient(string fileName, string content) | Sends a file to the client that contains the provided string content, using the provided file name |
| void SendFileToClient(string fileName, Collection[byte] content) | Sends a file to the client that contains the provided byte collection content, using the provided file name |
Code samples
// Send the file found at ~/AppData/data.txt to the client machine
SendFileToClient(CommonLib.Utilities.GetDataPath("data.txt"));
// Send the file stored to the CvDocument property of a Customer class
// using the original uploaded file's name
SendFileToClient(Model.Customer.CvDocument);
// Send the file stored to the CvDocument property of a Customer class
// using 'CustomerCv.doc' as filename
SendFileToClient("CustomerCv.doc", Model.Customer.CvDocument);
// Send a file named 'hello.txt' containing the text 'Hello, world!'
SendFileToClient("hello.txt", "Hello, world!");
// Create a 100x100 pixels thumbnail image based on
// the ProfilePic FileData property of a Customer class
Collection[byte] thumbnail = Model.Customer.ProfilePic.GetThumbnail(100, 100);

// Send thumbnail content, using 'CustomerPic.jpg' as file name
SendFileToClient("CustomerPic.jpg", thumbnail);