ChatterBox
Introduction
This Walkthrough Tutorial will show how to create a Chat Appliation: An online application allowing multiple users to send messages to each other. Our Application, the ChatterBox as I call it will allow registered users to chat with each other using Public or Private rooms, being always aware of each other Statuses (Online, Available for Chat, Reading, Offline etc.).
Purpose
This Walkthrough assumes (and hopes) that you already have the required knowledge on how to create an Application, design a Business Model (classes), create new Forms with Controller Actions, Logic, UI etc. If not, please first create a fun Music Store as shown here and then do come back, as this walkthrough is somewhat more advanced.
We will not cover basic stuff here. All the basic stuff will be considered known, ok? In this Walkthrough we will dive a bit further into the beautiful depths (?) of zAppDev and learn how to:
- Raise and handle events, a.k.a. synchronous or asynchronous signals sent between 2 or more users or groups of users from any Form
- Manage possible issues that can occure when we need to access a Domain (Database) Object that is not yet available (synchronization issues)
- Add custom JavaScript scripts into our Forms and utilize zAppDev's comprehensive JS API
- Add custom StyleSheets into our Forms
- Use Workflows to run periodically and do stuff you need
Warning
This Walkthrough will not follow the basic "1-2-3" approach, as it won't do you any good IMHO. Reason: we're gonna play around asynchronous Events here. So, a step-by-step from start to finish will not be as helpful.
Instead, we'll go like this: First, we'll quickly craft the basics of our Application, namely its layout, business objects, forms, models, some logic we'll need in the next steps etc.
And then, we'll dive into the actual tutorial where we'll learn (now, step by step, jumping around all the stuff we already created) how to create and utilize the Events to actually bind the Forms and the Logic together to create our Chat application
Prepare your Application
In this Section we will really quickly prepare our Application so that we can then focus on the more fun stuff. We're not gonna
C'mon!
Create new Application
Create a new Application following the steps presented here.
Make sure to select the Web Application Template and Asp.Net MVC as your Implementation Strategy. Feel free to set your own values as your Application's Name, Domain, Description, Theme etc.
I will name my Application ChatterBox and I'll select the Dark Theme, representing my psyche: dark and mysterious (just kiddin'. It's bright and fluffy).
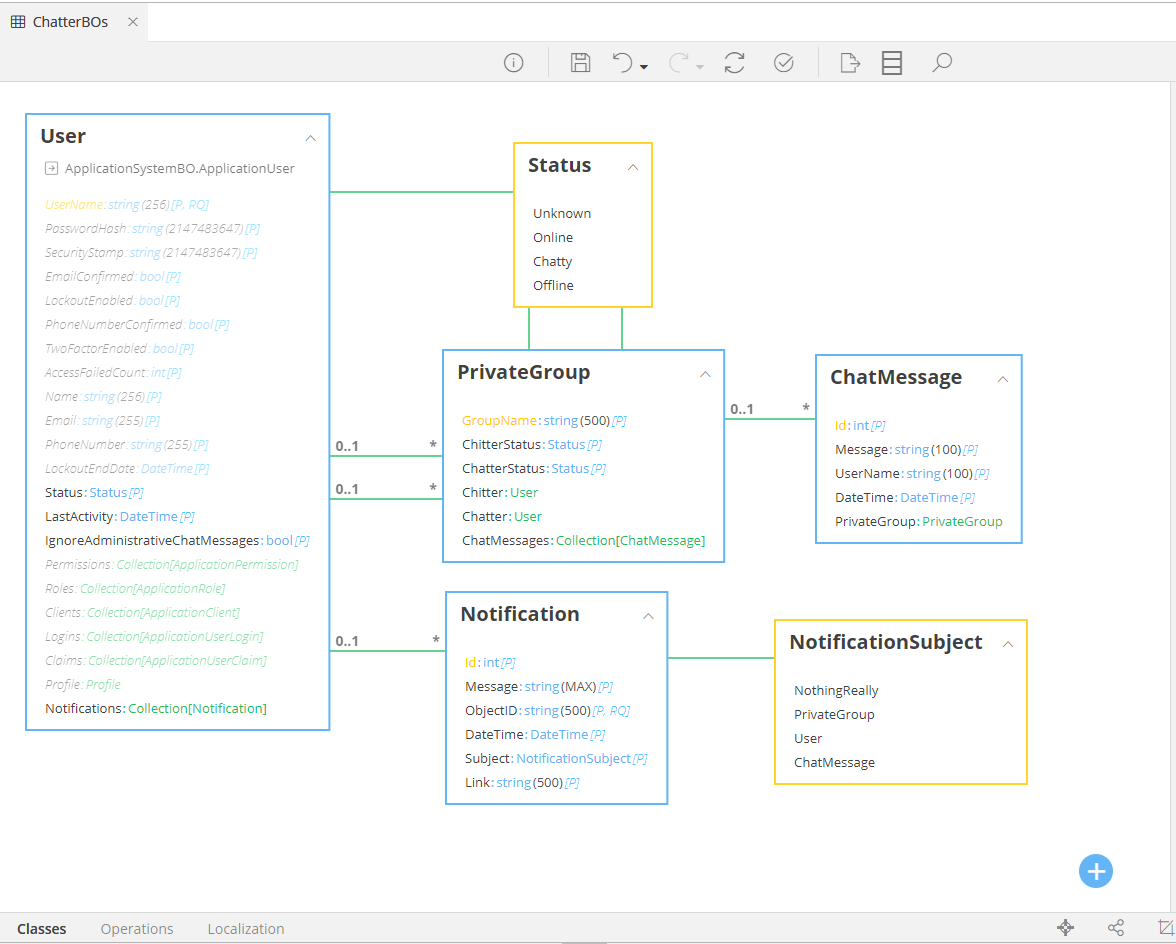
Business Model
Create a new Business Model consisting of the following classes:
- User: the User of our Application, extending the
ApplicationUserClass. Follow the steps shown here to see what to do when extending theApplicationUserbefore you proceed - PrivateGroup: Private channels that will allow two users to privately chat with each other
- ChatMessage: A class representing a Public or a Private Chat Message
- Notification: A class representing something a User should know (for example an Unread Message, a changed Status etc)
- Status: an Enumeration representing the current Status of a User
- NotificationSubject: an Enumeration representing the subject of the Notification
Make sure your Model looks like this
Warning
- Remember to follow the guidelines shown here to see what to do when extending the
ApplicationUser - Uncheck the Concurrency Control checkbox of your classes, as our Application will not need such checks (we want to create a rapid Chat application. No need to burden the DataBase with additional Version TimeStamp columns, updates and checks)
Operations
Next, we're gonna add some Operations we're gonna need in the next steps. Ofcourse, these are not the only Operations our ChatterBox Application is going to use. But these are the most simple ones that need no real introduction or explanation. In the next section we're gonna create together the real juicy ones ;)
I'm not gonna go into detail at this point and explain each Operation and its purpose in this Walkthrough. I'll just write what they do and why we need them in such comments just above their signature, ok? Thanx :)
What you're gonna need to do is simply open the required Class, create the Operations shown in the subsections that follow and copy-paste the Mamba Code that I'm giving you.
Attention
Pay attention to which Operation is static and which is not, ok?
User
/* Returns the currently logged in user, i.e. me */
static function Domain.User GetCurrent()
{
    return AppLib.Session.GetCurrentUser() as Domain.User;
}
/* Changes the Status of a User */
function void SetStatus(Domain.Status status)
{
    this.Status = status;
    this.LastActivity = DateTime.Now();

    this.Save();
}
/* Retrieves all Active Users (Available to Chat or Online ) */
static function Collection[Domain.User] GetActiveUsers()
{
    return Domain.User.Find(x =>
        x.Status == Domain.Status.Chatty ||
        x.Status == Domain.Status.Online
    );
}
/*
    Retrieves the First Administrator found
    We're gonna need this just to style the "Administrative" messages,
    such as "User X just Entered the Chat Room". Nothing serious..
*/
static function Domain.User GetAdministrator()
{
    Domain.User admin =
        Domain.User.Find(x => x.Roles.First(y => y.Name == "Administrator") != null).First();

    return admin;
}
PrivateGroup
/*
    This function will generate a Group Name by creating a
    unique Name for two pairs of Users, ordering them Alphabetically
    (just to enforce that a Group Name is really Unique for any two pair of Users)
*/
static function string GenerateGroupName(Domain.User chitter, Domain.User chatter)
{
    Collection[Domain.User] users = {chitter, chatter};
    return string.Join("_", users.OrderBy(x => x.UserName).Select(y => y.UserName));
}
/*
    This function will return a list of all the private groups
    in which the current user (i.e. me) is a participant
*/
static function Collection[Domain.PrivateGroup] GetMyPrivateGroups()
{
    Collection[Domain.PrivateGroup] privateGroups =
        Domain.PrivateGroup.Find(x => x.Chitter == Domain.User.GetCurrent() || x.Chatter == Domain.User.GetCurrent()).Distinct();

    return privateGroups.OrderBy(x => x.GetTheOtherPerson().UserName);
}
/*
    This function will look wheather a private Group already exists between the two pals.
    If yeah, it will return it.
    If not, it will create a new one and then return it.
*/
static function Domain.PrivateGroup OpenPrivateGroup(Domain.User chitter, Domain.User chatter)
{
    //Generate the unique Name of this Private Group
    string groupName = Domain.PrivateGroup.GenerateGroupName(chitter, chatter);

    //Check whether it already exists
    Domain.PrivateGroup privateGroup = Domain.PrivateGroup.GetByKey(groupName, false);

    //If not, create it and save it
    if(privateGroup == null){
        privateGroup = Domain.PrivateGroup.Create();
        privateGroup.Chitter = chitter;
        privateGroup.Chatter = chatter;
        privateGroup.GroupName = groupName;
        privateGroup.Save();
    }

    //Finally, return it to the caller
    return privateGroup;
}
/* Re-fetch this instance from the DataBase if possible */
function void TryRefresh()
{
    try
    {
        this.Refresh();
    }
    catch Exception x
    {
        //Hush, child....
    }
}
Notification
/* Re-fetch this instance from the DataBase if possible */
function void TryRefresh()
{
    try
    {
        this.Refresh();
    }
    catch Exception x
    {
        //Hush, child....
    }
}
Permissions & Roles
Our ChatterBox will allow:
- Chatters to use Public and Private chats
- Administrators to use only Private chats
To differentiate between them, we'll need an additional Role and Permission:
Todo
- Go to Configuration → app → Security settings
- Add a Permission named "Chat" under your Permission settings
- Add a new Role named "Chatter" and assign him the Chat Permission created earlier
Forms
Our ChattBox Application will use only 3 forms (aside from the already created ones that we will not really touch):
- a ChatRoom form that will be used for our Public Chat room where our Chatters will be able to publicly speak
- a PrivateGroup form that will be used for Private Chats between two Chatters (and/or Admins)
- the Master Page, that we will thoroughly change
ChatRoom
First, lets create the Chat Room.
Todo
- Create a new Form named "ChatRoom"
- Mark it as Normal and set its Master Page to the MasterPage
- Open its Controller tab and find the Render Action
- Uncheck the Available to All Anonymous and Available To All Authenticated Features
- Select the Chat Permission to allow only those users that have the "Chat" Permission to visit this form
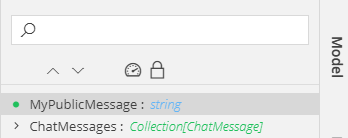
Now, lets quickly assign its Model:
Todo
- Add a
MyPublicMessage: stringproperty that will hold the Message we're about to send to the Public Chat - Add a
ChatMessages: Collection[ChatMessage]property that will hold all the messages that have been sent to the Public Chat. At this point the Model should look like this:
And lets design the UI that it will show to the users:
Todo
- Add a 12-column Layout onto your Form, named ChatLayout
- Add another 12-column Layout onto your Form, named NotInPublicChatRoomLayout (you'll understand why, soon enough)
- Drag and drop the
ChatMessagescollection onto the ChatLayout to create a Bound Table that will show all the sent messages - Drag and drop the
MyPublicMessagestring onto the ChatLayout. This will create a TextBox. - Select the TextBox, right-click on it and change it into a TextArea.
- Add a Button onto the ChatLayout that will be used to Send the messages you're gonna right into the TextArea later
- Add any text or image you want into the NotInPublicChatRoomLayout. Basically, the ChatLayout will be visible to those users that have entered the Chat (are in a Chatty mode), while the NotInPublicChatRoomLayout layout will hide all the messages, buttons etc. and will be visible to anyone that is not in a Chatty mode.
- To implement the logic explained in the previous step, create a Conditional Formatting like so:
 ](/assets/images/walkthroughs/chat/HideEverythingIfNotChatty.png)
 - Feel free to use the classes of your Form Model and the nice features that zAppDev is giving you to create the form you would like to see
For example, after following the steps above, the form I created looks like this:
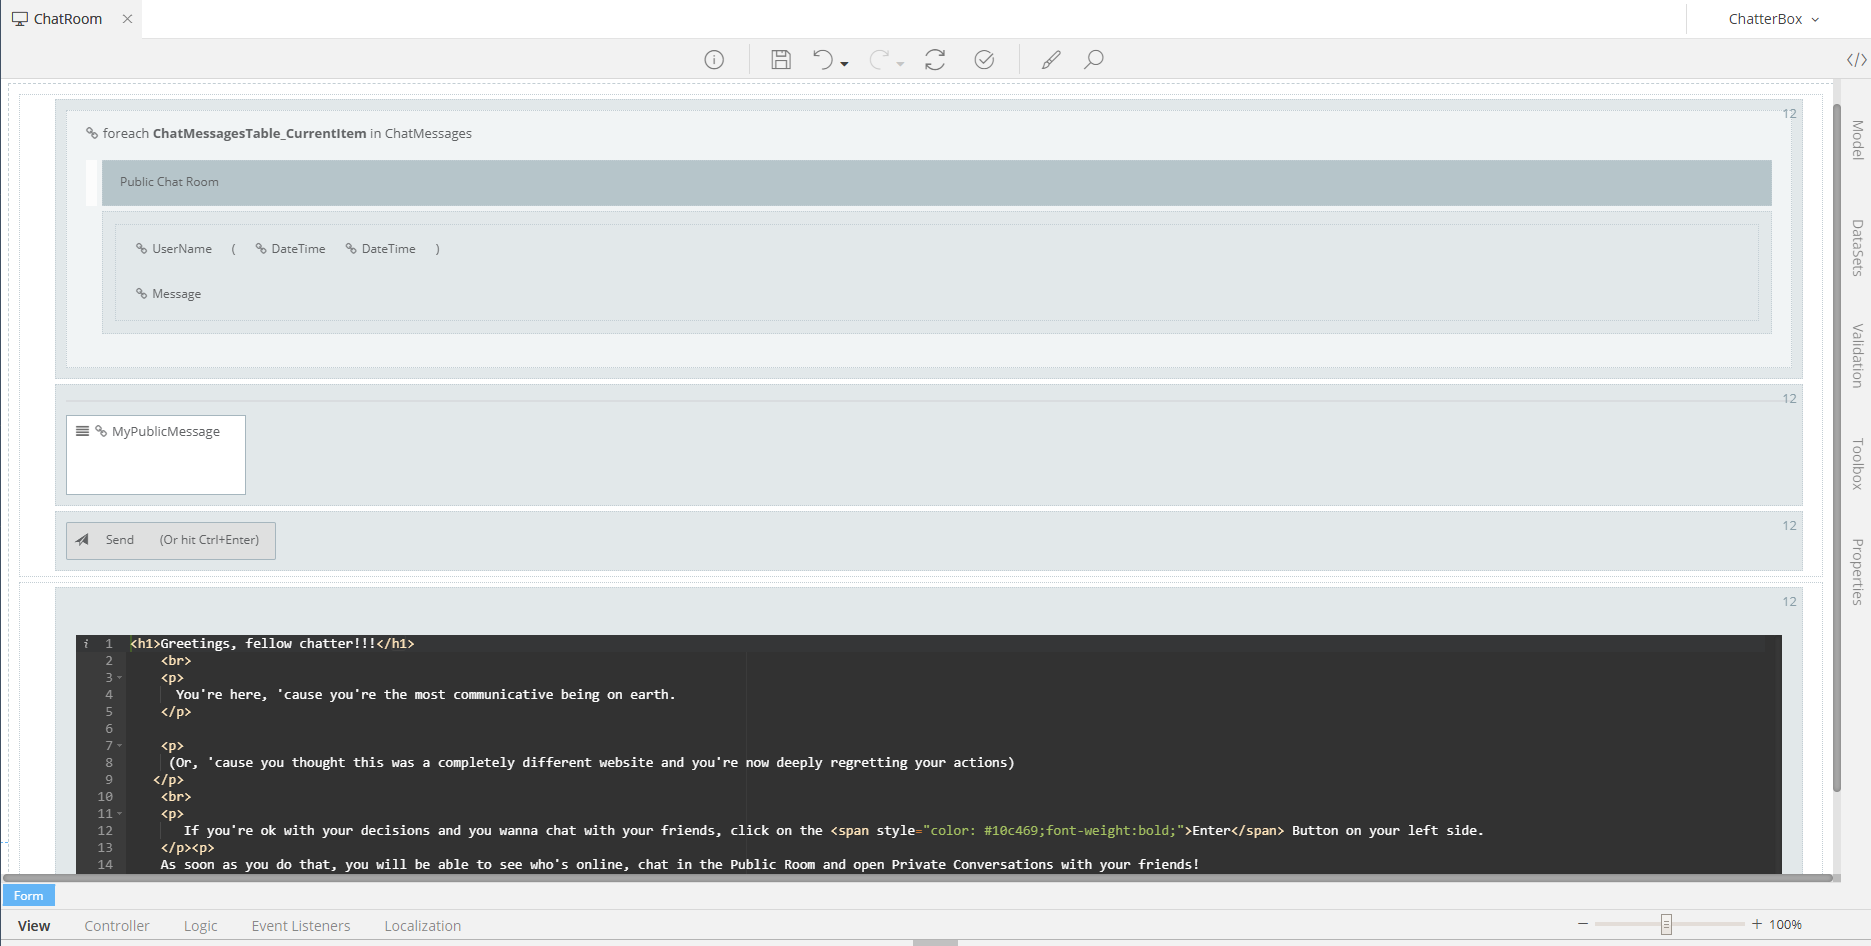
Notice that I played around with the ChatMessage class to show the UserName of the person that send the message, the Date and Time when the Message was sent and I used an HTMLContainer to write a simple message to be shown to those users that are in no mood to chat just yet (in the NotInPublicChatRoomLayout) . Note: You'll notice the "Or hit Ctrl+Enter" message in my button. If you're wondering how to do that, keep reading. We're gonna use the JS API for that, it's gonna be cool.
Exercise 1
Create a Conditional Formatting to change the color of the UserName of a Chat Message inside the Table presenting all sent Chat Messages whenever that message belongs to you
**Hint 1: ** You'll need to set the Rule Context to the Table holding the Chat Messages
**Hint 2: ** AppLib.Session.GetCurrentUserName() will help you
Exercise 2
Color the UserName of a Chat Message as Red whenever it belongs to an Administrator
Hint Check out the Operations we created earlier under the User class
Exercise 3
Disable the "Send" button whenever the Message to be sent is empty, using a Conditional Formatting
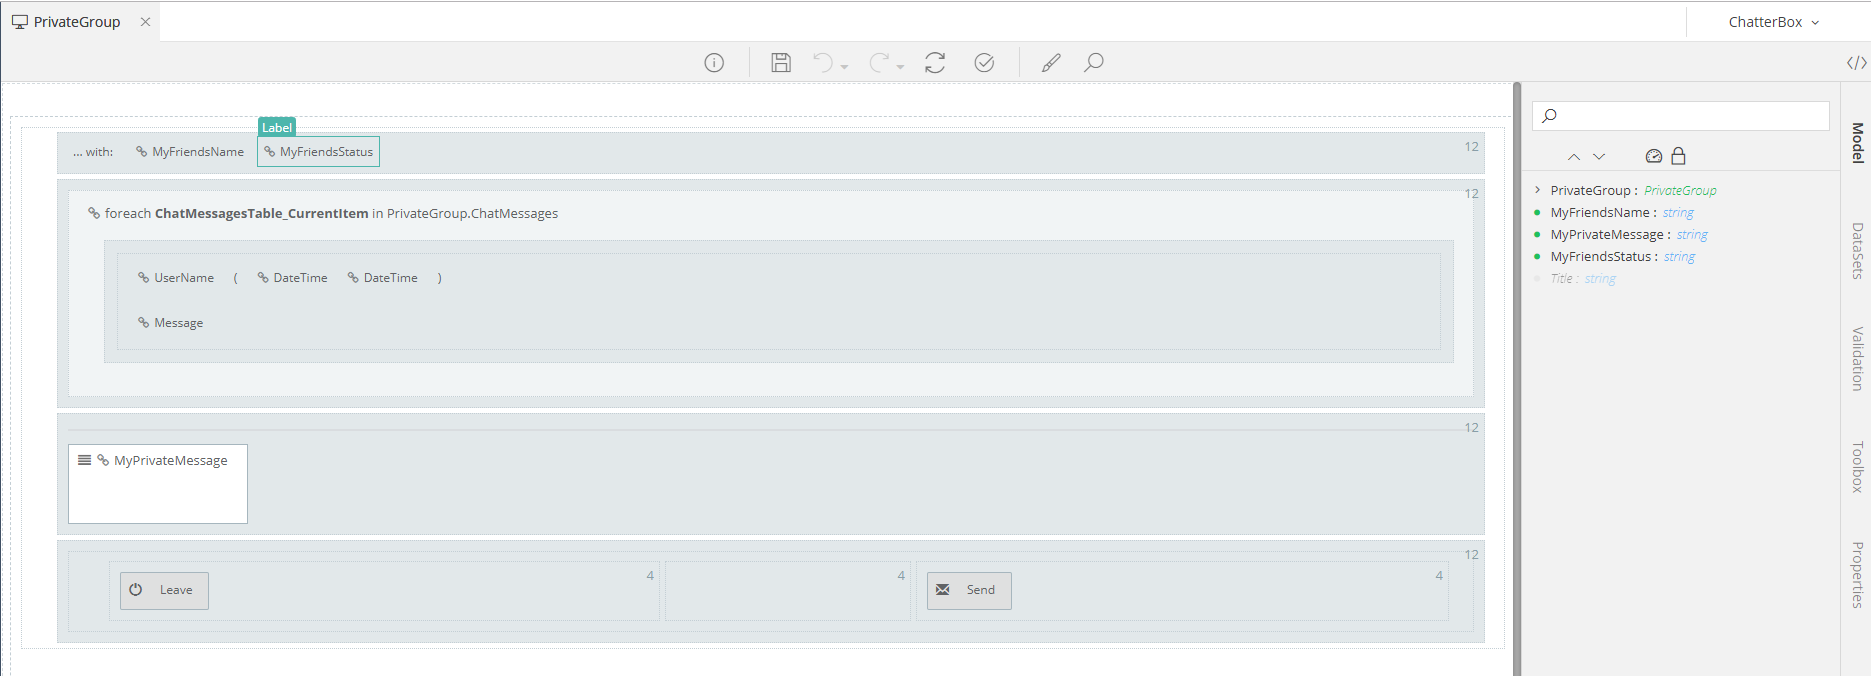
PrivateGroup
First, lets create the form.
Todo
- Create a new Form named "PrivateGroup"
- Mark it as Normal and set its Master Page to the MasterPageForSlide
- Open its Controller tab and find the Render Action
- Make sure its Available To All Authenticated checkbox is checked
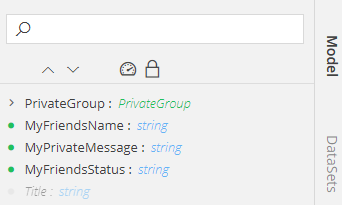
Now, lets quickly assign its Model:
Todo
- Add a
PrivateGroup: PrivateGroupproperty that will hold the information of the Private Group that is opened during the current private conversation - Add a
MyFriendsName: stringproperty to keep the name of our Friend (the other guy in this Private Group that's "not me"), just for viewing purposes - Add a
MyPrivateMessage: stringproperty that will hold the Message to be sent - Add a
MyFriendsStatus: stringproperty to keep the status of our Friend during this Private Conversation, just for viewing purposes. At this point the Model should look like this:
Finally, lets design its UI.
Todo
The Private Group will be quite similar to the ChatRoom we created earlier, except for the two Layouts (no need for the NotInPublicChatRoomLayout here) and some additional Model Properties that this Form has. I'm not gonna take you step by step as I did earlier, ok? You're gonna try and create this form by yourself. What I want you to do is the following: 1. Use the Model you've created to create your Form 2. Add one button (that will do nothing, for now) with a "Leave" label 3. Check out what my form looks like and feel free to copy it if you like it
Once again, I played around with the Classes I had. In addition, I created a nice little row at the top of my page to show with whom I'm talking and what his/her status is, added some Icons, styles etc.
Exercises
Repeat the Excercises you did during the ChatRoom form (Conditional Formattings) here as well. You'll like the results :)
MasterPage
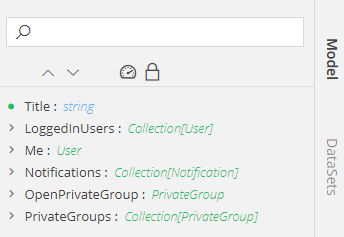
Finally, open the MasterPage (no need to create this one) and create its model like so:
Todo
- Add a
LoggedInUsers: Collection[User]property that will represent the list of the Users (remember our User class we extended from theApplicationUserearlier?) that are currently logged into the Application - Add a
Me: Userproperty that will represent.. well.. us. You, that is. We'll use this class simply to avoid back-end calls everytime we need to get information that has to do with ourselves (i.e. my own status, my name etc) - Add a
Notifications: Collection[Notification]property. This will be the list of anything we missed while browsing through our Application, for example missed Private Messages etc. - Add a
OpenPrivateGroup: PrivateGroupproperty. This will be the PrivateGroup (Private Chat or Channel, if you will) that is currently open, visible and used by us (the current user, a.k.a. me) - Add a
PrivateGroups: Collection[PrivateGroup]property that will represent all the Private Groups that we are a part of at any given time. At this point the Model should look like this:
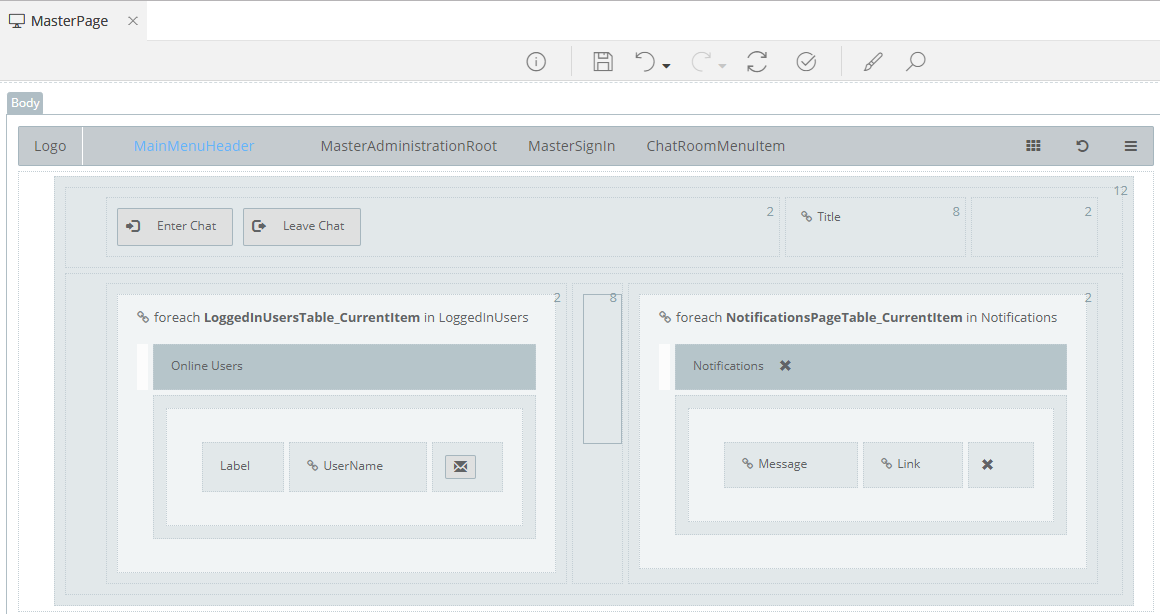
Now, create its UI following these steps:
Todo
- Change the 10-2 Layout holding the Title and the "Unsaved Changes" label to a "2-8-2" Layout. Remove the "Unsaved Changes" Label. Drop the "Title" into the "8" Cell
- Change the Layout holding the Body into a "2-8-2" Layout. Drop the Body element into the "8" Cell
- Drag and drop the
LoggedInUsersCollection onto the left column of the bottom Layout you just created, to create a Bound Table showing the List of the Logged In users - Add a button (that will not do anything, for the time being) to each row of the Logged In Users Table
- Drag and drop the
NotificationsCollection onto the right column of the bottom Layout you just created, to create a Bound Table showing the List of the Notifications you might have missed - Allow the
Notificationsrows to be Deleted - Create two buttons at the top left Cell with the labels "Enter Chat" and "Leave Chat" respectively. Name the first button EnterButton. Name the second button LeaveButton.
In the end, you should have a MasterPage View looking like this:
Events: The Actual Reason You're Here
At this point, you have everything you need. Now, it's time to play with Events. Shall we then?
Creating an Event
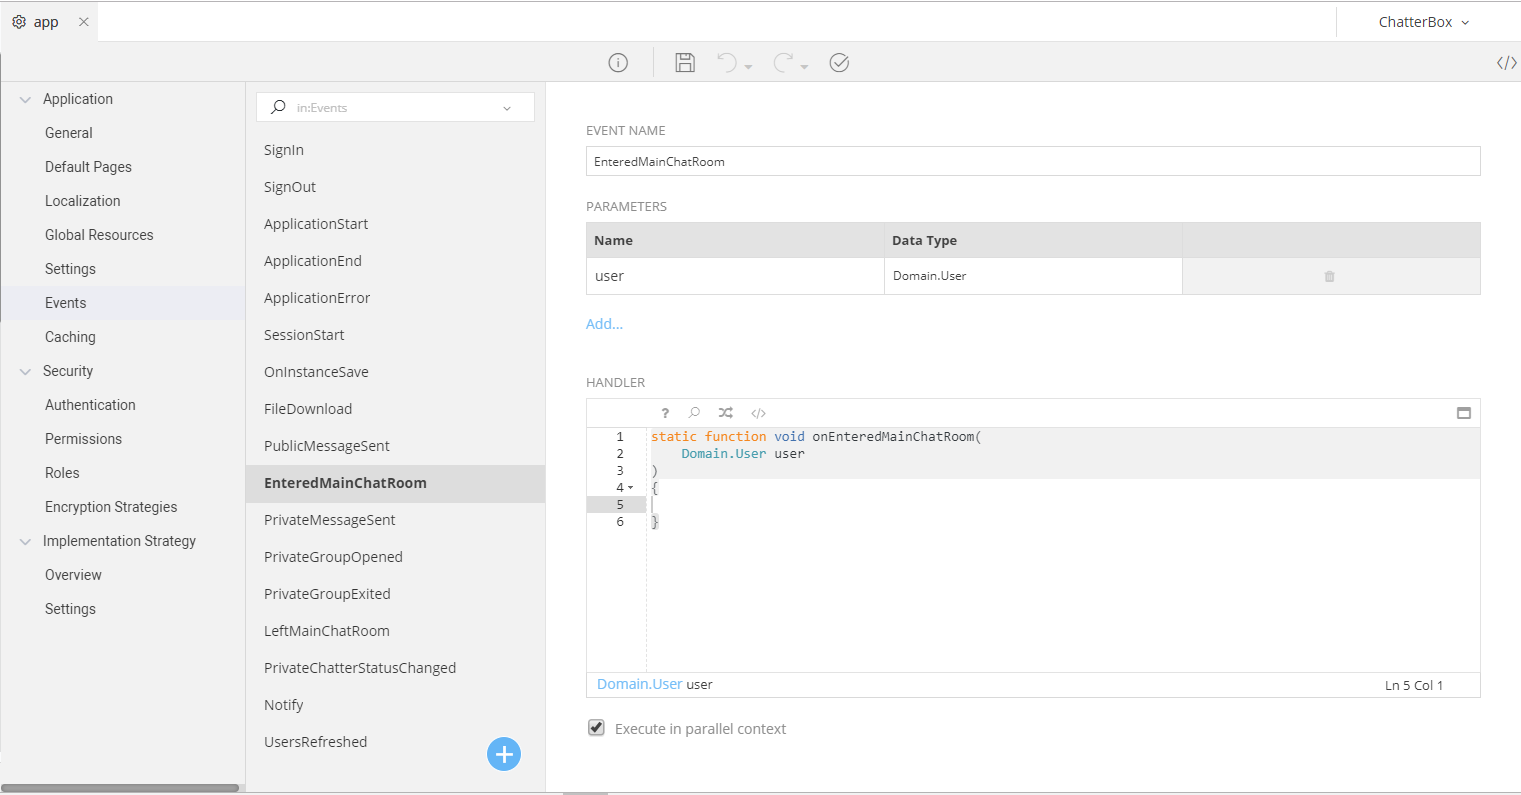
First, let see how to create a new Event. To do that, lets create a EnteredMainChatRoom Event that will be raised everytime a User wants to be flagged as "Available for Chat" both in a Public and a Private Mode (in other words, he/she is .. Chatty. He/she can Chat and other people can chat with him/her)
Todo
- Go to Configuration → app → Application → Events
- You should see some default events already created for you by zAppDev, like: SignIn, SignOut, ApplicationStart etc.
- Click on the
 to add a new Event
 - Notice the Event Name textbox. This will hold a unique name without any spaces defining our event. Enter "EnteredMainChatRoom"
- Now, notice the Parameters table. You can add any number of parameters that you would like to send with your Event. The parameters can be simple variables (e.g. a
string) or complex objects. To add parameters, simply click on the Add... link. For our event, add one parameter named user with aDomain.UserDataType. Thus, everytime an EnteredMainChatRoom event is risen, the object of the user that has entered the Chat Room will be sent with the event as well - Now, check out the Handler. You can use it to assign a Global handler to be ran throughout your whole Application. We won't need that here.. So, let it empty
- Finally, see the Execute in parallel context checkbox. When its checked, the Event will not hault the actual flow of our Application, allowing the Event and the Application to execute in a parallel mode. If unchecked, the Application will wait for the Event to be finished, before proceeding to the next steps. For this event, leave this checkbox checked
This should be the look of your event:
Entering/Exiting Chat
Events
Now, lets create two events that will allow us and our Users to mark us as Available or Unavailable for Chat. In other words, whenever the User Enters the Chat Room, he/she will get the Chatty Status. As soon as he Leaves it, he will get the Online Status (why Online you asked? Well.. it's not that he actually signed out, right? He's still online. Just not in the mood to talk to anybody).
So. We already created the EnteredMainChatRoom Event. Lets create its opposite. The floor is yours:
Todo
Using the steps shown before, create a LeftMainChatRoom Event that will run in a parallel context and will have a user: Domain.User input Parameter. Leave its global Handler empty