Class
New Class
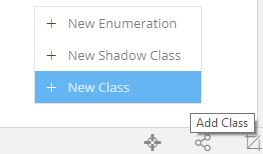
To add a new class go to the  button and select the New Class Option.
Tip
You can add Classes by hitting Insert anywhere on the Business Objects Editor.
Alternatively, you can right-click anywhere in the Business Object Designer and select the New Class option from the Menu that will appear.

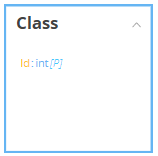
The Editor will create an empty Class for you with some default values and configurations that you will be able to change: A persisted class with a unique name and one persisted attribute representing the unique identifier of that class.
Important
After creating your Class, you will be able to access it via the Domain Namespace, like so:
Domain.YOUR_CLASS;

/** Example **/
Domain.User user;
user.Id = "queen";
var allUsers = Domain.User.GetAll();
Structure
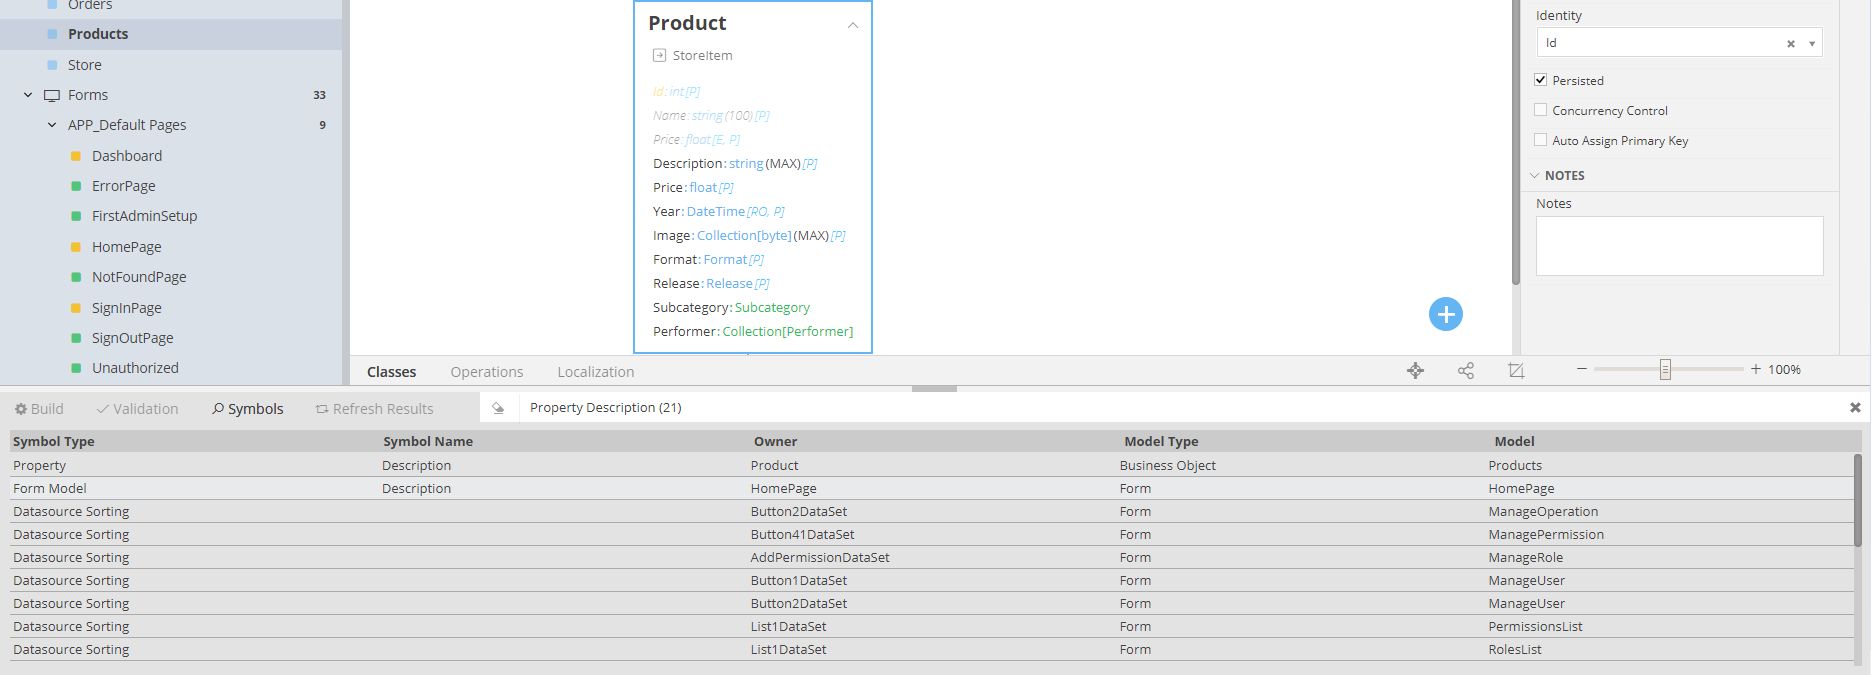
A Class is represented by a rectangle and consists of the following parts:
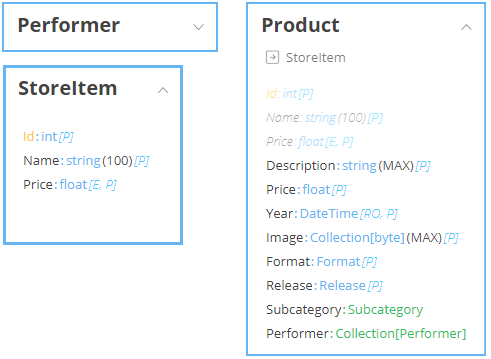
- The Name of the Class
- Unique, throughout your whole Application
- Example: Performer, StoreItem, Product
- Its Parent class, in the case that the Class is inherited
- By clicking on the Parent's class link, you can be navigated to its definition
- Example: The Product class inherits the StoreItem class. If you click on the StoreItem link right below the name of the Product class, you will be navigated to the StoreItem class (that does not inherit from another class)
- Attributes
- These are the Attributes that further define your Class, represented by:
- Name (Example: Description)
- Type (Example:
string) - Flags (Example: [P] for Persisted, [E] for Encrypted etc.)
- They might belong to
- your current class (Example: Product Class consists of a Description, Price etc) or
- to their Parent class, in the case of an inheritance (Example: Product class inherits the Id, Name and Price properties from the StoreItem class)
- They might have
- a simple datatype, represented with a blue color. (Example:
string,intetc.) - or a complex one, represented with a green color that denotes their Class (Example:
Subcategory,Collection[Performer])
- a simple datatype, represented with a blue color. (Example:
- These are the Attributes that further define your Class, represented by:
Available Operations
By right-clicking on a selected class, you will see a Menu like this:
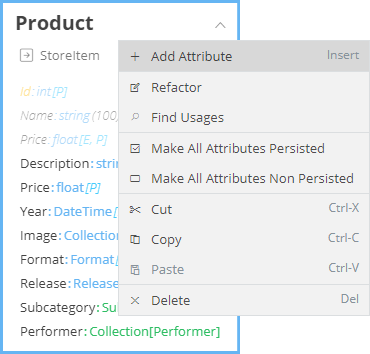
Add Attribute
You can add a new Attribute into your selected class using one of two ways:
- Selecting Add Attribute from the menu
- Selecting your Class and hitting the Insert key
To define your Attribute:
- Give it a name. It must be unique within the class
- Hit Enter to apply the name
- Select its datatype from the drop-down that will appear
- Note. If the datatype belongs to a Class, then a relationship will be created, connecting your current Class with the one that is being used as your Attribute. Additionally, if the related Class is defined in a different Business Objects Model, it will be added to your current one in the form of a Shadow Class
Refactor
By refactoring a Class, you are basically changing its name, but in such a way that it is changed in any other Model that might use it.
Attention
To simply rename a Class, double click on it and type in the new name. (Alternatively, you can use the Property panel). Remember, however, that if you rename your Class, the changes will be local, meaning that all other Models will be still using its previous name. To globally rename a Class, use the refactor option.
Tip
If you are just beginning your Modeling and you know that your class is not used anywhere, a simple rename is enough.
Find Usages
The Find Usages option is very helpful if you want to find all the Models that might be using your Class. All the hits will be presented in the Console, inside the Symbols panel. From then on, you will be able to Navigate to each Model that uses your Class, by double-clicking on the record you want, presented in said Console.
For example, the image that follows shows you that the Product class is used (among others):
- In the HomePage Form, as an item of its Model. By double-clicking it, you will be naviagated to that Form.
- In the ManageOperation form, within a Dataset. By double-clicking it, you will be naviaged to that Form and a Dataset Editor will be opened showing the Dataset that uses the Product class
Make All Attributes Persisted
This is like a "shortcut", that allows you to define all the Attributes of the Class as Persisted (meaning they will be saved in a DataBase). After clicking on this option, you will see the [P] flag appearing next to every Attribute in your Class
Make All Attributes Non Persisted
Being the exact opposite of the previous option, this option helps you define all Attributes of the Class as Non Persisted (meaning that they will not be saved in a DataBase) This is a useful option when you need a class for mere operational purposes (example, a helper class, or a mere representation of some data) that you do not want to be added into your actual DataBase.
Properties
Every class has a set of properties that you can define, visible in the Properties Grid.
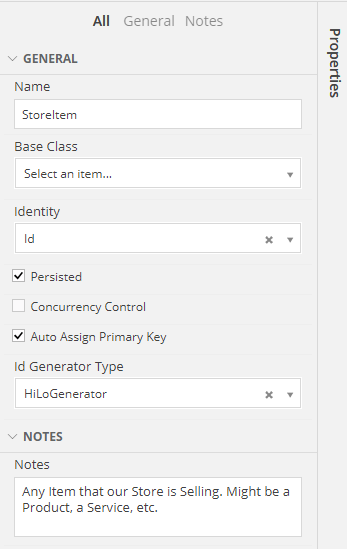
An explanation of each property and rules follows:
| Property | Description | Editable | Availability |
|---|---|---|---|
| Name | Name of the Class | All times | All times |
| Base Class | The Parent Class whose Attributes and Operations the class will inherit | All times | All times |
| Identity | The Unique Key, identifying your Class. Required for Persisted Classes | On Non-Inherited Classes | All times |
| Persisted | If checked, the Class will be added to your Database | On Non-Inherited Classes | All times |
| Concurrency Control | If checked, zAppDev will make sure that when the Application accesses the Classes concurrently (i.e. by two threads, sessions, users etc.), their actions will be performed one after another. | On Non-Inherited Classes | On Persisted Classes |
| Auto Assign Primary Key | If checked, the Primary Key (Identity) of the Class will be automatically assigned by the Application. Note. If unchecked, you will have to remember to set it! | On Non-Inherited Classes | On Persisted Classes |
| Id Generator Type | The Type of the Generator to use, to auto-generate the Primary Key. HiLo: an algorithm to rapidly generate Primary Keys without accessing the DataBase. Sequence: traditional algorithm that generates Primary Keys giving them unique, incremented numbers. | On Non-Inherited Classes | On Persisted Classes with an Auto-Assigned Primary Key |
| Notes | Useful notes regarding the Class | All times | All times |
Design Rules
- The name of any Class must be unique throughout your whole Application
- The name of any Class cannot be the same as the Application's name
- A persisted Class must have at least one (1) persisted Attribute
- A persisted Class must have an Identity Attribute
Attributes
Warning
This section will talk about simple Attributes, that have a simple Data Type (example: string, int).
Attributes with complex types are covered in the [ASSOCIATIONS] section (since a complex Attribute is nothing but an Association between two classes: the current one and the Class whose type we are using for our Attribute)
Available Operations
By right-clicking on a selected Attribute within a class, you will see a Menu like this:
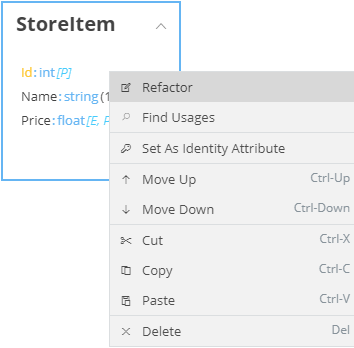
Attention
The Menu appears only for the actual Class' Attributes. It will not appear for the inherited ones, in the case that the Class has a Base Class
Refactor
By refactoring an Attribute, you are basically changing its name, but in such a way that it is changed in any other Model that might use it.
Attention
To simply rename an Attribute, double click on it and type in the new name. (Alternatively, you can use the Property panel). Remember, however, that if you rename your Attribute, the changes will be local, meaning that all other Models will be still using its previous name. To globally rename a Attribute, use the refactor option.
Tip
If you are just beginning your Modeling and you know that your Attribute is not used anywhere, a simple rename is enough.
Tip
If you choose to simply rename your Attribute, all Classes that are accessing it, will be aware of the new name. Thus, the refactoring is only required if a different Model accesses this Attribute (example: a Form Model, an API and anything else outside the Business Objects Models)
Find Usages
Same logic as the one described earlier, for the Class.
Find Usages
Same logic as the one described earlier, for the Class.
Set As Identity Attribute
This is a shortcut, that enables you to set the selected Attribute as the Identity of the Class
Move Up
Displays the selected attribute one row higher, in the list of the Class' Attributes
Move Down
Displays the selected attribute one row lower, in the list of the Class' Attributes
Properties
Every Attribute has a set of properties that you can define, visible in the Properties Grid.
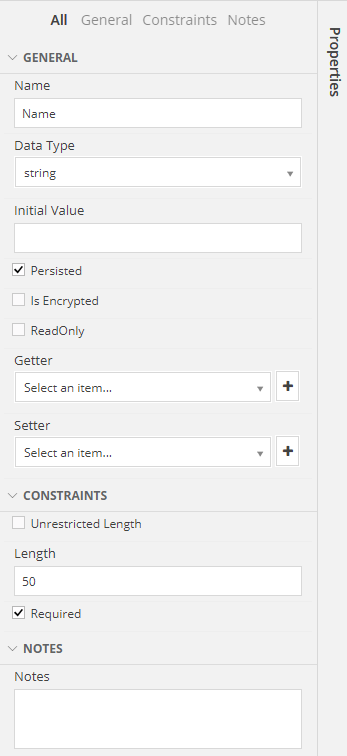
An explanation of each property and rules follows:
| Property | Description | Comments |
|---|---|---|
| Name | Name of the Property | |
| Data Type | The Type of the Property. Can be a simple type (e.g. int, string) of a complex one (e.g. Subcategory, Release) |
Whenever you set a complex type as the Data Type of your Attribute, its Class will be fetched into your Designer and linked to your Class via an Association |
| Initial Value | A value to be used as "default" whenever the Class is being created | Example: Name : string with Initial Value set to "Unknown" |
| Persisted | If checked, the Attribute will be mapped in the Database as the Class' Table's column. Otherwise, it will not appear in the Database | Adds a [P] flag after the Attribute's Definition |
| Is Encrypted | If checked, the Attribute's value will be saved in an Encrypted Column of the Database, using AES Encryption and the key calculated from the Encryption Strategy. | Adds an [E] flag after the Attribute's Definition. Can be applied to Primitive Attributes only (i.e. strings, numbers, booleans etc). |
| Read Only | If checked, the Attribute will be un-editable. | Adds a [RO] flag after the Attribute's Definition |
| Getter | An accessor to be used to return the Attribute's value | For more information, read this |
| Setter | An accessor to be used to assign a new value to the Attribute | For more information, read this |
| Required | If checked, the Application will regard this Attribute as required, making sure no null value is allowed to be set |
Adds a [RQ] flag after the Attribute's Definition |
| Unrestricted Length | If checked, the length of this Attribute will be the maximum allowed | Available for Attributes with a length (i.e. string etc.) |
| Length | Maximum length of the Attribute (e.g. 50 characters) | Available for Attributes with a length, that is not marked as Unrestricted |
| Notes | Useful notes regarding the Attribute |
Getter
A getter is an accessor that defines the way that the Attribute's value is to be return. In zAppDev, you can define a getter as a function that follows the rules described below:
- The function must have the same return type as the Attribute's
- The function cannot have any parameters
- The function must be an Instance Method (meaning that it cannot be
static)
Example
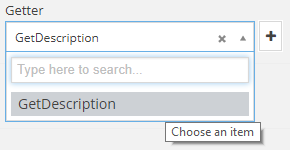
Let Description : string be an Attribute inside a class. We want our getter to enclose the Description inside brackets each time we access the Attribute to read it.
function string GetDescription()
{
    return  "[" + this.Description + "]";
}
To create a getter for your attribute, you can choose one of two ways:
Automatic
- Click on the + button
- Notice that you will be navigated to the Operations, where a new function for your getter has been defined for your
- Set your logic into the created function, to describe what should happen every time the Attribute's value is read
Manual
- Create a function following the rules described earlier
- Select the Attribute that should run the defined getter
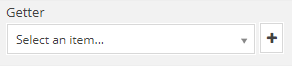
- Open the drop-down box under the Getter property and select the function you created
Setter
A setter is an accessor that defines the way that the Attribute's value is to be set. In zAppDev, you can define a setter as a function that follows the rules described below:
- The function must have the same return type as the Attribute's
- The function must have exactly one parameter, with the same datatype as the Attribute's
- The function must be an Instance Method (meaning that it cannot be
static)
Example
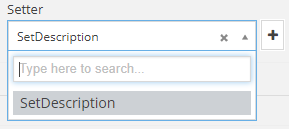
Let Description : string be an Attribute inside a class. We want our setter transform its text to lower-case, every time the Application is setting its value.
function string SetDescription(string description)
{
    this.Description = description.ToLower();
    return this.Description;
}
To create a setter for your attribute, you can choose one of two ways:
Automatic
- Click on the + button
- Notice that you will be navigated to the Operations, where a new function for your setter has been defined for your
- Set your logic into the created function, to describe what should happen every time the Attribute's value is set
Manual
- Create a function following the rules described earlier
- Select the Attribute that should run the defined setter
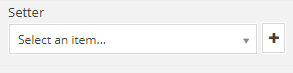
- Open the drop-down box under the Setter property and select the function you created
Design Rules
- An Attribute must not have the same name as its containing Class
- Numeric precisions for
decimaldata types must have a precision configuration between 1 and 38 (if configured and not left 0) - The decimals of a
decimaldata type must be between zero (0) and the defined precision (see previous rule) - The valid values for a
stringlength are:- 1 to 4000 or
- "MAX"
- The Attribute used as an Identity Attribute that has been configured as an Auto Assigned must have one of the following data types:
int,long,Guid
Remarks
If your Classes and Enumerations clutter your designer, find out how to clear the space up here.