Creating the Music Store Application in zAppDev
Introduction
This Walkthrough Tutorial will show how to create a Music Store: An online e-shop that sells Records of various Formats to its Users.
Be warned that it looks long and tedious only because I tend to talk too much. The whole process described, though, shouldn't take more than 1-2 hours, leaving you with a functional Online Music Store to play with! In any case, whenever you feel like you wanna skip my blubbering and go to the "just tell me what to do" part, just follow the steps described in the ToDo Sections, formatted like this:
Todo
- A Step
Tip
Feel free to Build your Application and review the changes, at any point during this tutorial
New Application
In this section we will see how to
- Create New (ASP.Net MVC) Application
- Configure its Theme
- Set up its Default Pages
Creating a New Application
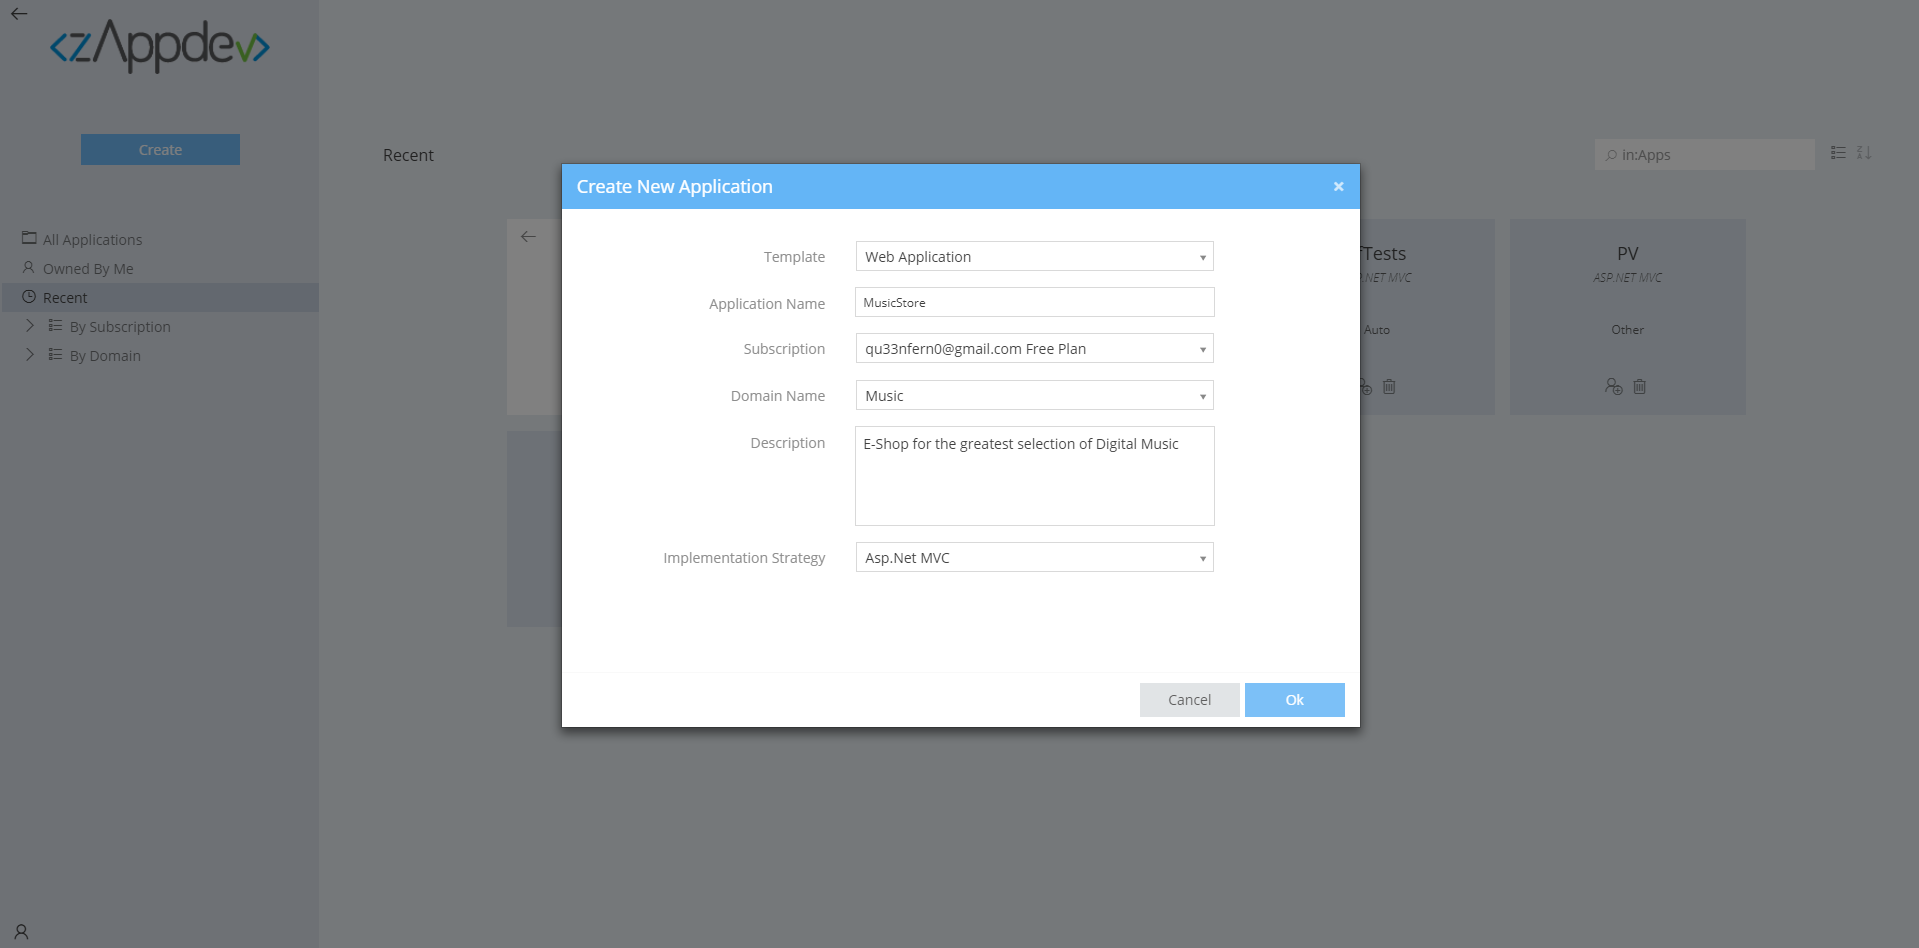
Todo
- Go to your Applications
- Click on Create to create a new Application. A Modal Dialog will appear
- Leave the Web Application as the Template
- Type "MusicStore" as the Name of your Application
- Select "Music" as the Domain Name
- Add a relevant Description
- Leave Asp.Net MVC as your Implementation Strategy
- Click Ok
Configuration
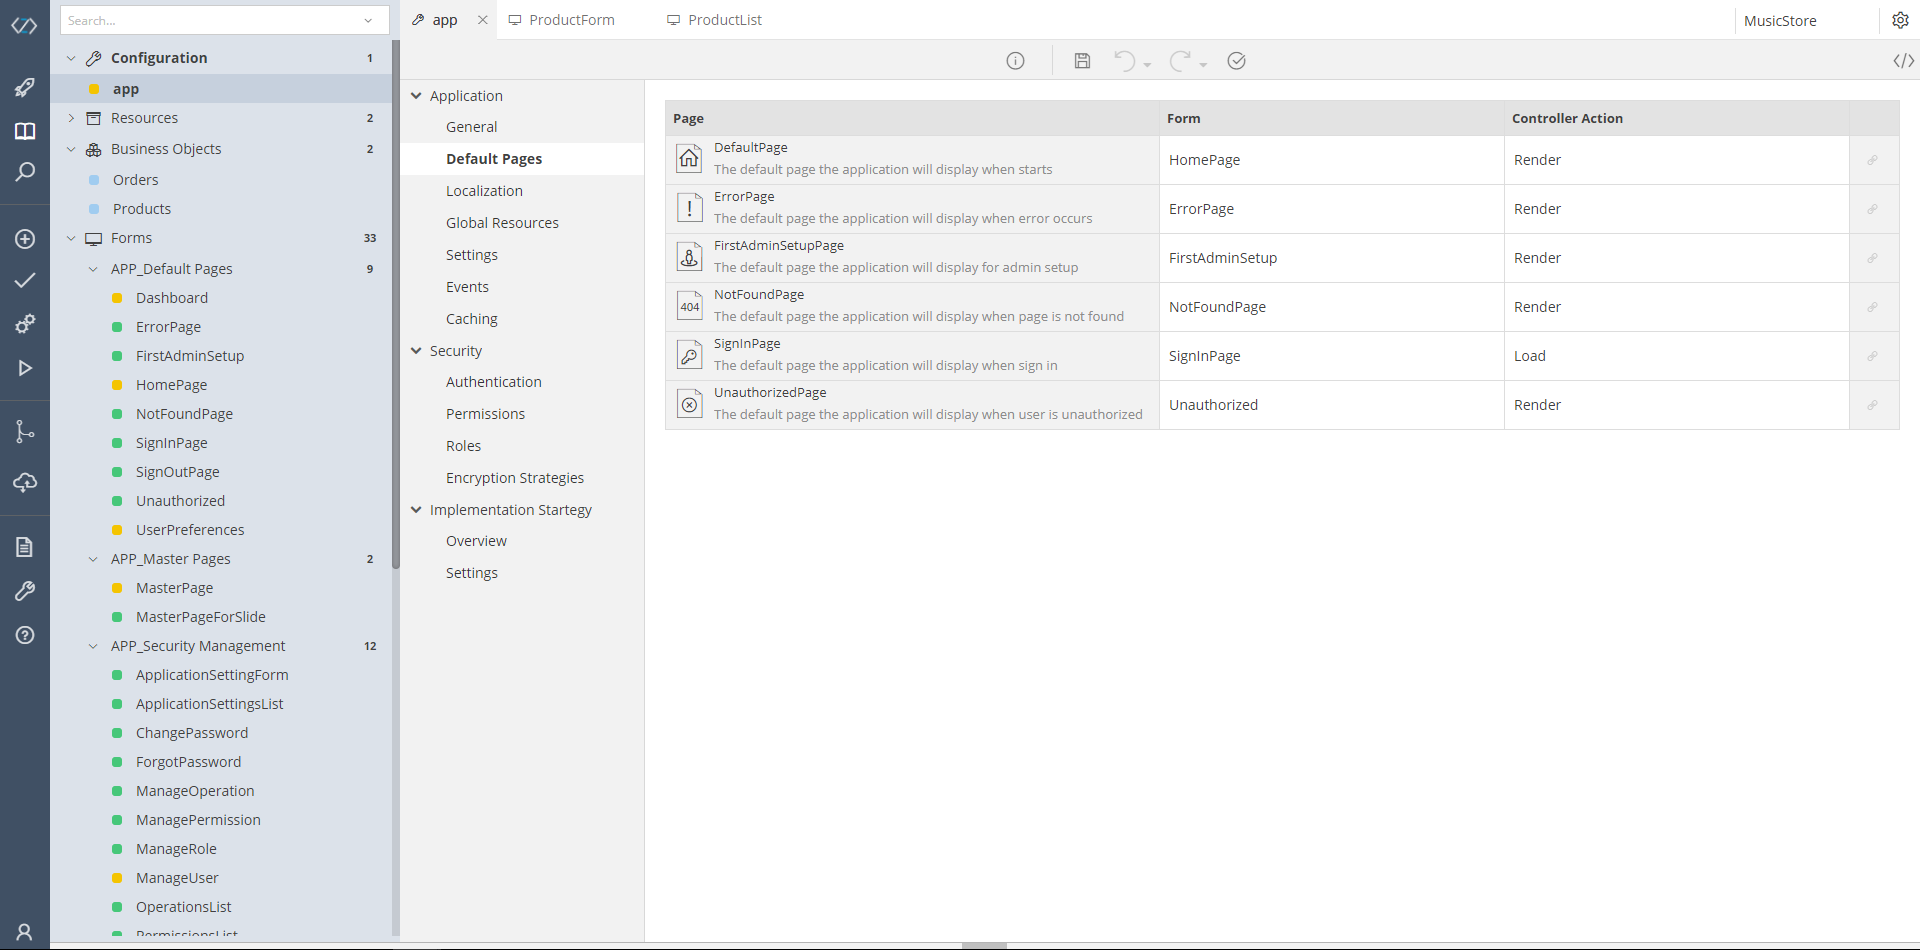
Find the Configuration
- Take a look at the Models Tree (it is the first, scrollable panel just next to the main, left, vertical menu)
- You will see that the first item is Configuration. Expand it, if needed
- Click on the app option
Theme
Todo
- In the Configuration Editor, find the very first group of options: Application
- Click on the General tab to open it
- Find the DEFAULT THEME drop down
- Select LightTheme
- Save the change, by clicking on the floppy disk icon, located at the horizontal menu (ribbon) of the Configuration Editor

Default Pages
Todo
- Open the Default Pages Panel (just under the General you opened previously)
- Take a look at the table that appears
- Go to the DefaultPage Option. If the Default Page isn't the HomePage, we don't want that, so
- Change the DefaultPage's Form to HomePage
- Change the DefaultPage's Controller Action to Render
- Save your changes
Now, every time we need to navigate to the Default Page of our Application, we will be navigated to the Home Page (that later on, will be our actual store)
Business Objects
In this section we will see how to
- Define Business Objects
- Design our Business Models
- Set their Relationships and Associations
- Define their Functionality, replicating our Business Logic
Business Objects Models
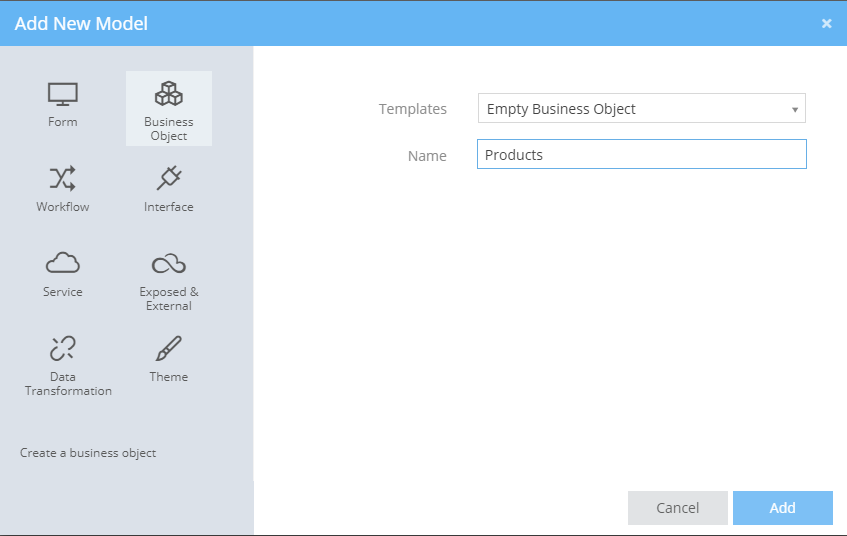
You can add a new Business Object Model (a designer that will hold your Classes and/or Enumerations) using one of two ways:
First Way
- Take a look at the main vertical menu (far left)
- You will see a circular + button

- Click it
- Find the Business Object option
- Select Empty Business Object on Templates, if not selected
- Name the new Business Object as "Products"
- Click Add
Second Way
- Take a look at the Models Tree
- Find the Business Objects Item
- Right-click on it
- Select Add
- Continue with the steps 5 and 6, described in the "First Way" section

Products
Classes & Attributes
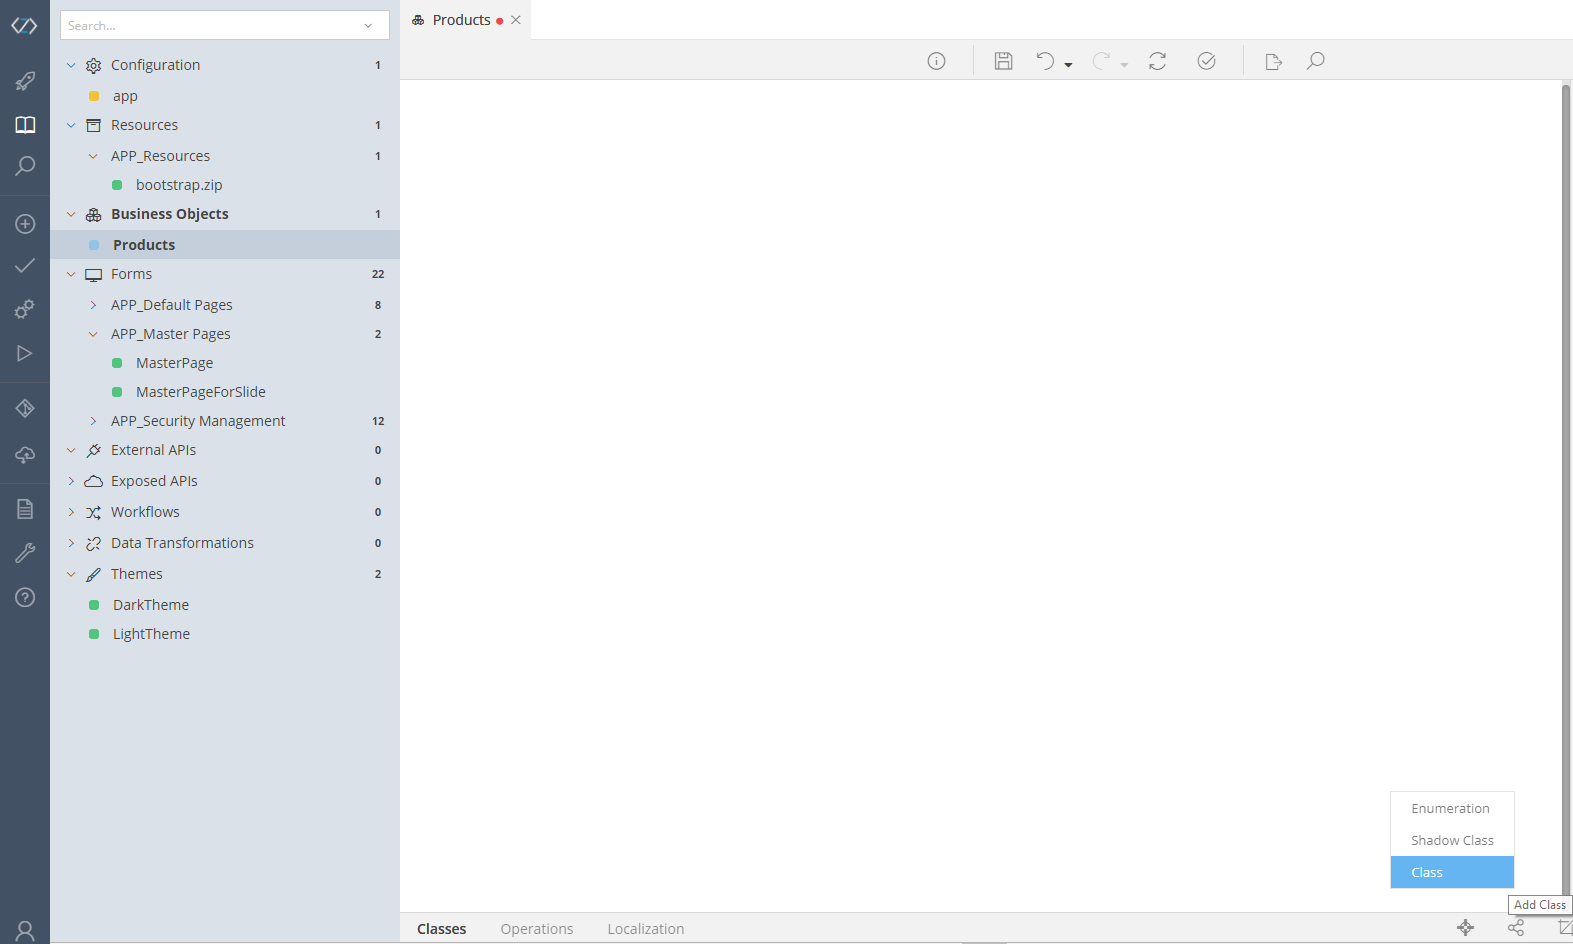
Open the Products Business Objects Model. First off, we will add some classes to model your Store, with regards to its Products.
Todo
You can add classes either by
- expanding the
 button at the bottom right corner of the Business Objects editor
 - or by right clicking anywhere at the blank space of the editor and selecting the New Class option
- or by hitting Insert anywhere at the blank space of the editor
The Classes we will add into the Products Business Objects Model are:
- Category: This is the generic categorization of our Products. It will store values such as Rock, Pop, Classic etc.
- Subcategory: This will be a more detailed categorization of our Products, storing values such as Classic Rock, Jazz Rock, Punk Rock, providing more classification of our Rock category
- Product: This will be the actual product: the music we are selling (for example: Queen’s Innuendo CD, first-release, under Classic Rock)
- Performer: This will be the singer/band of our Music. (For example Queen)
So, for now, go ahead and:
Todo
- Add a Category Class
- Leave all of its properties to their default values
- If you wish, add a Description (Notes) to your new Class, to provide your Team Members with some documentation
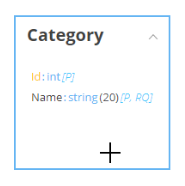
At this point, you should have a Model looking like this:

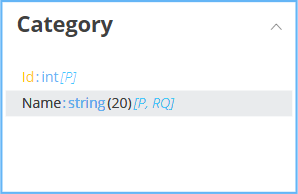
Now let’s add some properties into our Category. As shown, the Category will work as a mere notation for the types of Music we are selling, for example Rock, Metal, Classic etc. So all we need is a plain Name.
Tip
To add an Attribute you can
- either right-click on the Class and select Add Attribute,
- or hit Insert on your keyboard.
Todo
- Select the Category classes
- Hit the Insert button
- Start Typing the Name of the new Attribute. In this example, it's: Name
- Hit Enter : A drop down box will appear
- Choose
stringas the Data type for this Attribute (since a "Name" is a simple alphanumeric) - Take a look at the Properties panel
- Leave all values to their defaults
- Change the Length to 20 (to keep the Name relatively small)
- Check the Required checkbox
At this point, the Category class should look like this:
Now, let's drop the rest of our Classes onto the Business Objects Editor, as we did with the Category:
Todo
- Add a Subcategory class
- Add a Product class
- Add a Performer class
- Add a Name Attribute with a
stringData type to each class. Make it Required, with a length of 50
If you wish, add relative Notes (Descriptions) to each Class and/or Attribute.
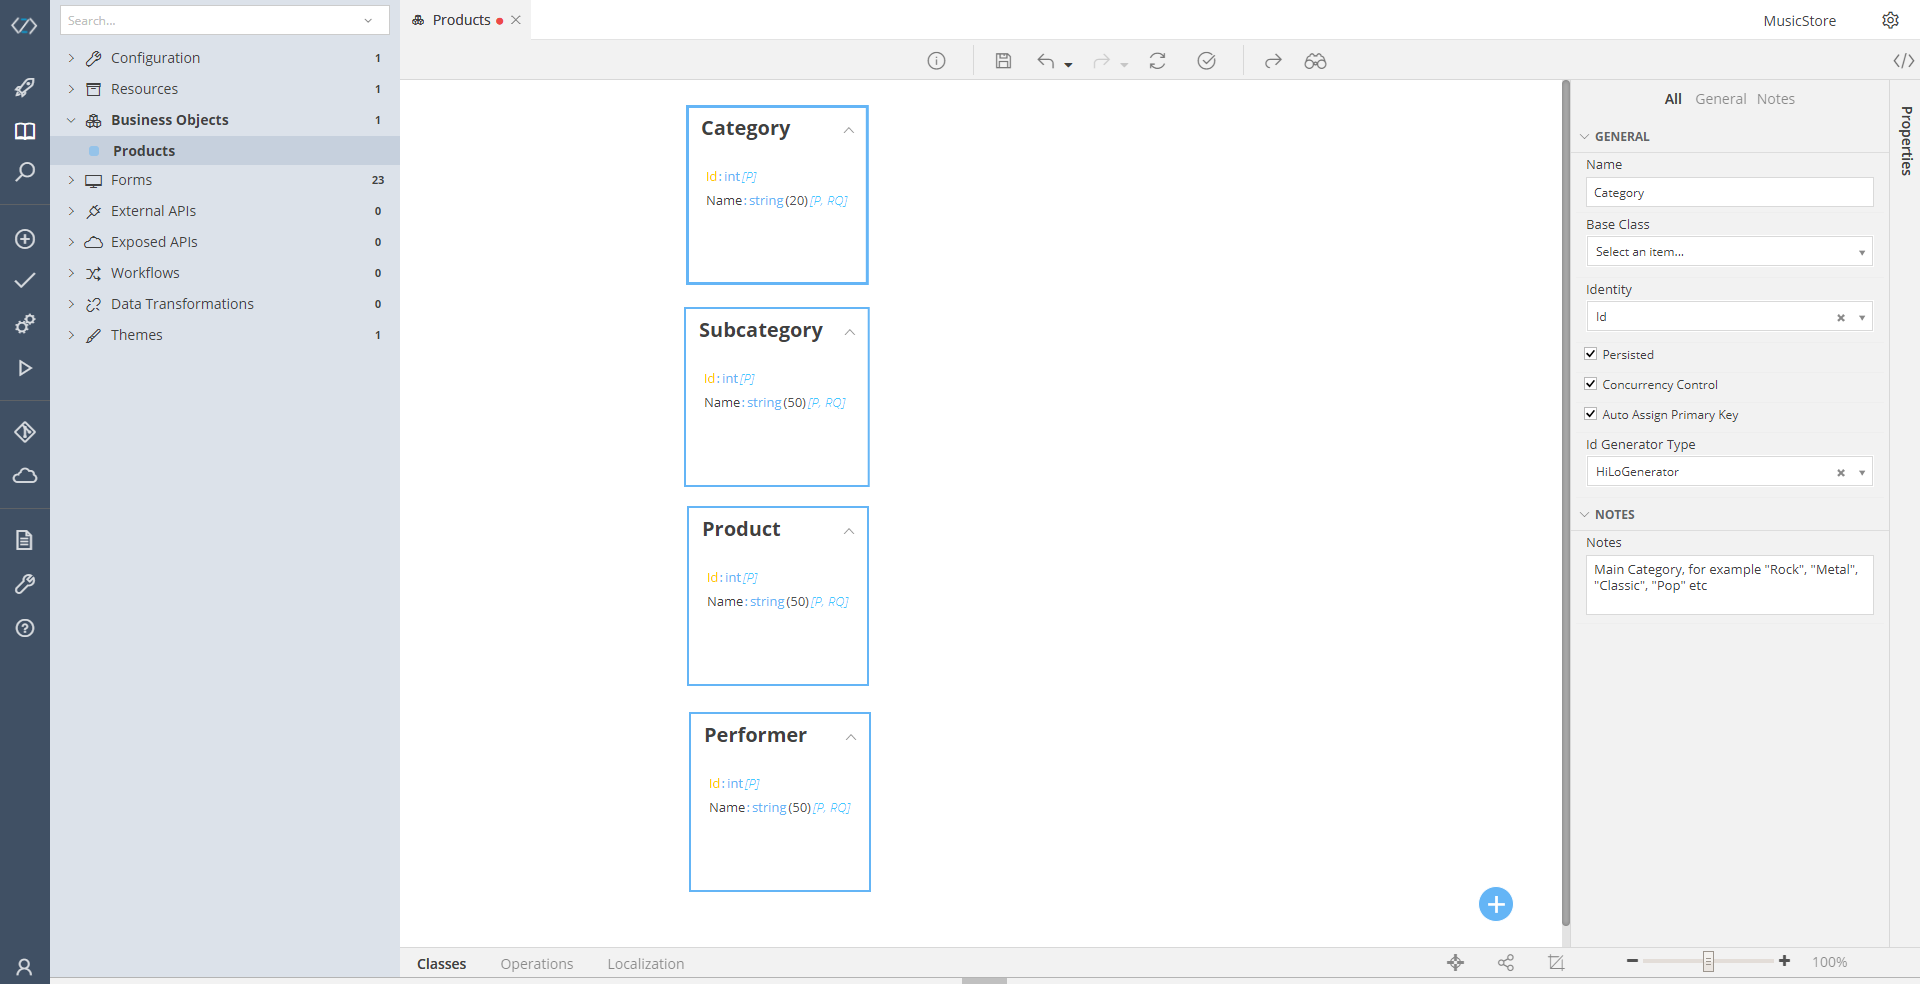
At this point, you should have 4 Classes with 2 Attributes each (Id and Name), looking like this:
Now, let’s add some Attributes to our Product. Add the following Attributes, using the steps described before:
- Description
string: This will be a description of our Product. For example Freddy Mercury's last studio album and best album in the world. Its length will be Unrestricted, whereas all other properties shall be left to their default values. - Price
float: This will be the Price of our Product. - Year
DateTime: This will be the year of our product’s release. - Image
Collection[byte]. Set its length to Unrestricted. This will be the Image of our Product
Enumerations
Finally, we'll add two Enumerations.
Tip
To add an Enumeration, expand the + button and click on the first item on top
You can add values the same way you add attributes to a class.
To add an enumeration, expand the + button and click on the further left icon. Our Enumerations will be:
-
Format, with values:
- Default
- CD
- DVD
- Vinyl
- Cassette
- (anything else you would like)
-
Release, with values:
- Default
- BestSeller
- New
- Future
- WebOffer
- (anything else you would like)
Associations
Now that we have our Business Objects in place, it is time to define their Business Relationships. First, let's create a rule to state that One Category has one or more Subcategories. Each Subcategory has one parent Category.
Todo
- Place your mouse over the Category class, until your cursor becomes a cross
- Click on the Category class and drag a line until you reach the Subcategory class
This will create a new relationship, that by default has a "0..1 to 0..1" multiplicity. To change that:
Todo
- Double click on the green line that connects Category with Subcategory (the one you just created). This will open a pop-up dialogue
- Click on the "0..1" placed next to the Subcategory and select many from the Dropdown menu that will appear
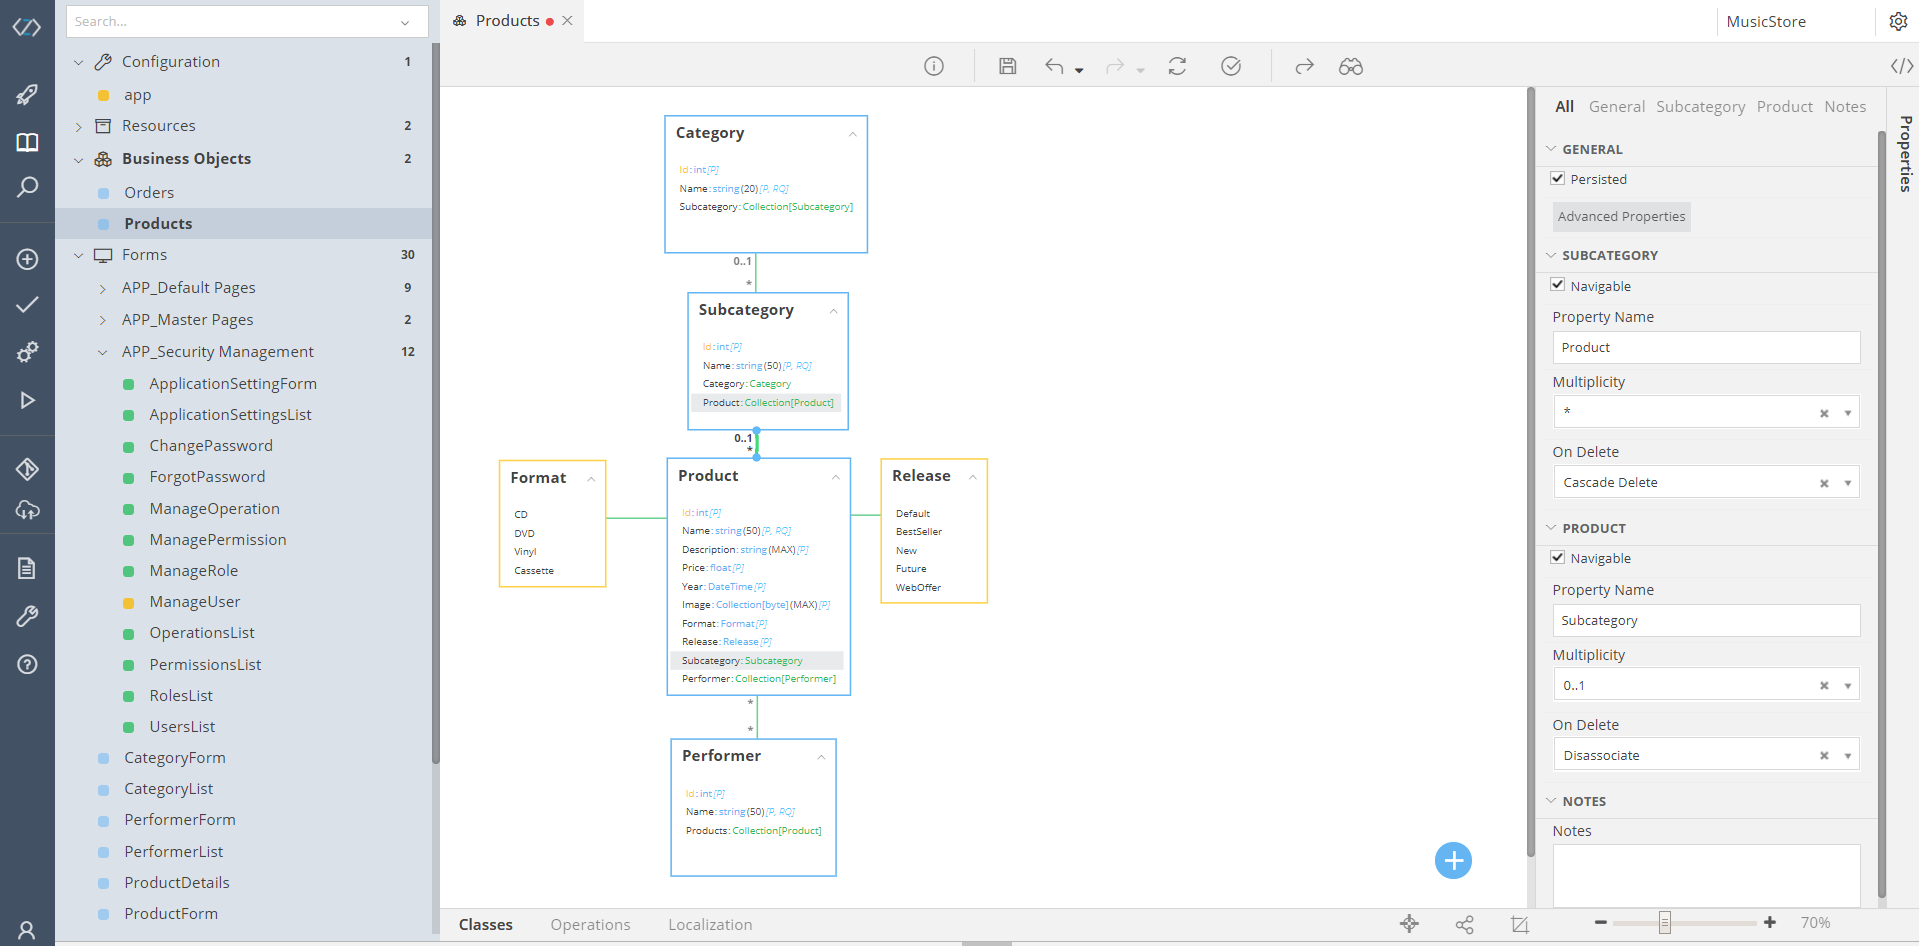
- Check the Navigable attribute inside the Subcategory box. (This will create the relationship we want, as well as make the parent Category appear as an Attribute inside our Subcategory class)
- Go to the Category box and rename the "Subcategory" Attribute to "Subcategories"
Finally, lets create our "On delete" rules. We want the following: whenever a Category is deleted, its Subcategories should be deleted as well.
Todo
- Go to the "On Delete" rule under the Category class
- Select CascadeDelete
- Leave everything else as it is
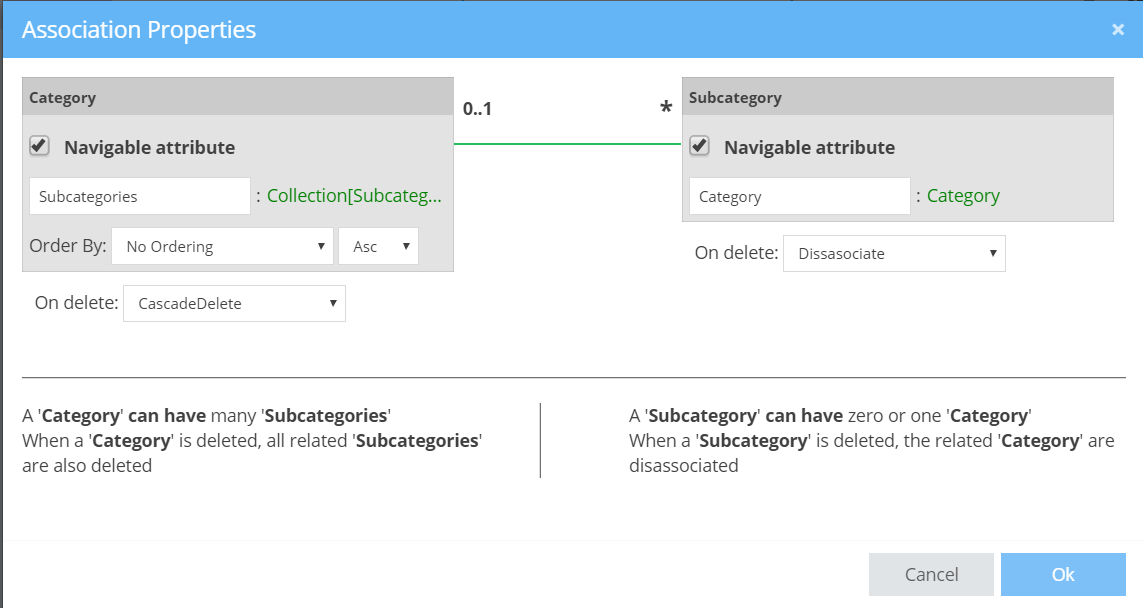
Finally, click on OK to save these new rules. At this point, your two classes should look like this:
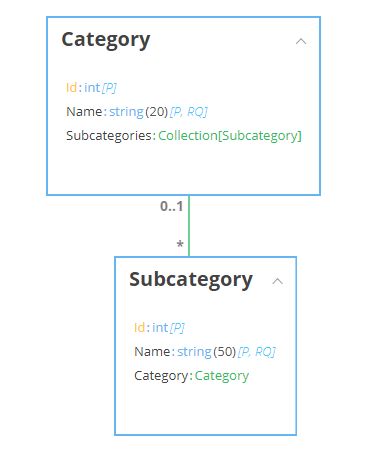
On your own
Now, try to apply the same logic to the Subcategory Products yourself. Our rules will be:
- One Subcategory can have zero or more Products
- Each Product is assigned to maximum 1 Subcategory (hint: same relationship as before)
- When a Subcategory is deleted, the Products will be deleted as well (hint: choose CascadeDelete as your "OnDelete" rule under the Subcategory class)
Now, we will link the Format and the Release to add more searching options to our Product.
Todo
- Add a line to connect the Format Enumeration with the Product.
- Do the same for the Release Enumeration
You will see that you cannot define this relationship further. This is because we are adding a plain Attribute, that has the type or our Enumeration. No "one to more" relationships or deletion rules can be defined here.
After connecting the two Enumerations, you will see two new Attributes under the Product class: Attribute and Attribute_1. Let's rename them to something more meaningful. To rename them, you can either click on their respective name or select them and rename them using the Property panel on your right. So,
Todo
- Rename the "Attribute" (Format) to "Format"
- Rename the "Attribute_1" (Release) to "Release"
Finally, lets link our last Class: the Performer. Here, our Business Logic will state that: A Product might have one performer (singer or band) or more (for example, a Rock compilation might have numerous bands). Obviously, the same performer can appear in none or more Products. This will create a many to many relationship.
Todo
So, go ahead and connect the Product and Performer classes, configuring them as following:
- Select "Many" instead of "0..1" just next to the Product class
- Select "Many" instead of "0..1" just next to the Performer class
- Set the Product class under the Performer as Navigable
- Rename the two created Attributes to "Performers" and "Products" respectively, as they are both Collections containing multiple items
- Leave all other properties to their default values
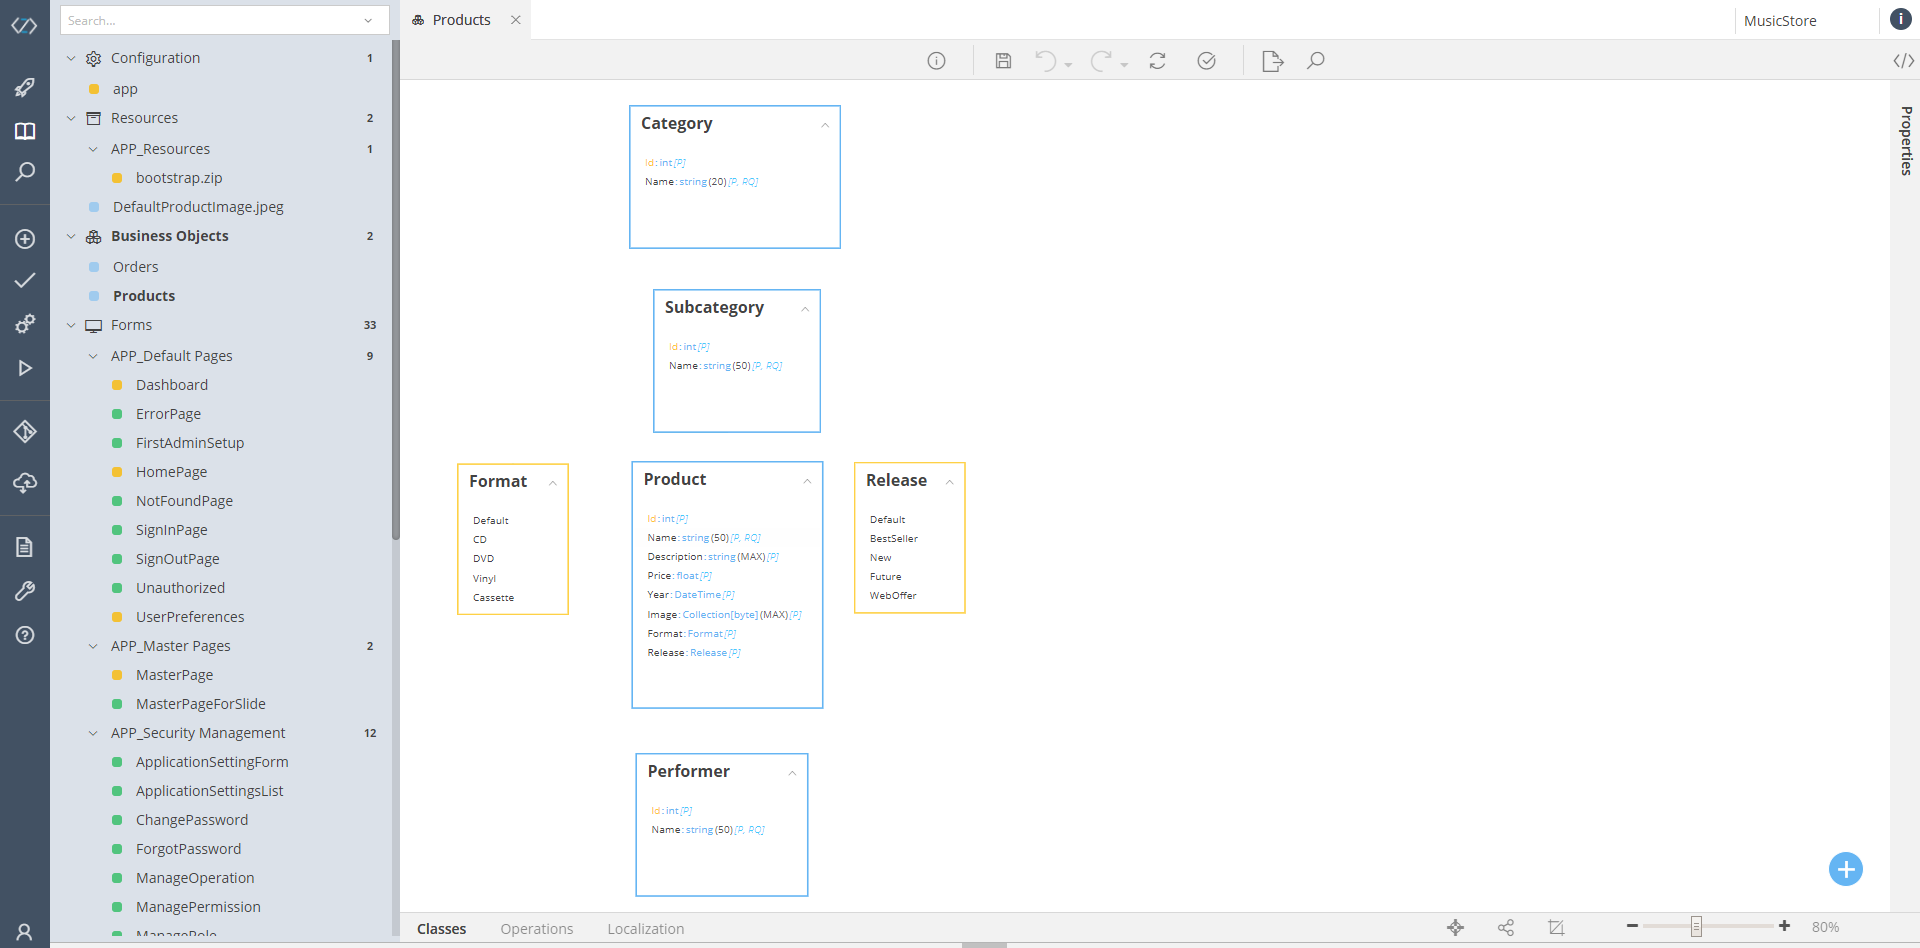
After all there changes, your Business Model should look like this:
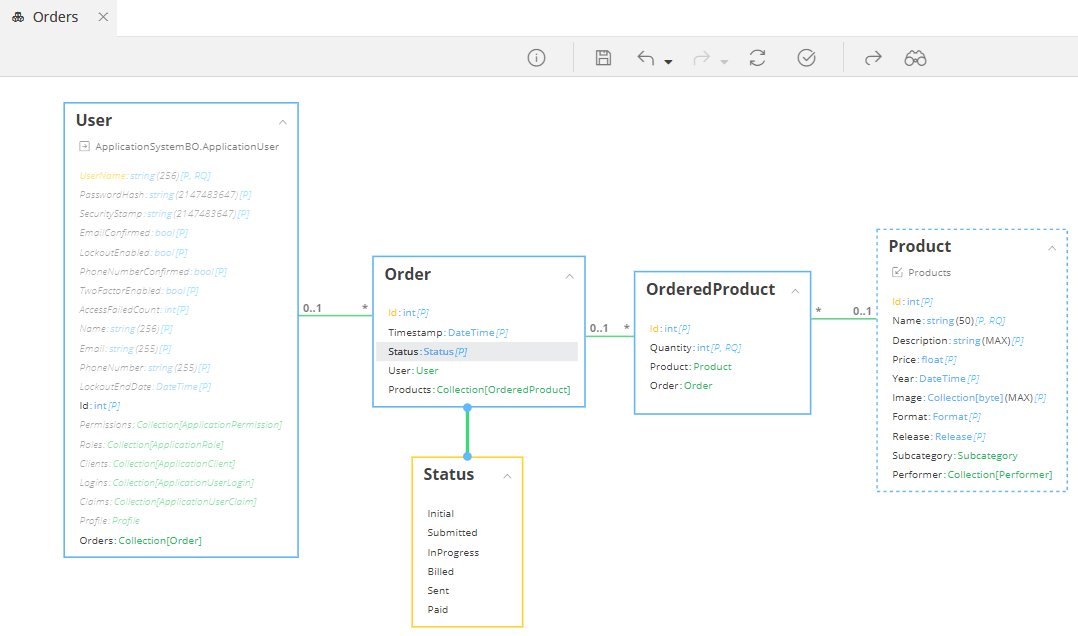
Orders
Inheritance
Create a Business Objects model named Orders. We will use it to create Object that will model our Ordering functionality. So, the "story" we'll model in this section is the following:
- A registered user adds Products to his/her cart and sets their Quantities
- When he/she finishes, the Cart is submitted to the Store
- An employee then changes the Status of the Cart, depending on the pending actions to: In progress, Completed, Sent, Paid.
Note
We will assume that the client pays his/her items upon their receipt, so we will not add the actual Payment functionality into our system.
Since we are creating a Web Application, that has many pre-designed and fully-functional classes, we will use them to model our Users. So, both our Registered Users and our Store Employees will be Users, that inherit all properties of an ApplicationUser (one of the aforementioned pre-defined classes).
Todo
- Create a new Class named User
- Select this class (just click on it) and view its Properties via the Properties Panel (on your right)
- Notice the Base Class dropdown. This is the Class that our User will inherit
- Open the dropdown class and find the ApplicationUser record
- Select the ApplicationUser as your Base Class
As soon as you select said Base Class, you will see your empty User class filled with many Attributes, inherited by the ApplicationUser. And just like that, we now have our own User (a buyer or an employee) that we can use for our Ordering processes.
Todo
-
Next, add an Enumeration named Status with the following values:
- Initial
- Submitted
- InProgress
- Billed
- Sent
- Paid
-
Save the model, so that the changes are applied
- Add a class named Order with the following attributes:
- Timestamp (
DateTime) - Status (
Status) (Notice that the Status attributes will be automatically linked to the enumeration)
- Timestamp (
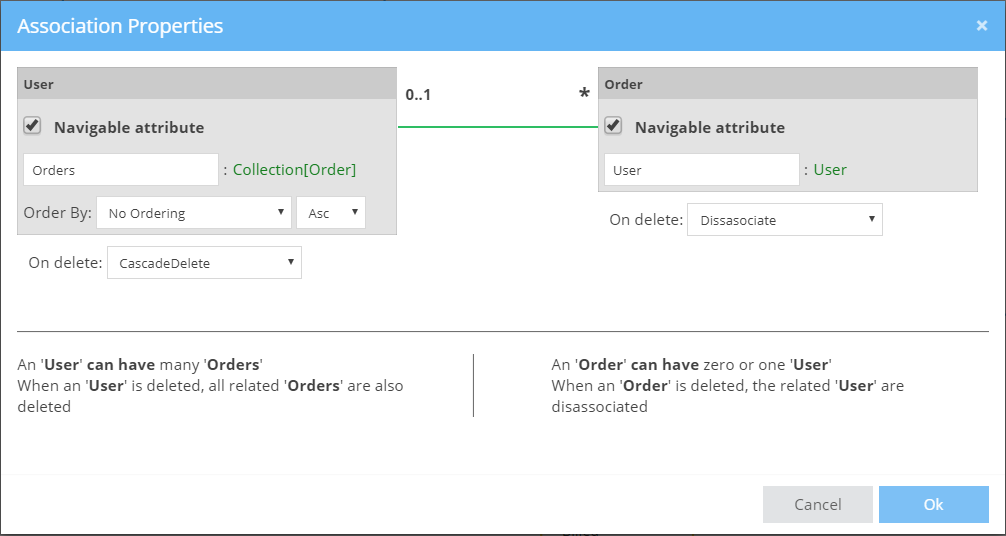
Now, let’s link the User to his/her Order. The Business rule here will be:
- A User might have many Orders
- Each Order belongs to one and only one User
- An Order cannot be deleted, as long as it is not in a Paid status
- When a User is deleted, all his/her Orders are deleted as well
Todo
So, add a relationship between the two classes and configure them like so:
Shadow Classes
Now it's time to bring our Products to the game. Since the Product class resides in a different Model, we will have to add it as a Shadow class in our current Model. So,
Todo
- Expand the
- Select Add Shadow Class.
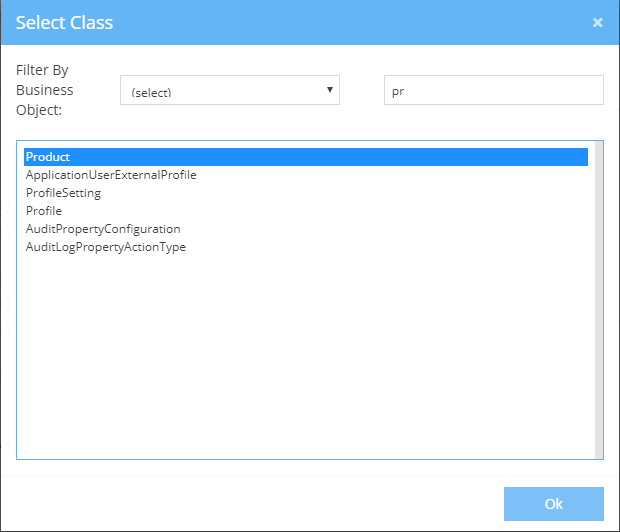
- (This will open a dialog that will allow you to choose the "external" class you wish to see. Here, you can either browser through the list, or use the Search textbox)
- Find the Product class, select it
- Click OK
Next,
Todo
- Add a Class named OrderedProduct
- Add a Quantity attribute, with an Integer (
int) type - Mark the Quantity as Required
- Set
1as its Initial Value
- Add a Quantity attribute, with an Integer (
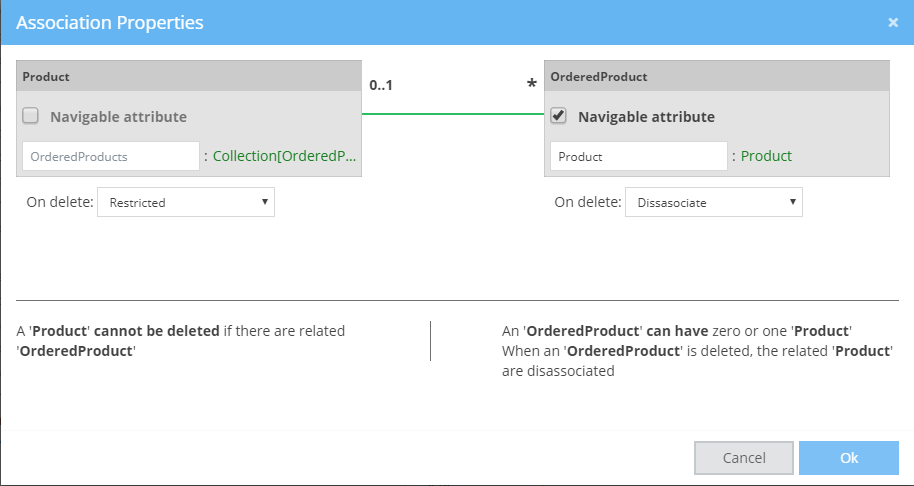
- Next step: associating our OrderedProduct with its related classes.
- Add an Association between the OrderedProduct Class and the Product Shadow Class, like so:
- Add another one, between Order and OrderedProduct, naming the Collection of OrderedProducts Products like this:
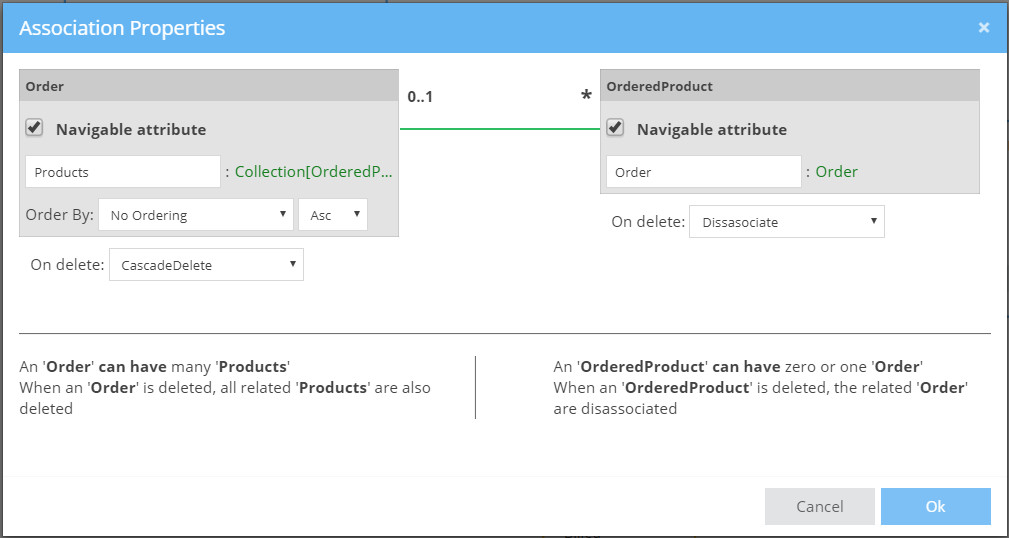
- Add an Association between the OrderedProduct Class and the Product Shadow Class, like so:
So, after all these changes, your Orders Business Model should look like this:
Operations
At this point, all our Business Objects and their relationship are defined and ready to go. Or are they?
Instance Operation
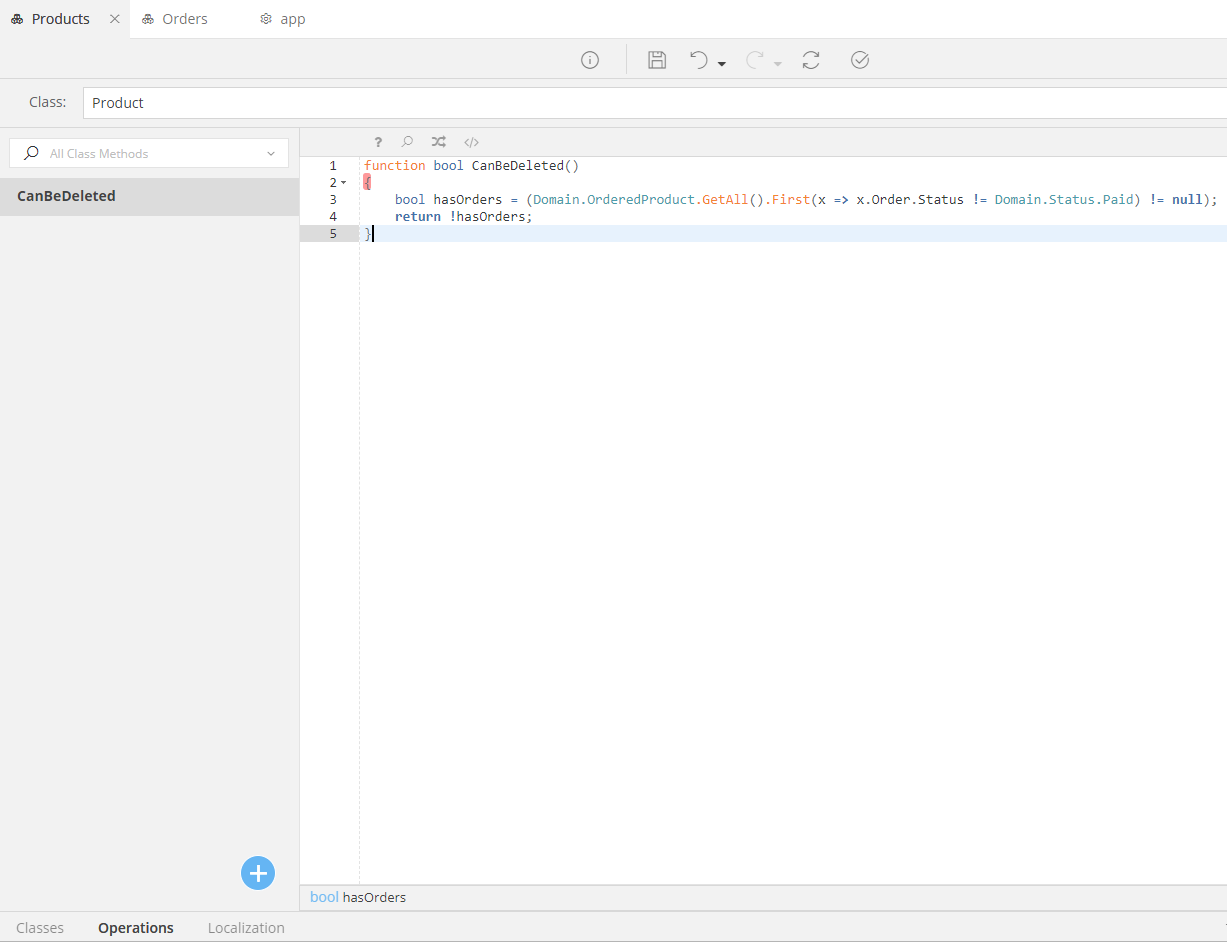
Remember that previously we wanted to prohibit the deletion of a Product if it appears in un-paid Orders? Well, now it's time to add this rule. To do that, we will create an Operation under the Product class:
Todo
- Open the Products Business Objects Model
- Select the Product Class
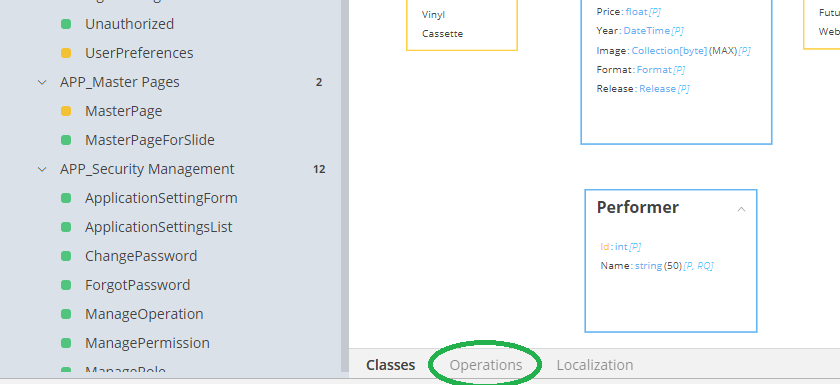
- Open the Operations tab located at the bottom of the model
- Click on the button you will see, to add a new Operation
- Change the name of the NewOperation to "CanBeDeleted"
- Change the return type of the operation to
bool, instead ofvoid -
Place the following Mamba Code as the Operation's Body
bool hasOrders = ( Domain.OrderedProduct.GetAll().First(x => x.Order.Status != Domain.Status.Paid) != null); return !hasOrders; -
Check that you have a new Operation that looks like this:
Static Operation
Now, later on you will see that we will need a way to get the "current" Order of the logged-in Customer, so as to always know what his/her Cart holds. To do that, we will add a Static Operation into our Order class, like so:
Todo
- Open the Orders Business Object Model
- Select the Order Class
- Open the Operations tab located at the bottom of the model
- Click on the button you will see, to add a new Operation
- Change name of the NewOperation to "GetOngoingOrder"
- Change the return type of the operation to
Domain.Order, instead ofvoid - Set the Operation as static, by adding the word
staticjust before thefunctionkeyword - Add
bool createIfNotExistsas input to the operation (just add it inside ( ) after the operation's name) -
Place the following Mamba Code as the Operation's Body
Domain.Order ongoingOrder = Domain.Order.GetAll().First(x => x.Status == Domain.Status.Initial && x.User.Email == AppLib.Session.GetCurrentUser().Email); if(createIfNotExists && ongoingOrder == null){ ongoingOrder = Domain.Order.Create(); ongoingOrder.Status = Domain.Status.Initial; var email = AppLib.Session.GetCurrentUser().Email; var user = Domain.User.Find(x => x.Email == email).First(); if(user == null){ throw BusinessException.Create("User ["+email+"] not found! Cannot instantiate a new Order."); } ongoingOrder.User = user; } return ongoingOrder; -
Check that you have a new Operation that looks like this:

At this point, our Business Models are more-or-less ready. Next step: defining Permissions and Roles.
Roles & Permissions
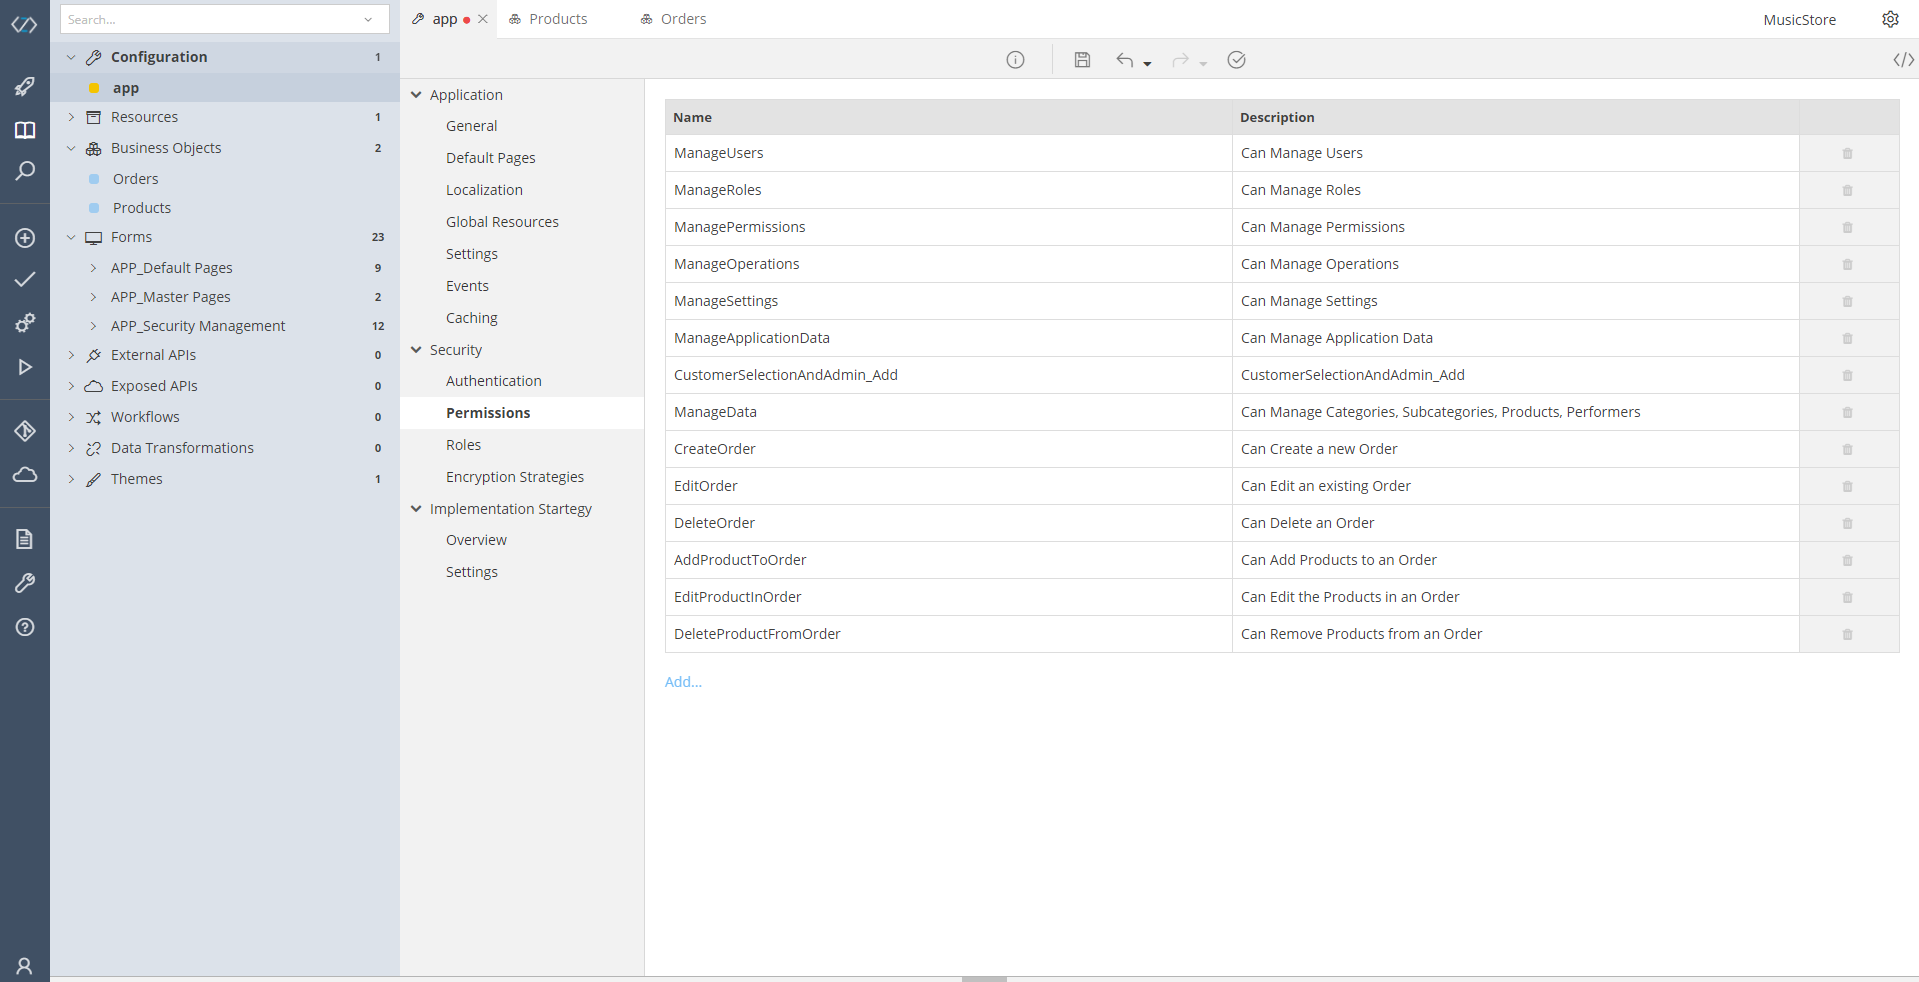
Permissions
Todo
- Go to the Configuration of your Application
- Find the Security options
- Open the Permissions tab (Configuration → app → Security → Permissions)
You will see some Permissions have already been set for you, concerning the pre-designed classes that where added when you selected the "Web Application" Template. Leave them be, and add the following ones, by clicking on the "Add..." link at the left bottom side of the table:
| Name | Description |
|---|---|
| ManageData | Can Manage Categories, Subcategories, Products, Performers |
| CreateOrder | Can Create a new Order |
| EditOrder | Can Edit an existing Order |
| DeleteOrder | Can Delete an Order |
| AddProductToOrder | Can Add Products to an Order |
| EditProductInOrder | Can Edit the Products in an Order |
| DeleteProductFromOrder | Can Remove Products from an Order |
When you finish entering these Permissions, you should have a page looking like this:
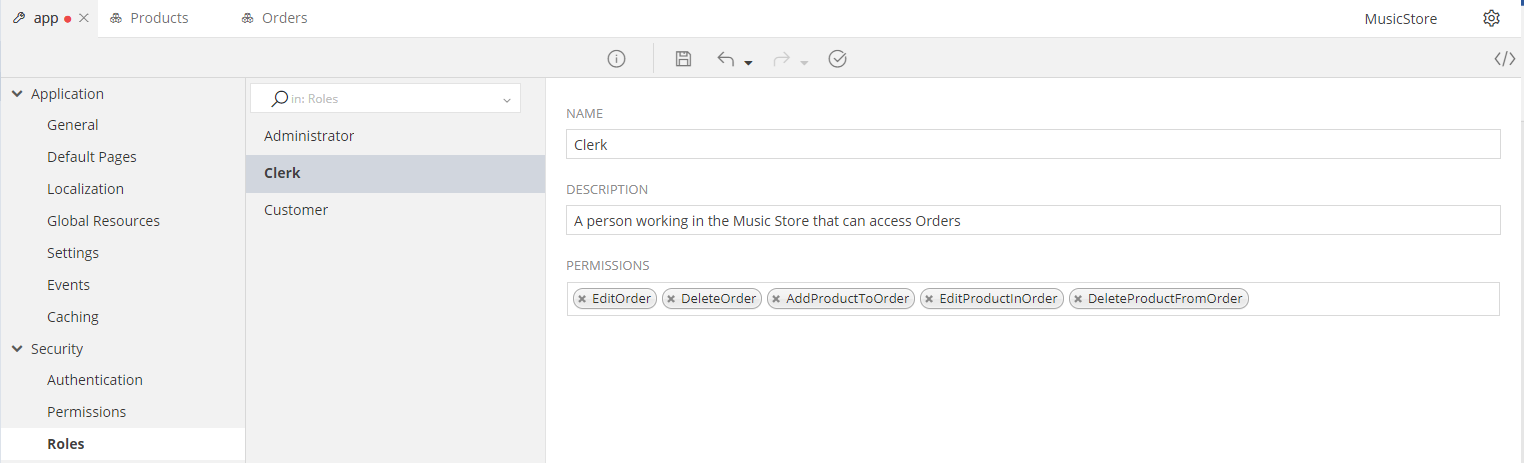
Roles
Next, open the Roles tab, right under your current Permissions tab (or navigate to it like so: Configuration → app → Security → Roles). You can add Roles by using the blue + button located in the middle of the page.
You will see that the Administrator role has already been added. So,
Todo
Add two more roles:
- Clerk
- Description: A person working in the Music Store that can access Orders
- Customer
- Description: A Registered User that can buy our Products
Roles with Permissions
Now its time to assign the Permissions we created to each role:
Todo
-
Administrator
- He will have all the permissions. So, leave the ones that have already been assigned to this role and add all of the rest by clicking anywhere on the Permissions selection area and selecting the permission to add. After adding all of our Permissions to the Administrator, you should have something like this:
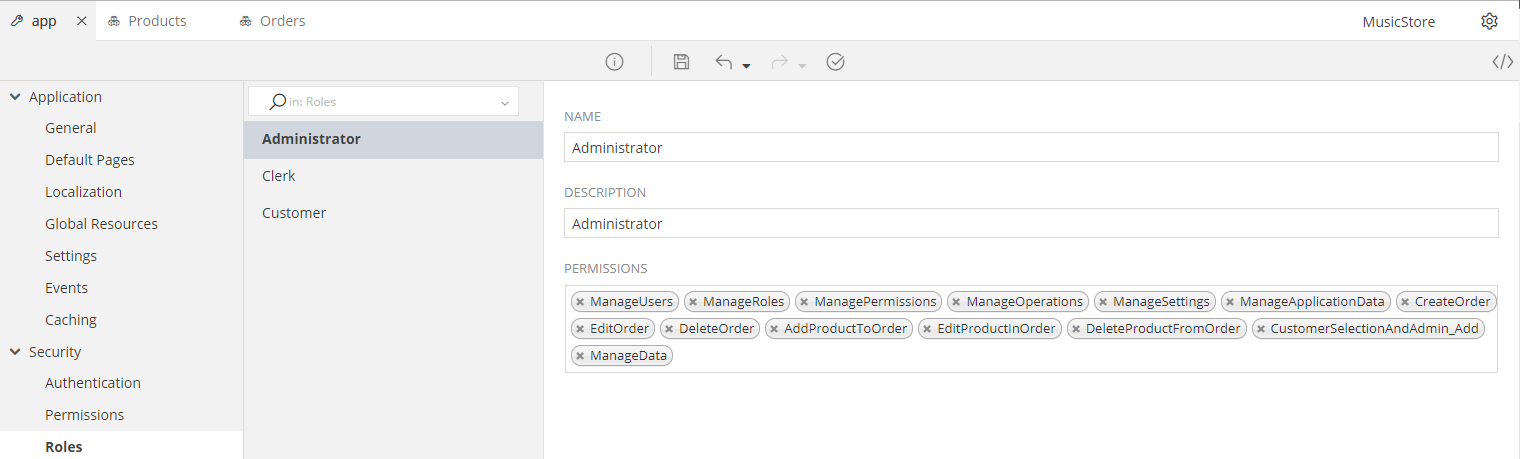
- He will have all the permissions. So, leave the ones that have already been assigned to this role and add all of the rest by clicking anywhere on the Permissions selection area and selecting the permission to add. After adding all of our Permissions to the Administrator, you should have something like this:
-
Now, select the Clerk role and add the following Permissions:
- EditOrder
- DeleteOrder
- AddProductToOrder
- EditProductInOrder
- DeleteProductFromOrder
This way, a Clerk will be able to edit an existing order, however he/she will not be able to create a new one or alter any of the Store’s information
Finally, our Customer shall be able to:
- CreateOrder
- EditOrder
- AddProductToOrder
- EditProductInOrder
- DeleteProductFromOrder

Of course, once the Order is submitted, anything other than the CreateOrder will not be possible (we do not want our Customers to edit orders that we are already working on!). This logic, however, will be implemented in our Controllers and Validations, rather than at a Role/Permission level.
Forms
In this section, we will create all the required Forms that will display our Business Objects.
Automatic Creation
Let’s start with the Administrative forms – the ones that manage the Categories, Subcategories, Products and Performers.
These forms will be available for only those users that have the Administrator role. In addition, they will have a Master-Detail type, allowing the Administrator to View All Products and then open each Product’s Detail to edit it.
zAppDev has many predefined Templates that cover almost any View you would ever need. For our Master-Detail view, we will use zAppDev’s Data Entry and List Form. So let’s create our Categories form, first. To create it, use the following steps:
Todo
- Click on the circled + at the left side menu of zAppDev (or click Ctrl+Insert).
- You will see a Dialog titled Add New Model
- Browse through various Models and find Form
- You will see a dialogue that will help you generate such a Model for any Business Object you would like
- Select under Templates Data Entry and List Form
- Select the Category class under the CLASS drop down box.
- Uncheck the Create Simple List checkbox
- Check the Create Advanced List checkbox
- Leave all other fields to their default values and press Add
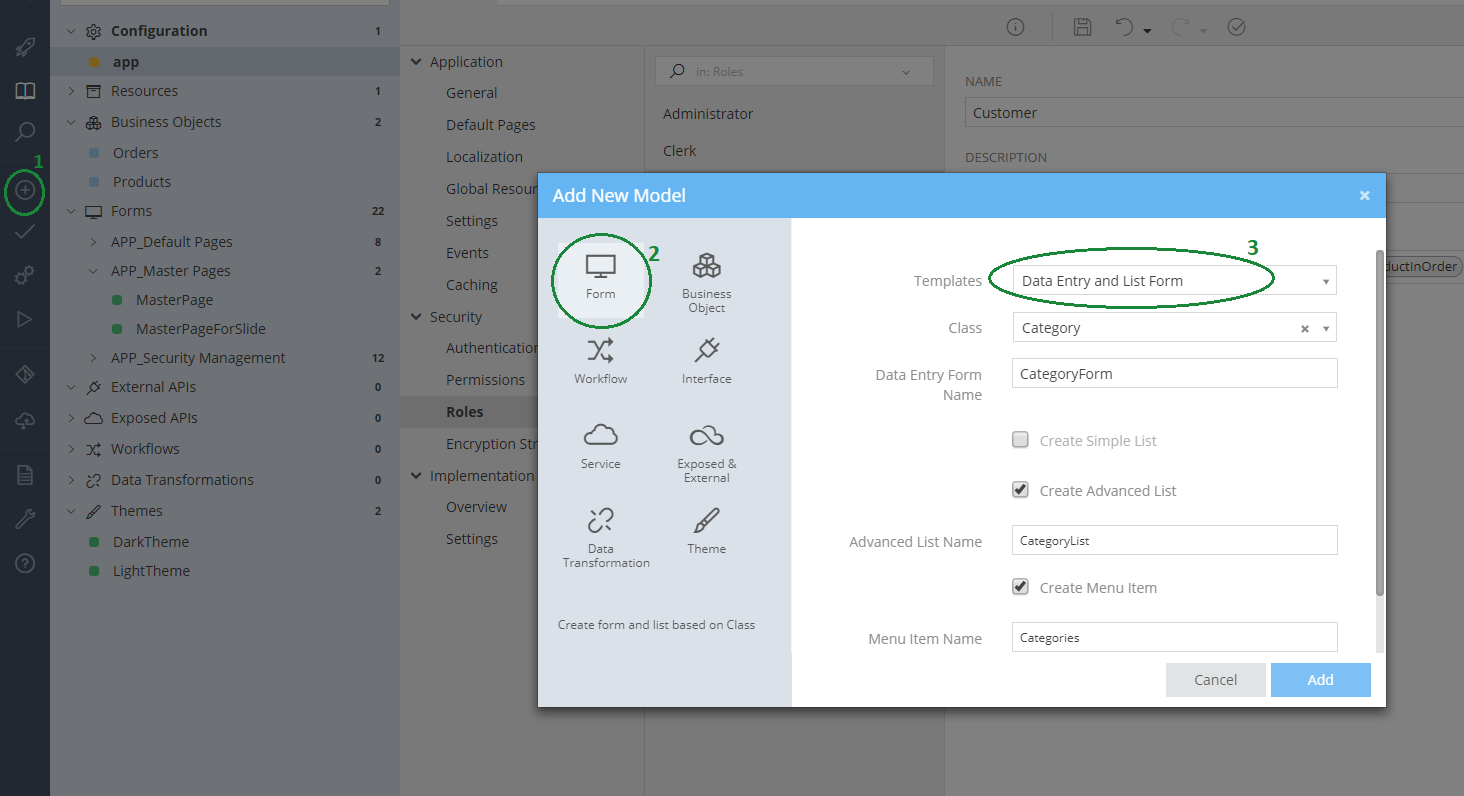
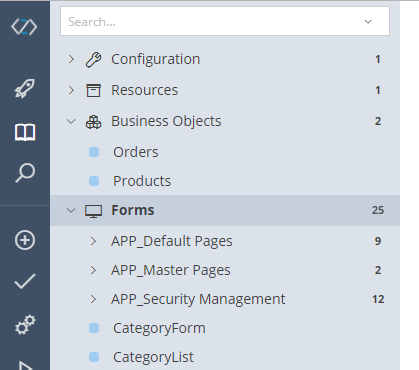
You should now see a confirmation dialog stating that zAppDev has created two Models for you:
- CategoryForm (this is the Detailed view)
- CategoryList (this is the Master view) So now, if you open your Forms, you will see these two Models added, like so:
Next step: allowing the use of these new Forms to only those that have the specific permissions. To do that, follow these steps:
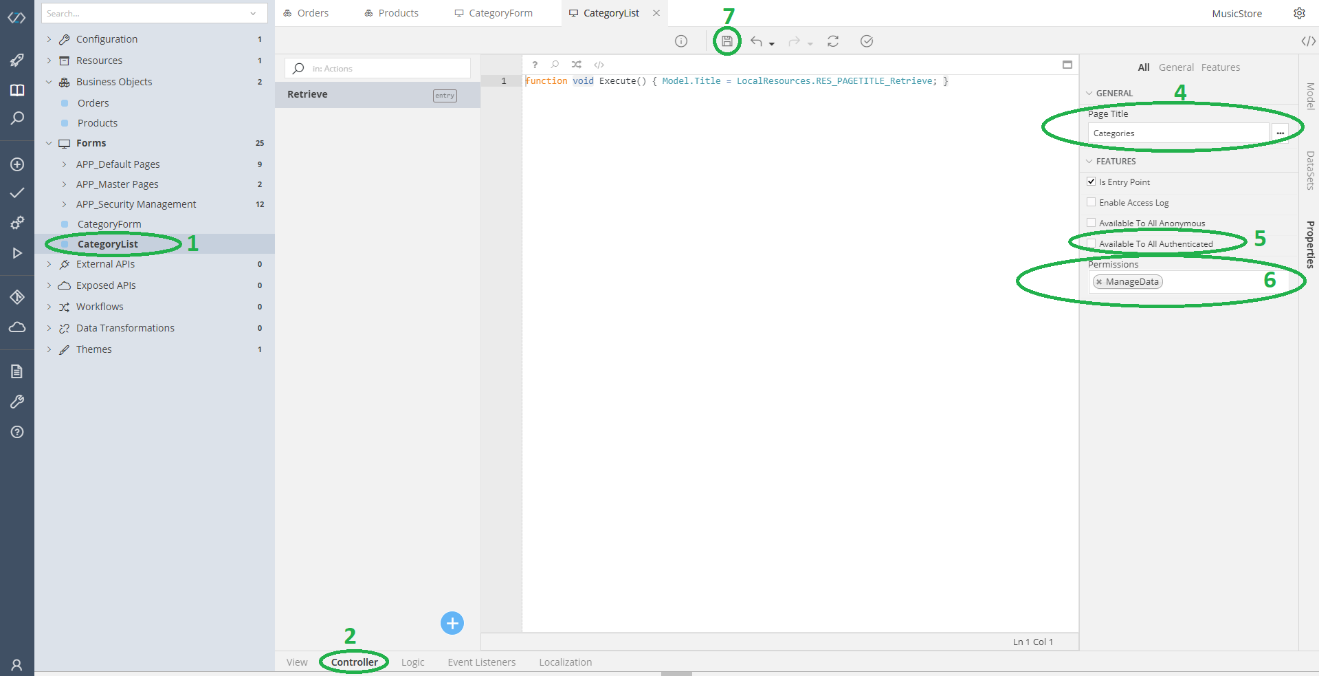
Todo
- Open the CategoryList form
- Open its Controller panel
- You will see only one controller action, named Retrieve
- Take a look at this Action’s properties
- Rename the Page Title to Categories
- Uncheck the Available To All Authenticated checkbox
- Now a Permissions selector has appeared. Select ManageData
- Save your Model
On your own
Repeat the same steps for the CategoryForm and all of its Controller Actions (here, you can leave the Page Title of each Action unchanged, as it is pretty informative):
- AddCategory
- EditCategory
- SaveCategory
- DeleteCategory
Finally, repeat all of the above for the following Business Objects:
- Performer
- Product
At this point, with very few steps, you have 6 set up, ready, fully functional and secure forms that your Administrator can use to fill his/her database.
Correcting the ManageUser Form
If you remember, when we were designing our Business Objects, we created a class named User that inherits the ApplicationUser. Now, since we created a new Templated Web Application, many forms have been generated for us. One of them is the ManageUsers that now uses the ApplicationUser class. We need it to use our new User Class. Since it's already inheriting the ApplicationUser, the corrections will be pretty easy. Let's do them.
First step: Locating the generated ManageUsers form. To do that:
Todo
- Either type "ManageUsers" into the Search field on top of the Models Tree or just
- Go to your Models Tree, find the App_Security Management folder and locate the ManageUsers Form Model
Model
The first thing we're gonna do, is change the Model. Open the View panel, if not already open, and check the Model on your right, you will see that is has an attribute like this: ApplicationUser : ApplicationUser.
We will change its type to User. So,
Todo
- Click on attribute's
ApplicationUser : ApplicationUsertype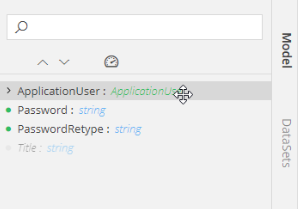
- See a Dropdown that appears, containing all available classes to use
- Select the User class

Controller
Next, we will change the Controller, so that it uses the new User Class, instead of the old ApplicationUser one. Thankfully, since we changed the Model, all we have to do is just change the place where a new user is created: the NewUser Action. Thus:
Todo
- Open the NewUser Action
- Find the line that writes:
Model.ApplicationUser = Domain.ApplicationUser.Create(); - And just change it to:
Model.ApplicationUser = Domain.User.Create();
And that's it! Now you can freely use the ManageUser form to manage your own User classes!
Refining the ProductForm
Now, although zAppDev generated functional forms for us, we might want to redesign them a little bit. So, open your ProductForm and see that it looks like this:
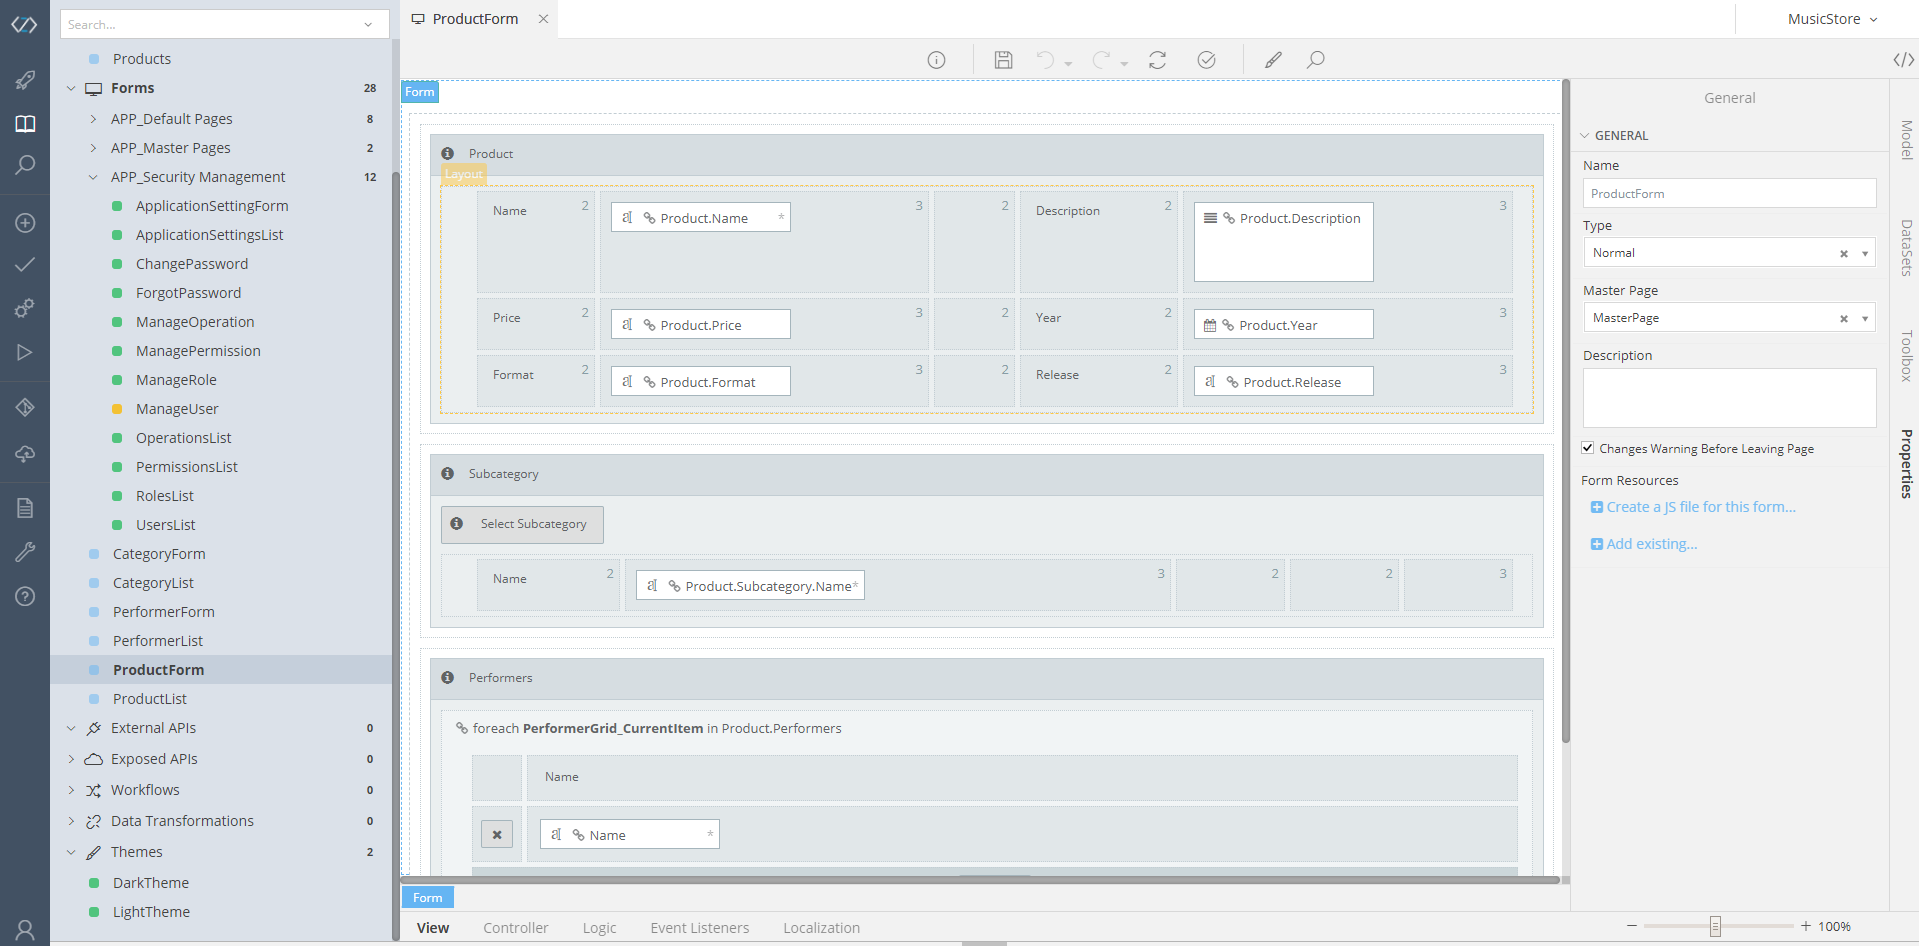
As you might notice, our Enumerations (Format and Release) are plain Textboxes, our Subcategory (one, per Product) is displayed as a Table and our Performer is also an editable Table. So, lets change this form to make things a bit friendlier.
Datasets for Enumerations & Dropdowns
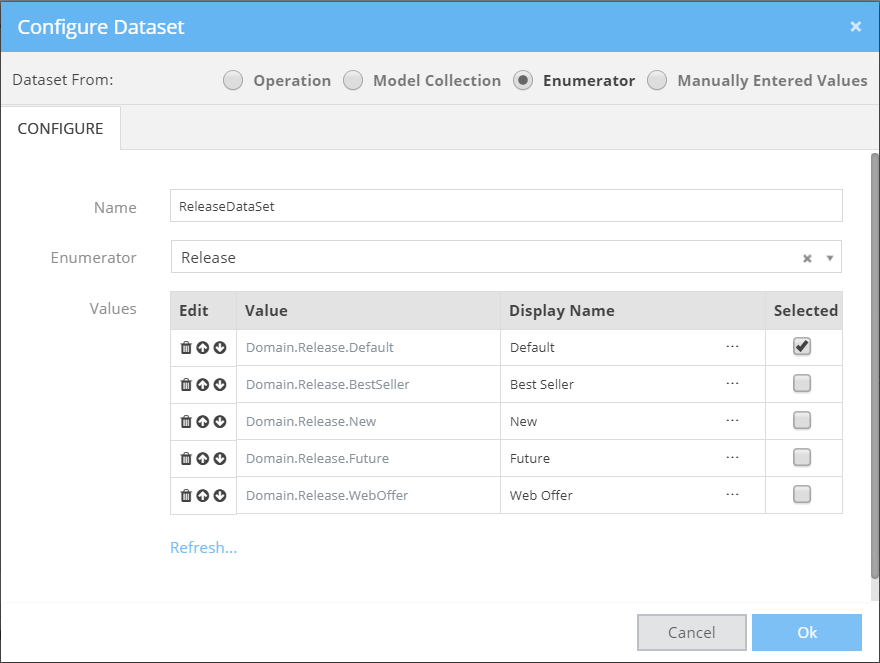
First of all, lets change those Format and Release Textboxes into Dropdowns. To do that, we will need to create two Datasets. Lets start with the Format:
Todo
- Open the DataSets Panel
- Expand + to add a new Enumerator Dataset and select the From Enumerator option.
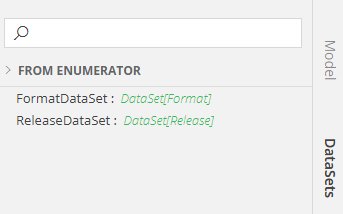
- In the opened Dialog, name the new Dataset FormatDataSet
- Go to the Enumerator Drop Down and select Format
- When the Grid is filled with the correct values, check the Selected checkbox at the CD row
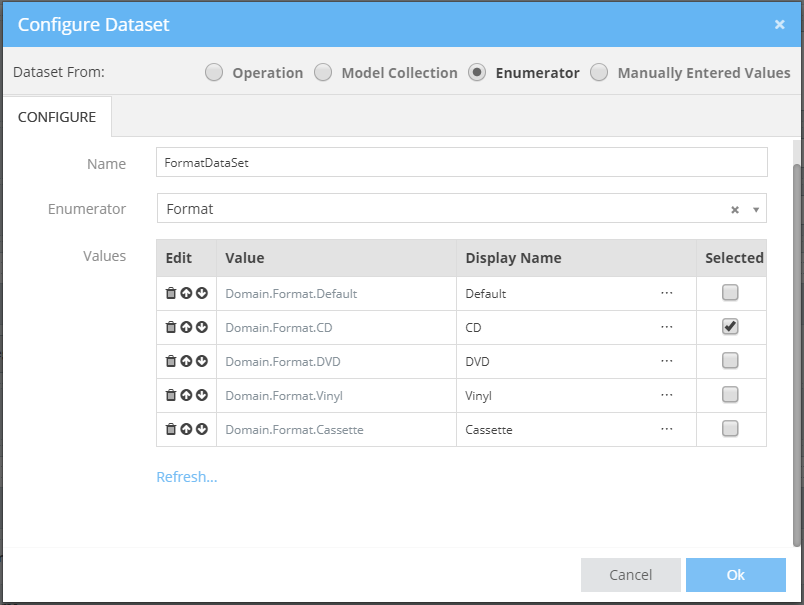
- Click on "OK" to save your new Dataset
On your own
Repeat the same steps to create a "ReleaseDataSet" for your Release Enumeration. The pre-selected value of our "ReleaseDataSet" will be the "Default"
Hint:
So, now that you have the two Datasets, it is time to throw them onto our Form. Again, we will start with the Format. So, the easiest way to add a DataSet onto our form, is to simple drag and drop it. Thus,
Todo
- Grab the FormatDataSet from the DataSets panel
- Drag it all the way to your Form, right next to the Product.Format Textbox
- As soon as you release your mouse, you will see a new Drop Down created for you.
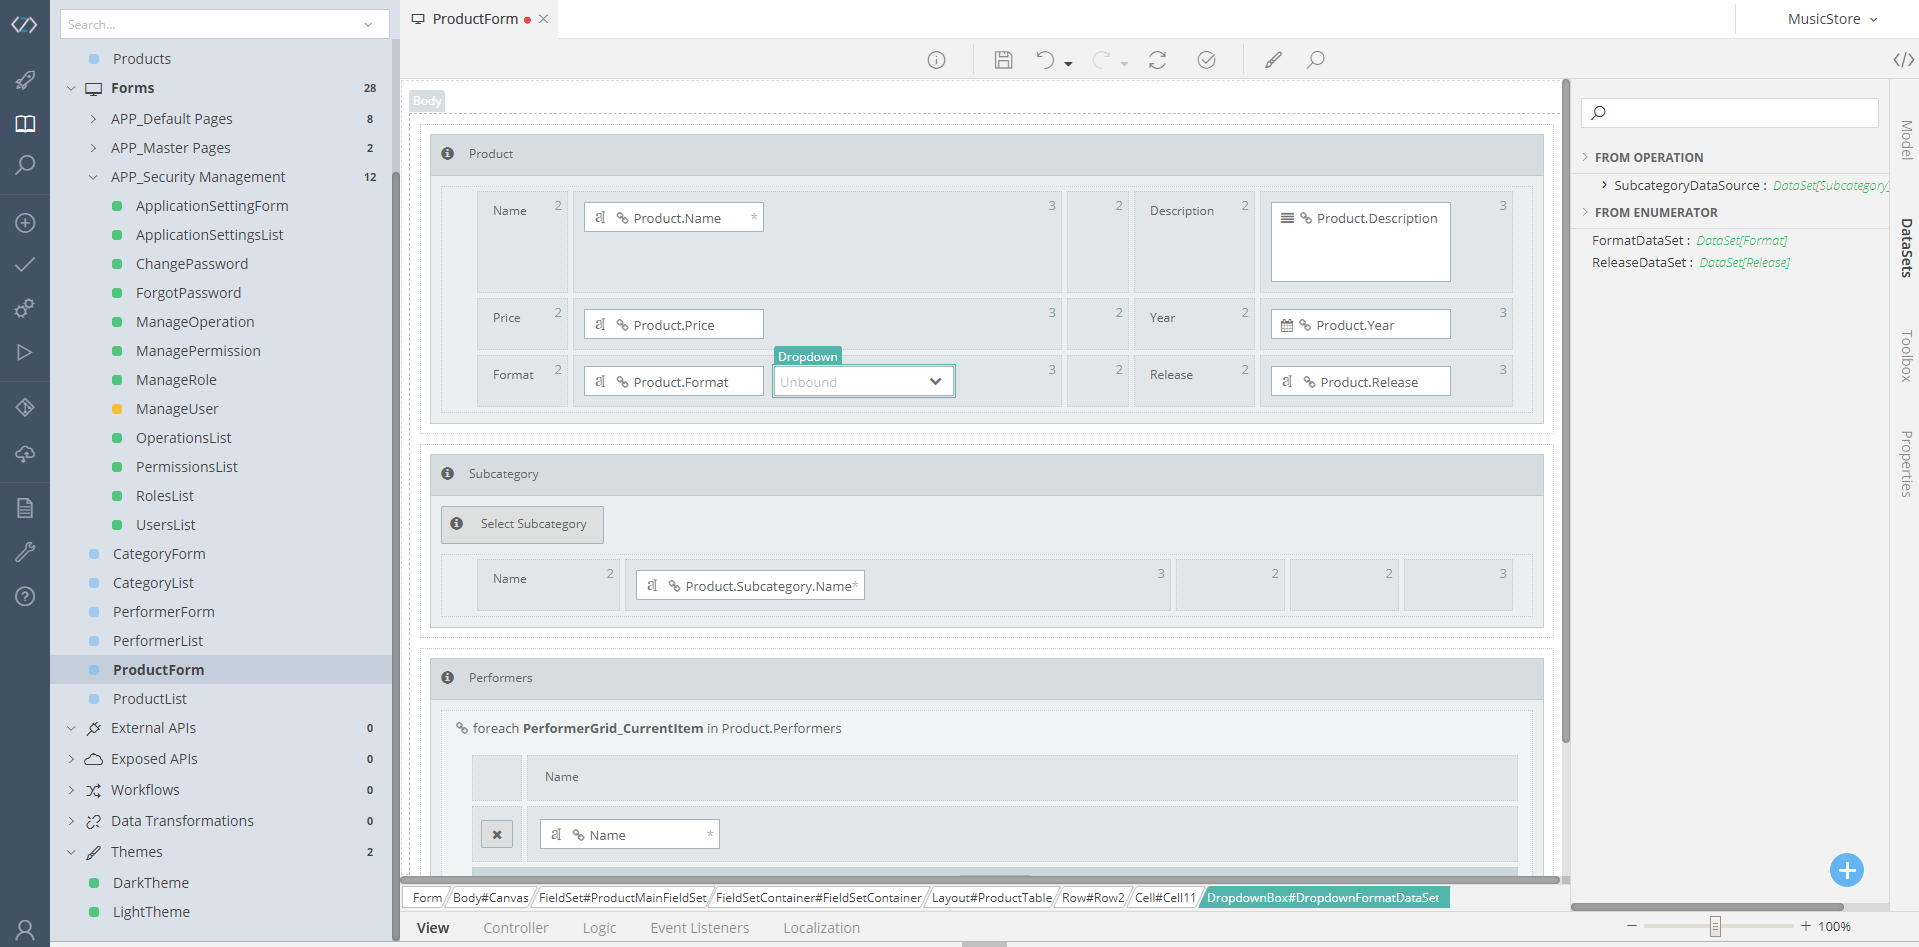
- Next, select the newly created Dropdown component and open its Properties. Find the Model Binding property and bind it to the Format attribute of your Product.
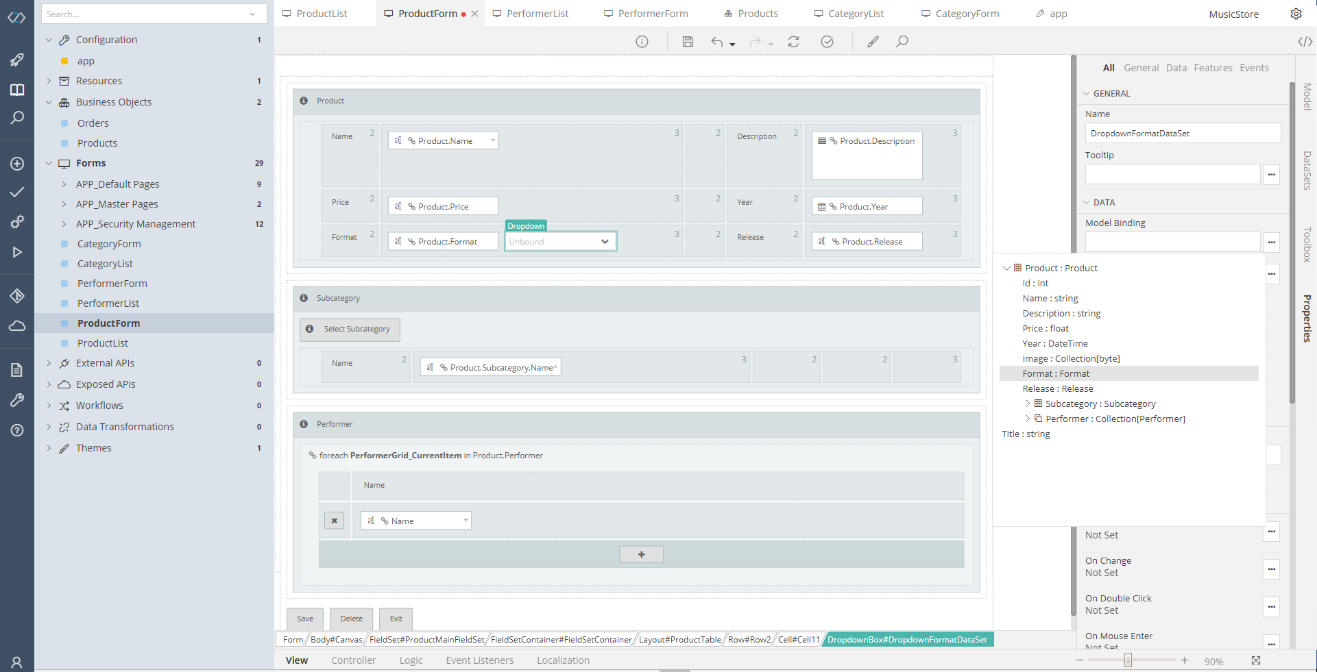
- Now, freely delete the Product.Format Textbox you had earlier and repeat the same steps for the Product.Release field, created as a dropdown from the ReleaseDataSet.
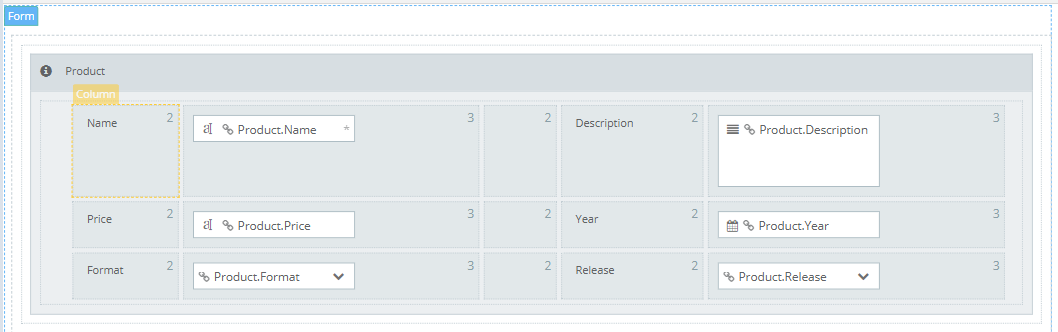
In the end, that part of your Form should look like this:
Formatting the Fields
Now, lets change some formats, shall we? Follow the steps described:
Todo
- Select the Product.Price textbox
- View its Properties
- Find the Required property and check its checkbox
- Find the Mask String property and set it to currency
In addition,
Todo
- Select the Product.Year textbox
- View its Properties
- Find the Required property and check it
- Uncheck the Include Time Picker
- Check the Allow Typing
- Select 2016 under the Date Format
After these steps, your Price will be formatted as a double-precision dollar price, whereas your Year Picker will show only the Year part of the selected Date.
Manual Dropdowns
Now, let’s do something about the Subcategory. Here, we will remove the table presenting the selected Subcategory as well as the Picklist, and present the data inside a Drop Down. So, follow my lead:
Todo
- Delete everything having to do with the Subcategory: the Subcategory table, its layout, the Picklist, the Panel
- Find the SubcategoryDataSource inside your DataSets panel
- Drag and drop the SubcategoryDataSource onto your Form and select Drop Down as its control
- Open the Properties of the new Drop Down control and click on the Display & Value Options
- Select Name as the Display Member
- Leave $Value as the Value Member
- Click Ok to close the Display & Value Options dialog
- Select Product.Subcategory as the Model Binding of this Drop Down
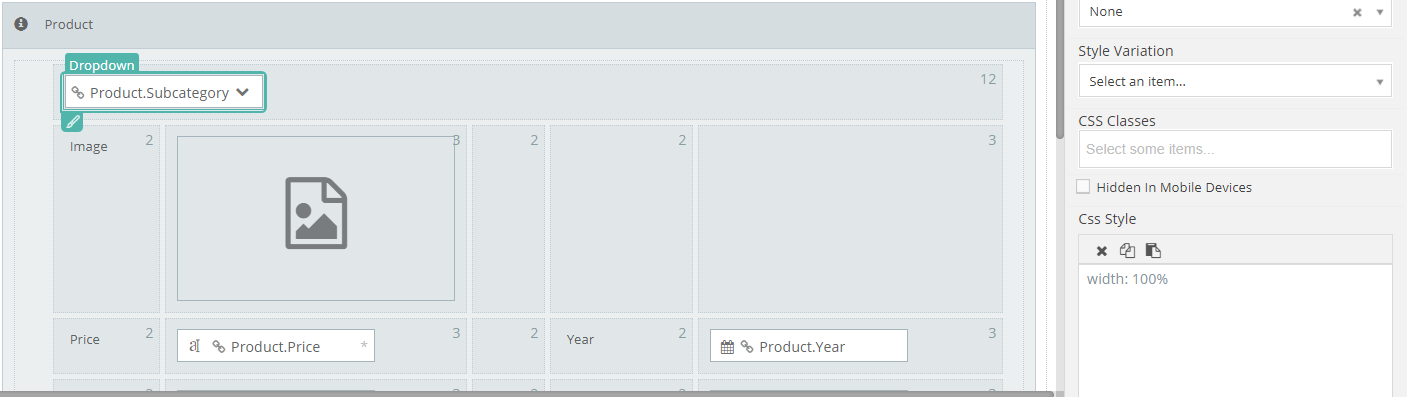
Images & Re-Styling
Go back to the Form’s View panel and add another Row inside the Product’s Panel. Place an ImageBox (Image Control) in a cell and configure it like so:
Todo
- Set its Type to Bound
- Set its Binding Type to DataBaseBinary
- Set its model Binding to Product.Image
- Sets its Height to 250
- Check the Show Full Scale Image on Click
Finally, lets move the Select Subcategory Drop Down onto a better place:
Todo
- Add another Row inside the Product Panel
- Delete all of its Columns, except for one
- Set the Columns value of your last column to 12
- Drag and drop the Select Subcategory Drop Down inside this new Row
- Set its Css Style to width: 100%;
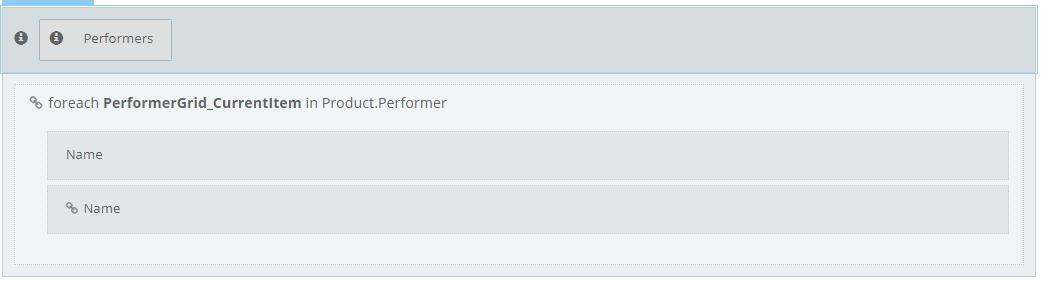
Picklists
Now, we will change the Performer settings. You will see that the Performers are added in a Grid. This means, however, that we will have to Enter a Performer’s name every time we create a new Product. And we will have to either write a don’t add the Performer if he/she already exists logic, or allow duplicates. So, lets avoid all this conundrum and just add one more picklist:
Todo
- Add a new DataSet created from an Operation
- Set its Class to Performer
- Click Ok
- Drag the new PerformerDataSet created onto the Performers panel (preferably on its header) and set it as a Data Picklist
- Select the Picklist
- Check the Allow multiple selection
- Set its Model Binding to Product.Performers
- Select the table we are changing (PerformerGrid)
- Uncheck the Add Row Allowed
- Uncheck the Delete Row Allowed
- Uncheck the Show Delete Warning
- Select the Name textbox placed inside the PerformerGrid Grid
- Right-click on it and select Change To → Label
- Change the Picklist’s Caption to Performers
- Delete the Performers Label (no need to Repeat it)
Calculated Expression (for Selected Performers)
First, lets add some controls we'll need:
Todo
- Find the Performers Picklist
- Add a new Label and name it "SelectedPerformersLabel"
We will use this Label to create a new Calculated Expression that will show us the number of selected Performers for this Product. To do that, follow the steps described:
Todo
- Open the Logic panel
- Add a new Calculated Expression by expanding the + button and selecting the first item on the top
- Name the new Expression as SelectedPerformersCalculatedExpression
- Set the body of the CalculatedExpression() function to:
int selectedPerformers = Model.Product.Performers.Length; if (selectedPerformers == 0) { return "(None Selected)"; } else { return "("+selectedPerformers+" Performer(s) Selected)"; } - Go to the APPLY TO section and click on the + button to add a Control to the Expression
- In the new Select Controls dialog that will open, find the new Label (SelectedPerformersLabel) we just added and click on it. You should see it appearing on the list at the left side of the dialog
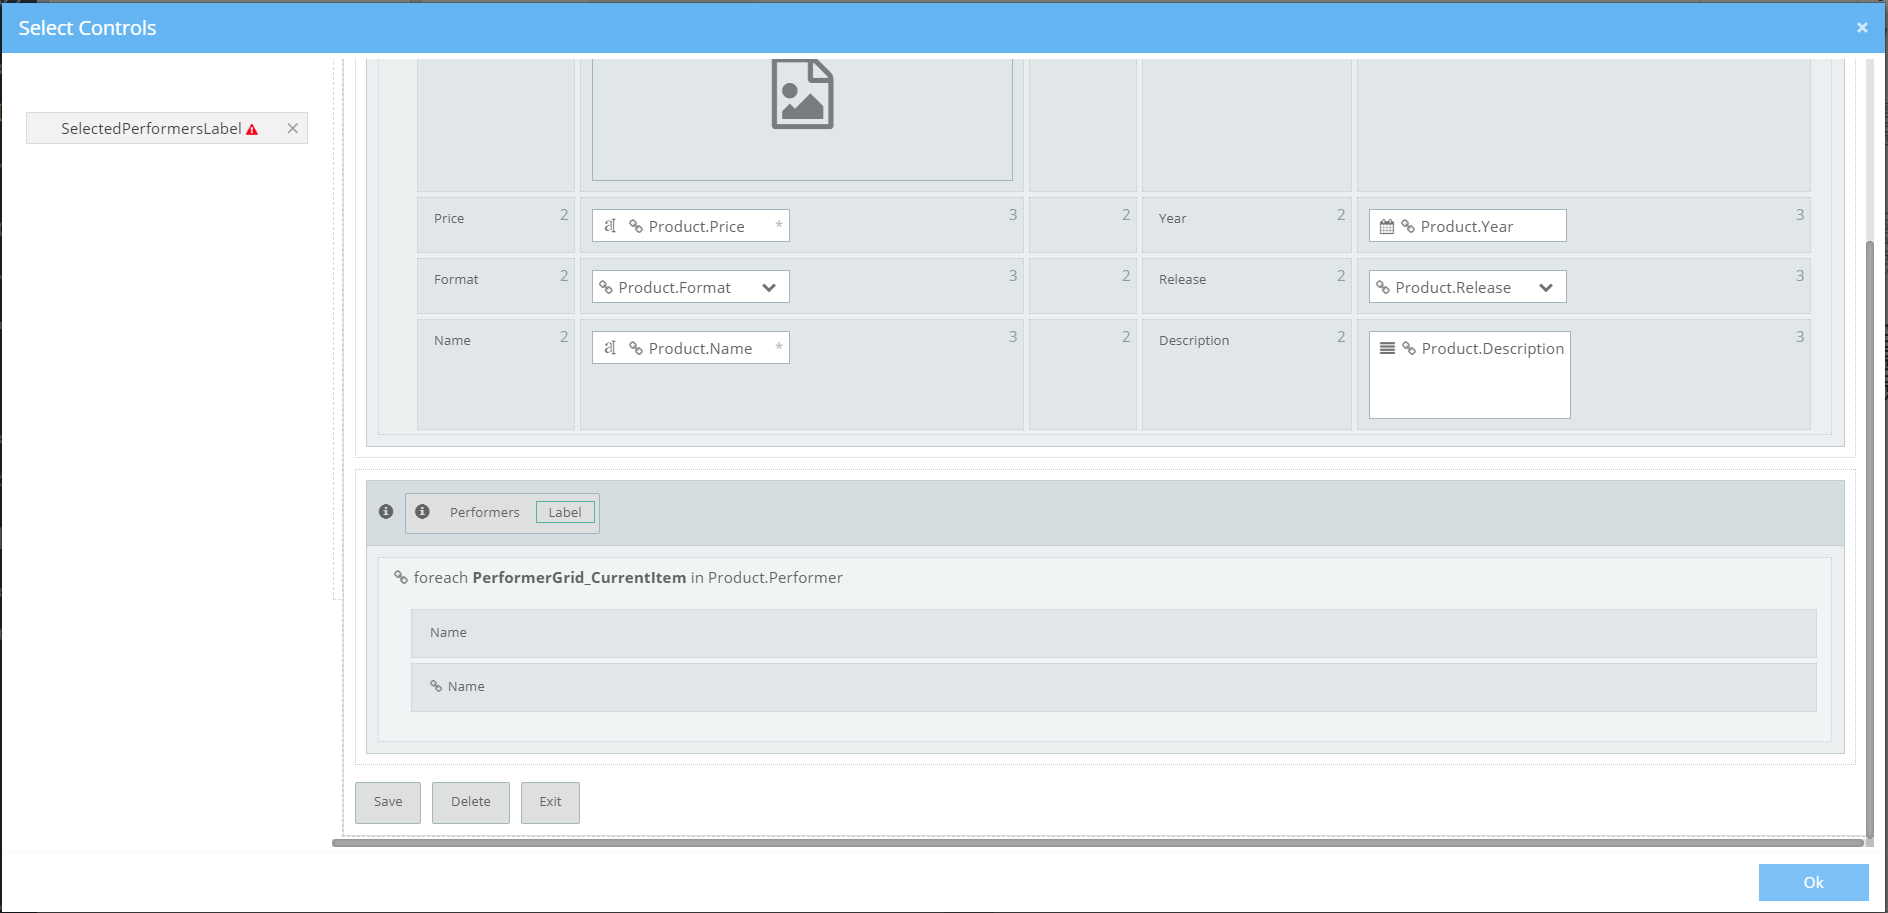
- Click Ok to save the configuration and close the Modal
Make sure your SelectedPerformersCalculatedExpression configuration looks like this:

Conditional Formatting (for Selected Performers)
Now, lets also add a Conditional Formatting for the Labels of our Performers Picklist.
Todo
- Add a new Conditional Formatting by expanding the blue + button and selecting the last option
- Rename the new Conditional Formatting to SelectedPerformersConditionalFormatting
- Place the following line inside the Condition() function body:
return Model.Product.Performers.Length == 0; - Go to the THEN panel and click the Add link. You should see a new box appear, containing a Drop Down with the Action to perform if the Condition() is true, as well as some buttons
- Select Change Style in the drop down
- Click on the + button, on the right inside the new box, to open the Component selector
- Select the two labels placed inside the Performers PickList
- Add the following rules inside the CSS Textarea:
text-decoration: underline wavy red;
- Click Ok to save the new rules and close the Modal
- Find the Create Reverse Action… link of your THEN panel and click it
- In the new box that appears at the ELSE panel, add the + to open the Components Selector, leave everything as is and just change the CSS Textarea to:
text-decoration: none; - Click Ok to save the changes and close the Modal
Your new Conditional Formatting should look like this:
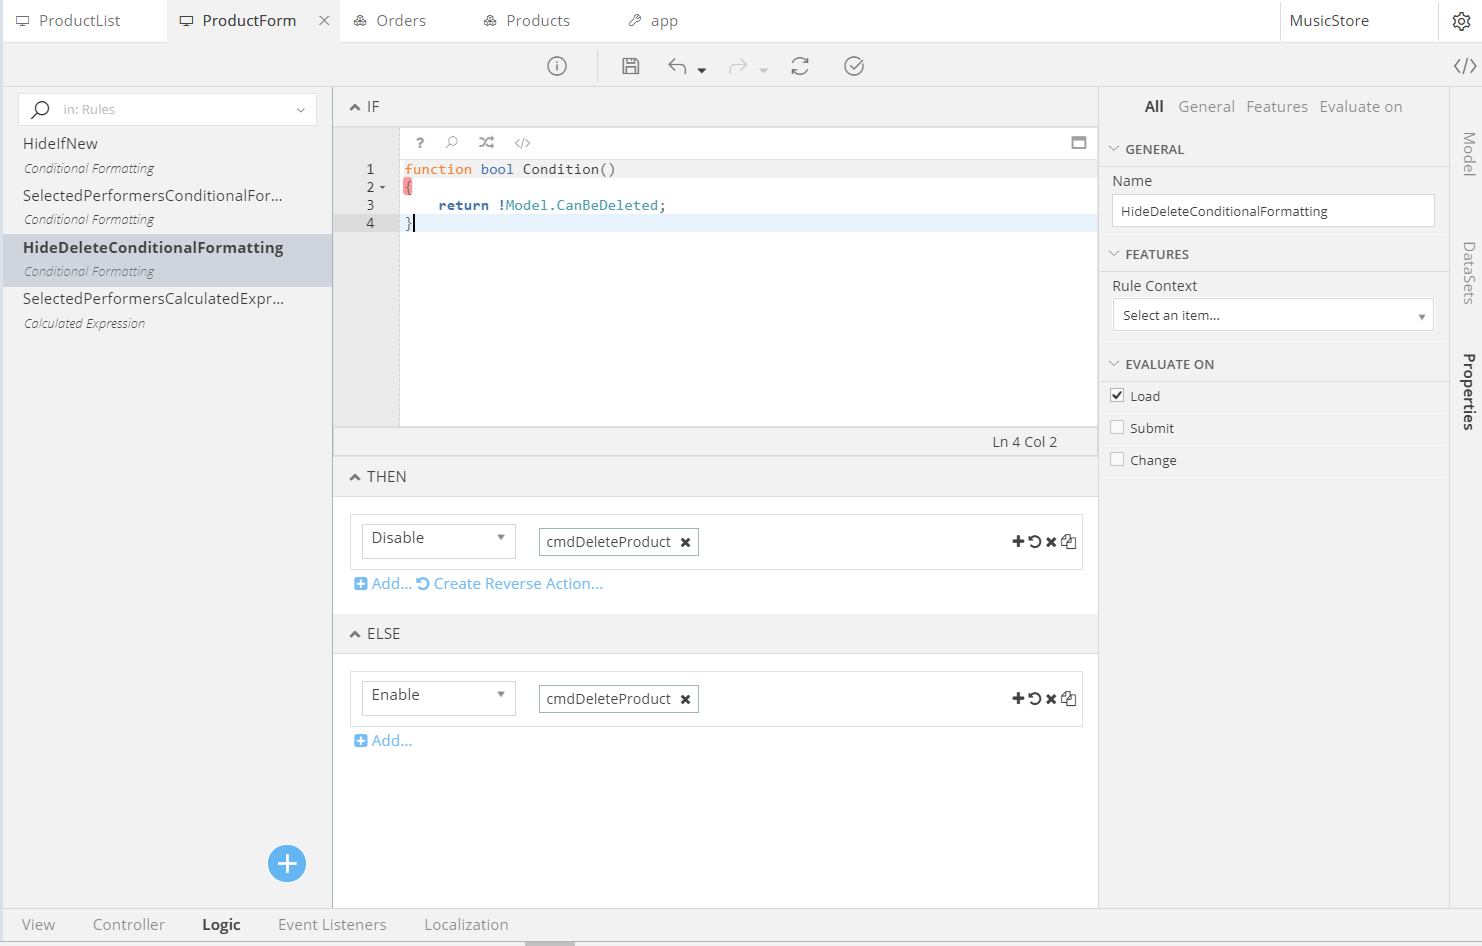
Conditional Formatting (for Delete Button)
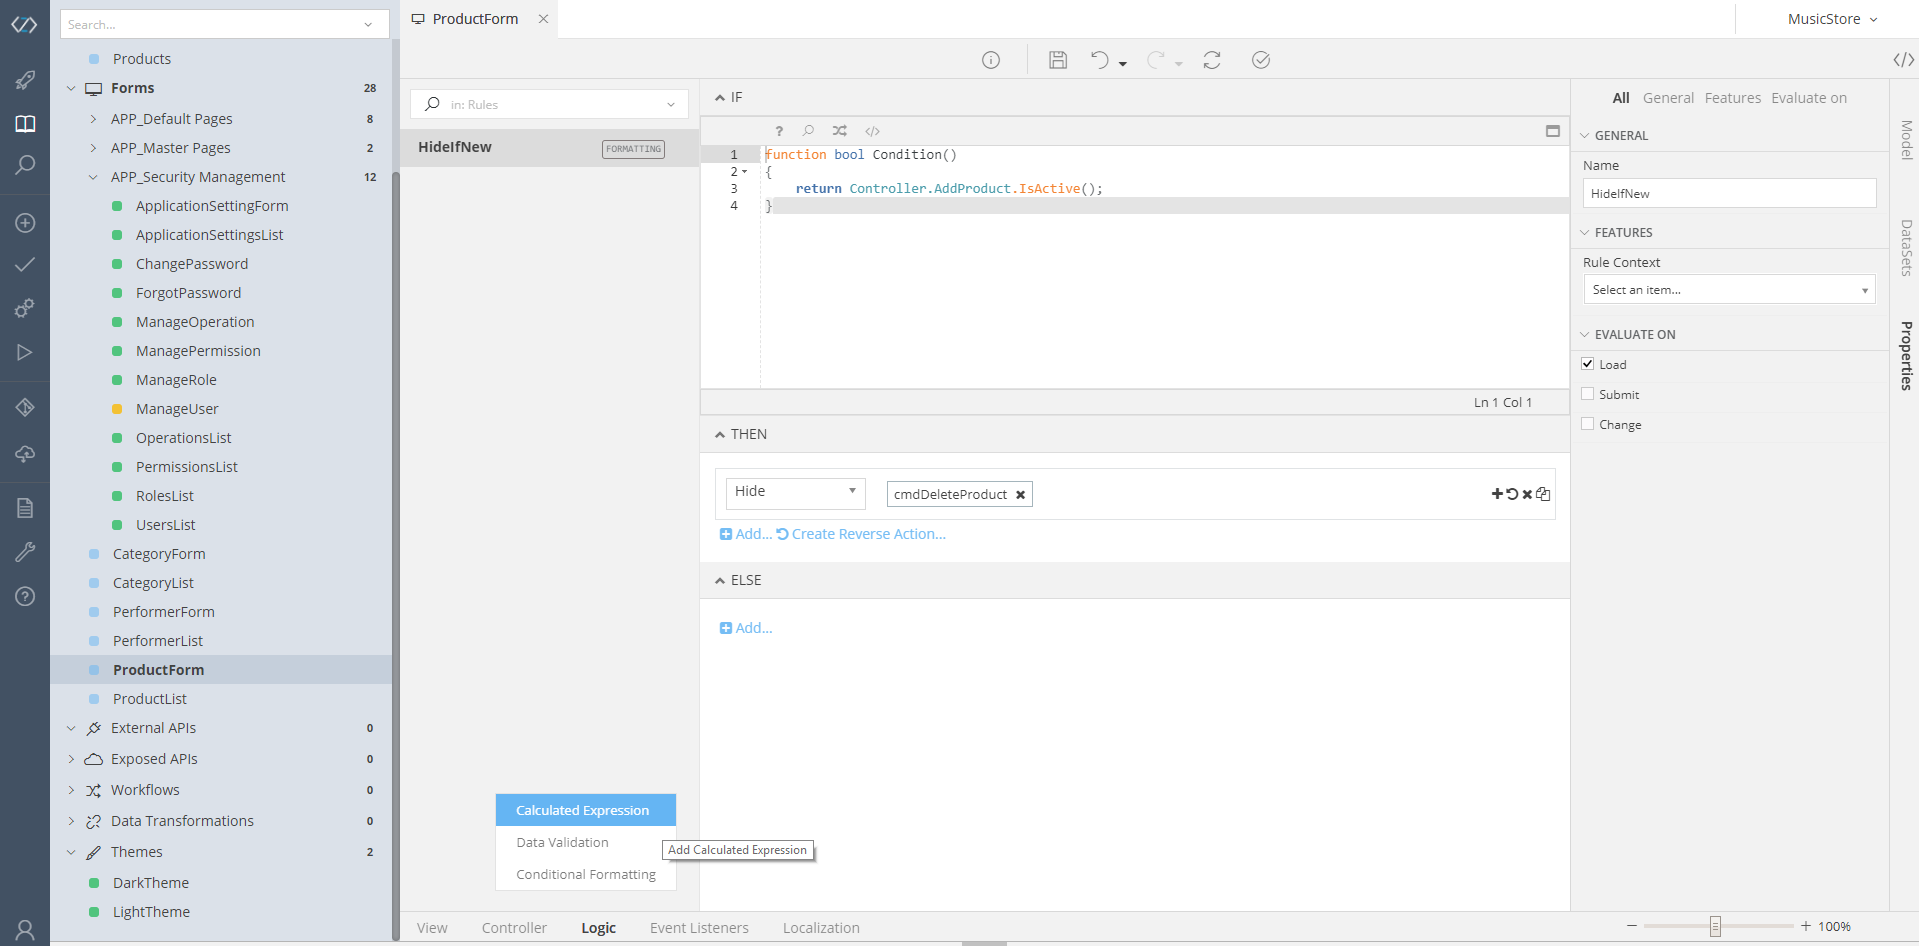
Now, we do not want the user to be able to Delete Products that appear in ongoing Orders. To enforce this Business Rule, we will add another Conditional Formatting to enable and disable the Delete button of our form. So first, we will add a new item into our Model:
Add a new Model Attribute
- Open the View panel
- Open the Model pane of the View
- Click on the blue + button to add a new property into the Model
- Rename the new property to CanBeDeleted
- Set the Data Type of the new property to bool
Change the Controller Actions
- Now, open the Controller panel and locate the two Entry Point actions: AddProduct and EditProduct. Place the following line at the end of each function’s body:
Model.CanBeDeleted = Model.Product.CanBeDeleted();
Now, every time our page is loaded, our form will know whether the Product can be deleted or not. It’s time to add this logic as a Conditional Formatting that will disable our Delete button. So, open the Logic panel again and follow the steps described below:
Create the Conditional Formatting
- Add a new Conditional Formatting
- Rename it to HideDeleteConditionalFormatting
- Uncheck the Submit checkbox under the EVALUATE ON Properties
- Uncheck the Change checkbox under the EVALUATE ON Properties
- Add the following line inside the Condition() body:
return !Model.CanBeDeleted; - Go to the THEN panel and click on Add…
- Select the Disable value inside the Drop Down that will appear in the new box
- Click on the + button of the new box to select the Delete button of your Form (as we did earlier with the Labels of our Performers Picklist).
- Click on the Create Reverse Action… link
- Make sure your new Conditional Formatting looks like this:
Validations
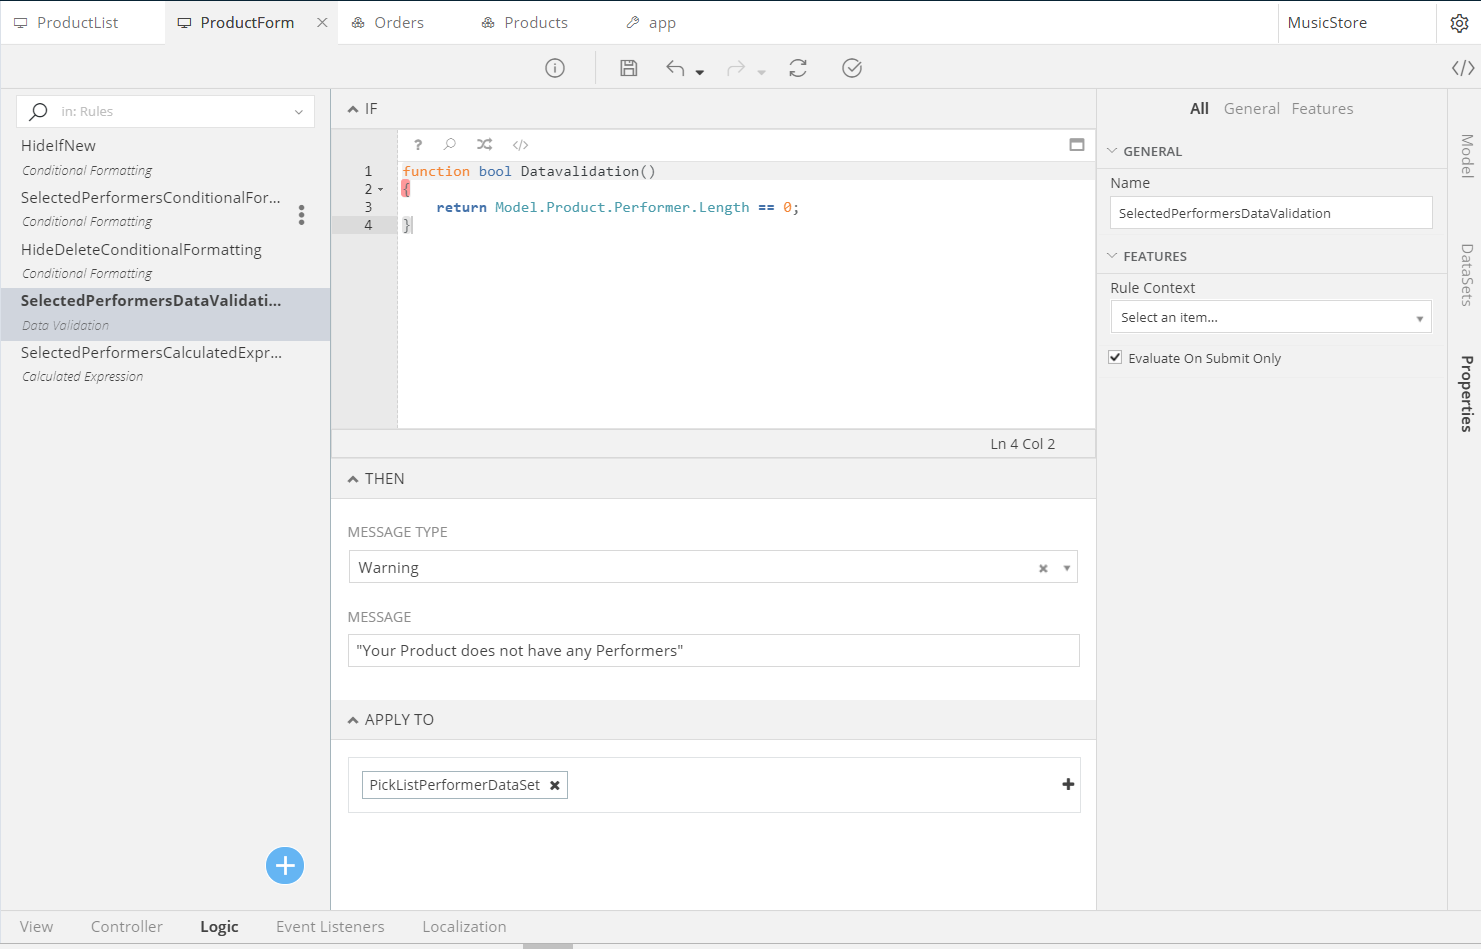
Now, lets Validate that the Administrator has selected at least one Performer for the Product. Our logic here will be to Warn the Administrator about no Performers, so that he/she can decide whether to proceed with no Performers or correct the Product. To do that, follow the steps described:
Todo
- Create a new Data Validation inside the Logic panel, by expanding the blue + button and selecting the middle Option
- Rename the new Data Validation to SelectedPerformersDataValidation
- Check the Evaluate On Submit Only checkbox
- Add the following line into the Condition() function’s body:
return Model.Product.Performers.Length == 0; - Choose Warning as the Message Type
- Write "Your Product does not have any Performers" into the Message’s Inline Code Editor
- Select the Performers Picklist (as we did numerous times before) as the APPLY TO Component.
Your final Validation should look like this:
On your own
At this point, you have a fully functional form. Go ahead and change its Look and Feel (UI, Components, etc.); make it your own. For example, I changed the UI by adding things into layouts, changed their positions, set some CSS rules etc.
Refining the ProductList
Conditional Formatting (within a Context)
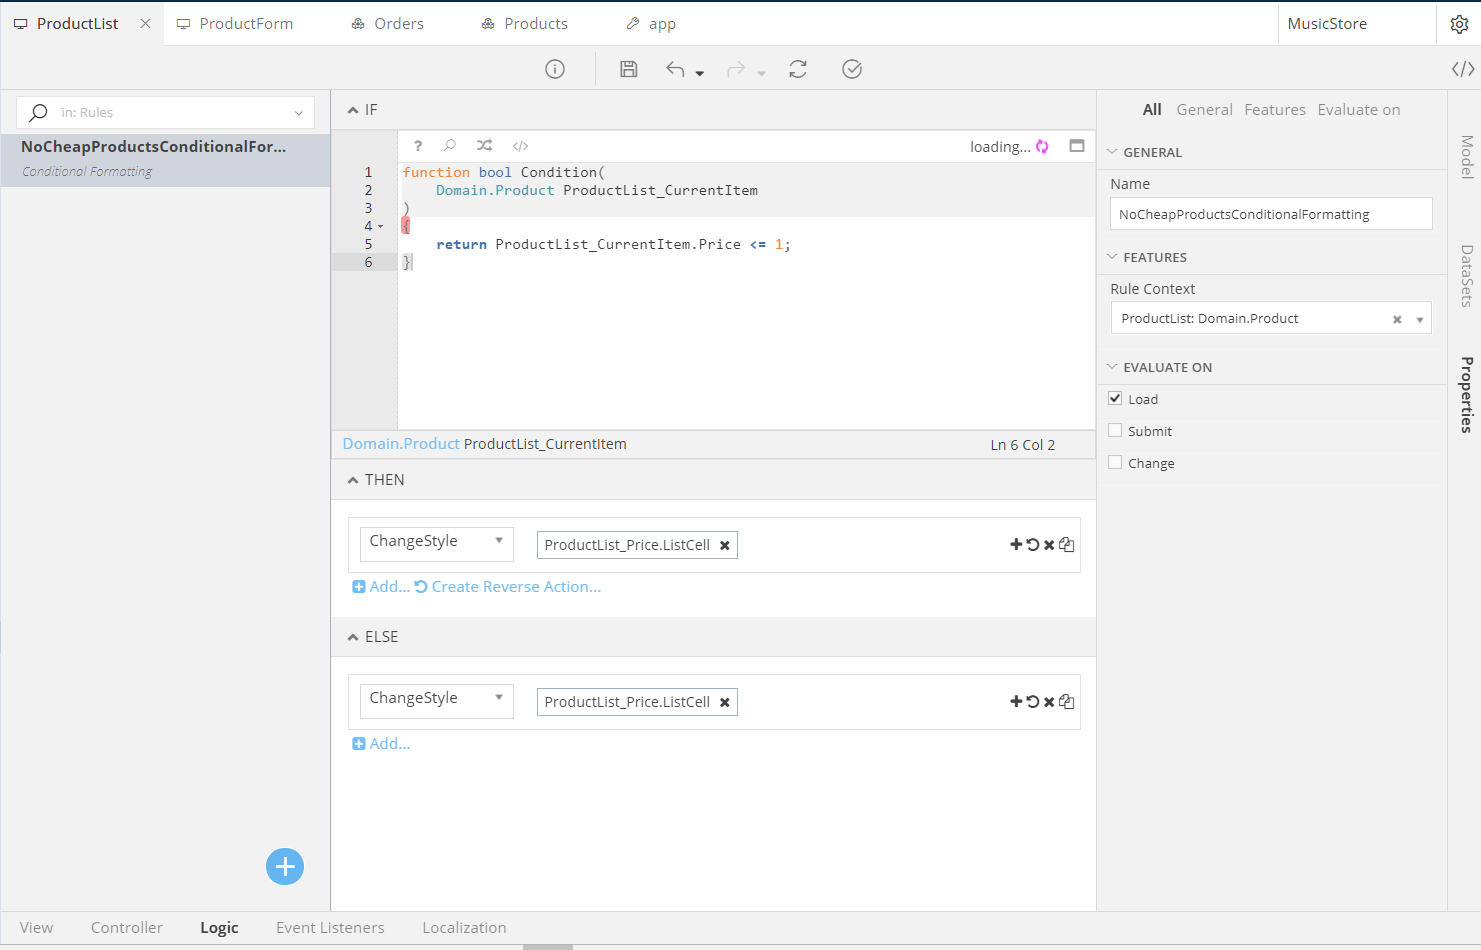
Now, we saw how to add Logic items (Conditional Formattings, Calculated Expressions, Validations etc.) into our Form. However, they were pretty simple: we applied them on specific controls placed right onto the Form. What about deeper elements, though? For example cells in a table or nested items? This section will present how to add a Conditional Formatting for a cell within a Table. Now, we have a Table in our ProductList form. Let’s add the following Formatting: If the price of any Product is less than $1, make it Red. So, open the ProductList Form, go into its Logic panel and proceed like so:
Todo
- Add a new Conditional Formatting
- Rename it to NoCheapProductsConditionalFormatting
- Find the Rule Context property and set it to the ProductList: Domain.Product. Now, our Logic will be working inside the List’s context. You should also see that the Condition() function has changed: it contains the current Item of the list!
- Place the following Mamba code inside the Condition() function
return ProductList_CurrentItem.Price <= 1; - Uncheck all checkboxes of the EVALUATE ON Property, except for the Load
- Add a new THEN statement (as we did before)
- In the new THEN statement, select the Change Style item of the Drop Down
- Open the Components’ Selector and click on any data cell of the list, under the Price column
-
Add the following rule in the CSS Textarea:
color: red;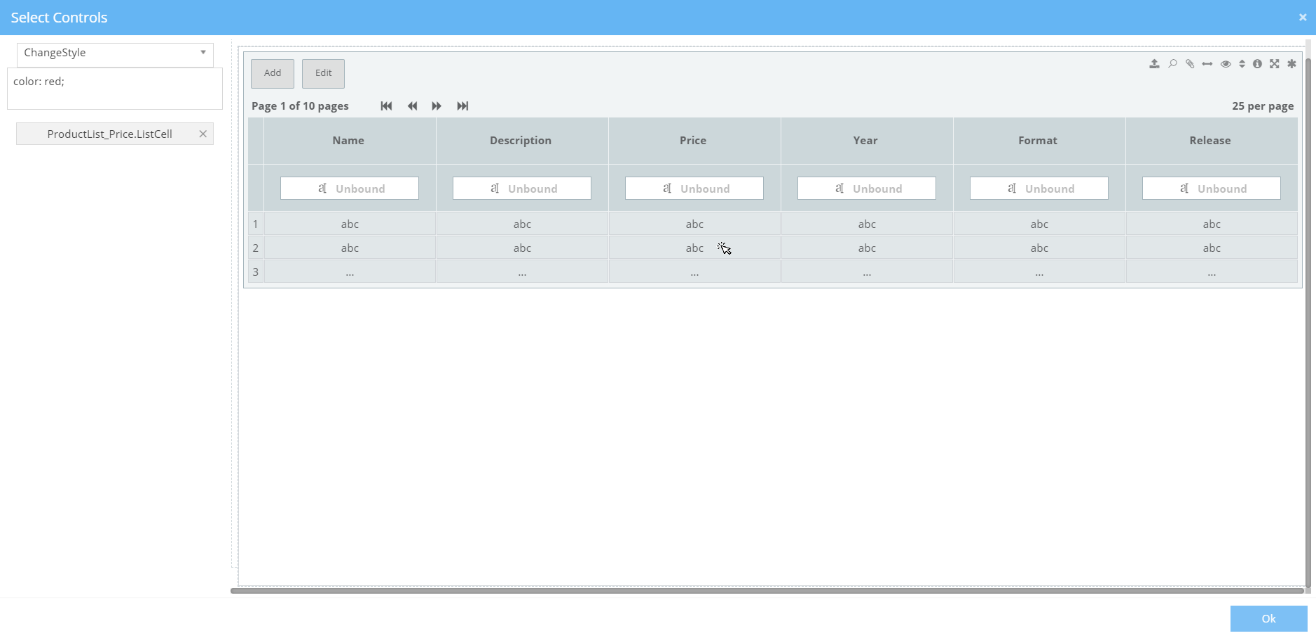
-
Create the Reverse Action for this rule, by setting the CSS Style to:
color: black;
Your new Conditional Formatting, working within a nested context, should look like this:
New Form from Scratch
In this section we will create a new Form that will present a selected Product inside a Modal. It will serve the following purposes:
- To show the details of a selected Product to any user
- To allow a Customer to add a Product to his/her cart
- To show a Customer that he/she has already added X items of this Product into his/her cart
New Form
Since our Form will be living in a Modal, we will need to use an appropriate Master Page (as the one we have been using all along contains logic and elements that we will not be needing: we need a much simpler master page). So, lets create our Form.
- Add a new Model (either by clicking Ctrl + Insert, or by pressing the button on the left vertical menu.
- Select Form Model and Empty Form on Templates
- Name the new form as ProductDetails
- Select MasterPageForSlide as the Master Page of this form

Now, we have a new Form, that has a blank Master Page, that we will be able to show in a Modal.
Model
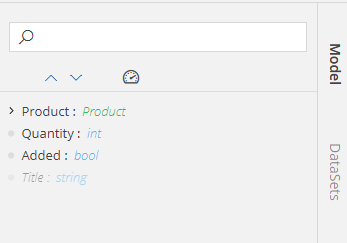
Now, lets create our Model: the data that this form will show. Add the following items, by clicking on the blue + button of the Model panel in your View:
- An item named Product of a
Producttype - An item named Quantity of an
inttype - An item named Added of a
booltype
Controller
Next step: defining the logic of our form.
Execute
Your form should already have a Render() function, working as an Entry Point. Lets change its signature a bit, to:
function void Execute(int id)
//Find the Product we are showing and use it to fill the Model
Model.Product = Domain.Product.GetByKey(id);

//Correct the Quantities, if needed
Controller.CorrectQuantity.Execute();

//Check whether an Order has already been created for this User
Domain.Order ongoingOrder = Domain.Order.GetOngoingOrder(false);

if(ongoingOrder != null){
    DebugLib.Logger.WriteInfoLine(ongoingOrder.Id);

    //Check whether the Order contains the Product we are showing
    Domain.OrderedProduct orderedProduct = ongoingOrder.Products.First(x => x.Product.Id == Model.Product.Id);
    if(orderedProduct != null){
        DebugLib.Logger.WriteInfoLine(orderedProduct.Id);
        Model.Added = true;
        Model.Quantity = orderedProduct.Quantity;
    }
}
If you noticed the CorrectQuantity Action of our current controller, do not get baffled. We will create it during the next steps.
AssignQuantity
Create a new Controller Action by clicking on the blue + button and name it AssignQuantity.
- Make sure that the following checkboxes are unchecked:
- Available To All Anonymous
- Available To All Authenticated
- Add the AddProductToOrder Permission
- Insert the following Mamba code for this Action:
function void AssignQuantity(int quantity)
{
    Model.Quantity = Model.Quantity + quantity;
    Controller.CorrectQuantity.Execute();
}
CorrectQuantity
Create a new Controller Action by clicking on the blue + button and name it CorrectQuantity. Leave all of its Properties to their predefined values and set the Mamba code for this Action to:
function void CorrectQuantity()
{
    if(Model.Quantity == null || Model.Quantity < 1){
        Model.Quantity = 1;
    }
}
AddToCart
Finally, this will be the Action that will perform our actual Business Logic: add items to the Cart (or Order, if you prefer).
- Create a new Controller Action and name it AddToCart
- Uncheck the
- Available To All Anonymous
- Available To All Authenticated
- Add the following Permissions:
- CreateOrder
- AddProductToOrder
- Set the Mamba code of this Action to:
function void AddToCart()
{
    //Either fetch the "ongoing" Order of this User, or create a new one
    Domain.Order ongoingOrder = Domain.Order.GetOngoingOrder(true);

    //Either fetch the ordered Product, or create a new one
    Domain.OrderedProduct orderedProduct = ongoingOrder.Products.First(x => x.Id == Model.Product.Id);
    if(orderedProduct == null){
        orderedProduct = Domain.OrderedProduct.Create();
    }

    //Assign the Product to this Order and set its Quantity
    orderedProduct.Product = Model.Product;
    orderedProduct.Quantity = Model.Quantity;

    //Add the Product to the Order
    ongoingOrder.Products.Add(orderedProduct);

    //Save everything
    ongoingOrder.Save();

    //Mark our Order as Added, for UI reasons
    Model.Added = true;
}
In the end, your Controller panel should look like this:

View
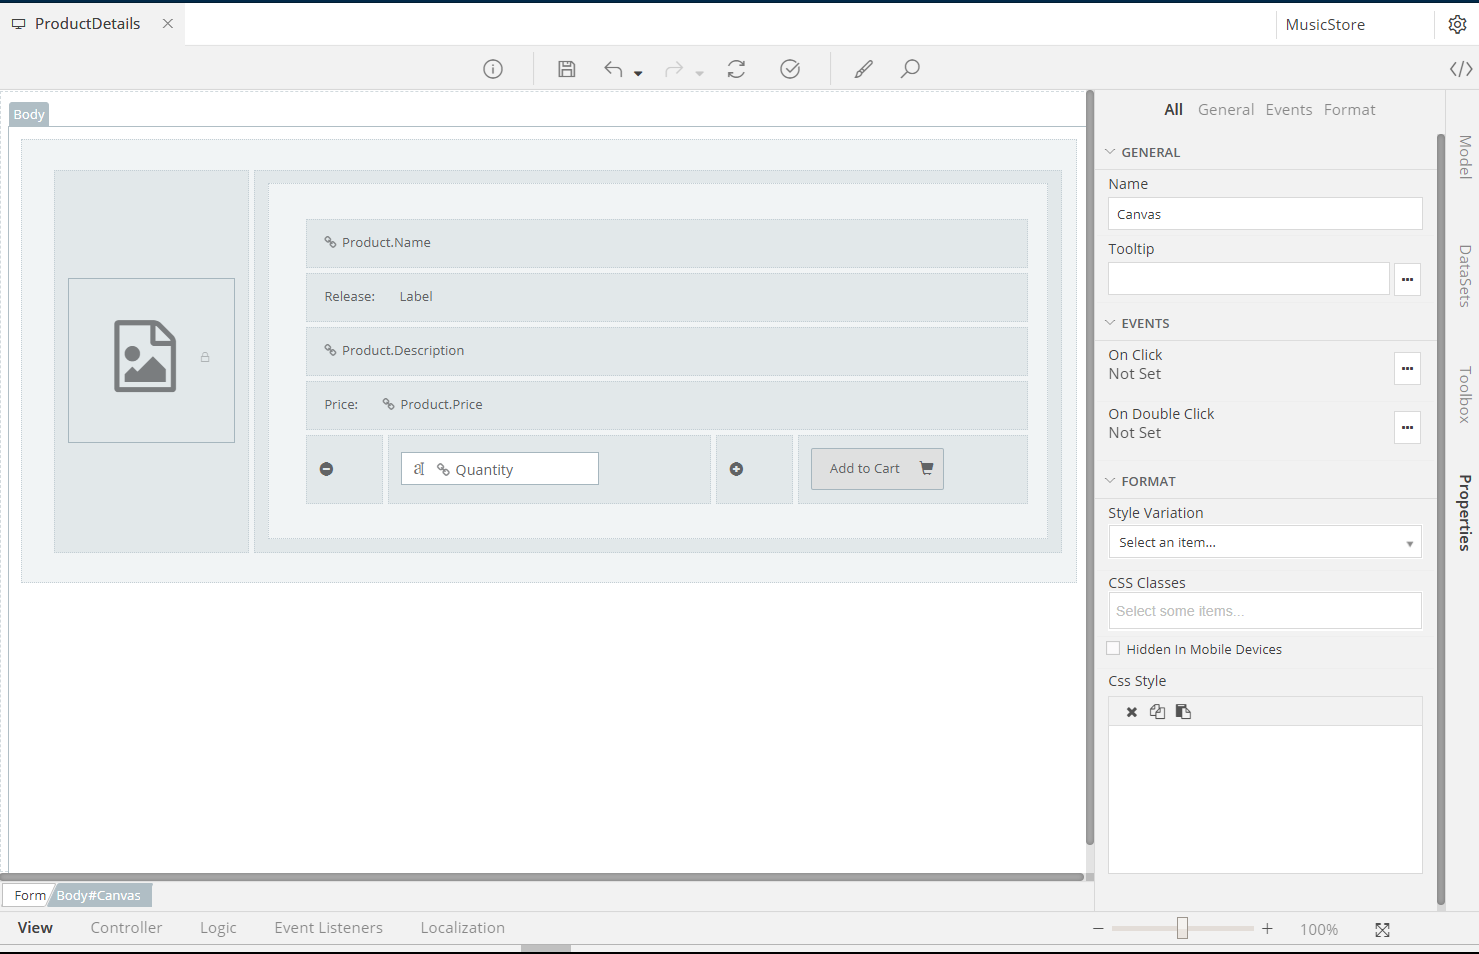
Now that we have our Data, as well as our Business Functionality in place, it is time to create the View. Now, I will guide you through the Components that you should add, however how you will place them will be up to you.
Image
Todo
- Drag and drop the Image attribute of the Product model onto your Form. This will create a new Textbox
- Select the created Textbox, right click on it and click on Change To → Image. Now, you have an ImageBox!
- Select the ImageBox and open its Properties panel
- Set its Type to Bound
- Set its Binding Type to DataBaseBinary
- Leave the Model Binding to
Product.Image - Check the Read Only checkbox
- Set its height to 250
- Go to the CSS Classes selector and add img-responsive
Name
Todo
- Drag and drop the Name attribute of the Product model onto your Form. This will create a new Textbox
- Select the created Textbox, right click on it and click on Change To → Label. Now, you have a Label!
- Leave its Model Binding to Product.Name
- Add the following CSS rules into the CSS Style TextArea:
padding-bottom: 9px;
margin: 0px 0 10px;
border-bottom: 1px solid #eee;
Now, your form will have a nice Label presenting the Name of the Product with a gray line underneath.
Year
Todo
- Drop a Label onto your Form
- Name it YearLabel
- Don’t do anything else. We will set its value via a Calculated Expression
Price
Todo
- Drop a Label onto your Form (or, drop the Product.Price attribute and then Change it into a Label, as we did earlier)
- Set its Model Binding to Product.Price
- Set its Format String to $1,000.23
Description
Todo
- Drop a Label onto your Form
- Set its Model Binding to Product.Description
Quantity
First, we will create a textbox so that the user can freely set the quantity he/she wants
Set the Textbox
- Drop the Quantity attribute of your Model onto the Form
- Select the newly created Textbox
- Leave its Model Binding to Quantity
- Check the Update binding while typing
- Select the Mask String as integer
- Set the Max Length to 5
Set its OnChange Event
- Find the Events and open the On Change event by clicking on the dotted button right next to it

- In the new dialog that opens, select Controller Action as your Action Type
- Select this as your Controller
- Select CorrectQuantity as your Controller Action
- Select Hide the element for your permissions check

- Click Ok to save the new event that will be executed every time a user is changing the value of our Quantity textbox

Now, lets create two small + and – icons that will increase and decrease the quantity with every click. For the – icon:
Add the - Icon
- Drop an Icon onto your Form
- Name it DecreaseQuantityIcon
- Go to the Icon properties and open their dialog by clicking on the dotted button
- Find the minus-sign icon, click on it and click Ok
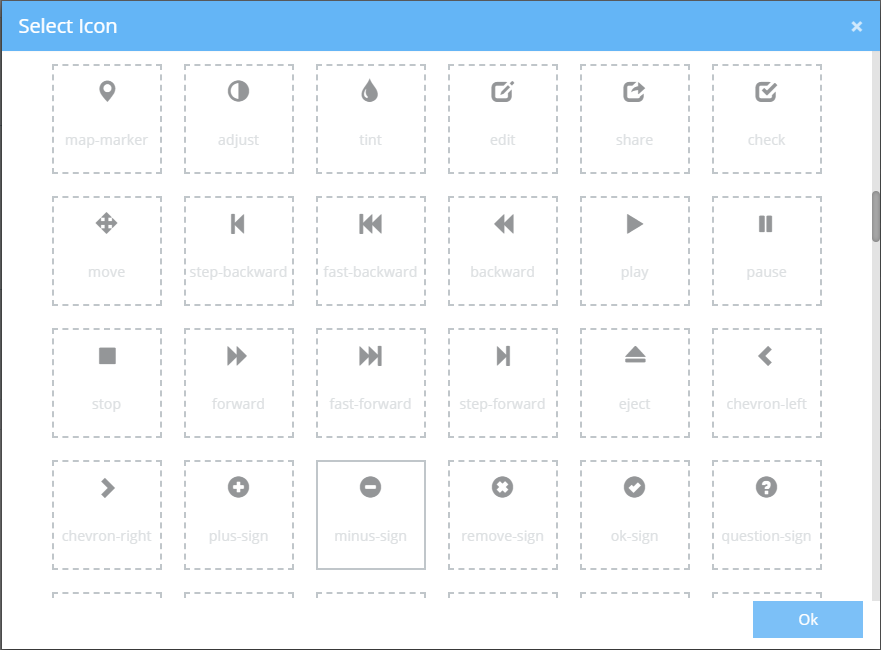
- Find the Color Role property and set it to Warning. This way this icon will have a nice orange color
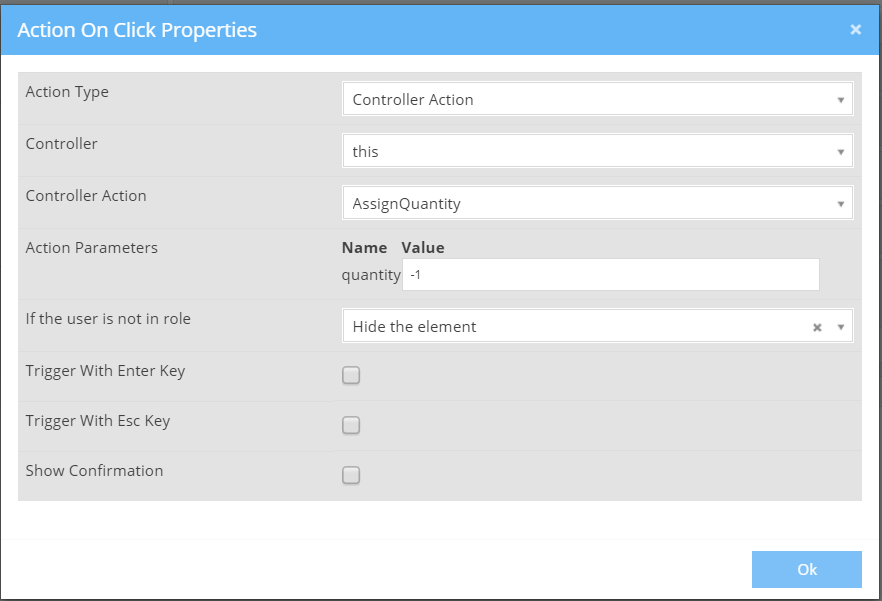
Set its OnClick Event
- Go to the Events and open the dialog for the On Click event (just as we did previously)
- Leave all values as they are and select AssignQuantity as the Controller Action
- Type -1 into the Action Parameters
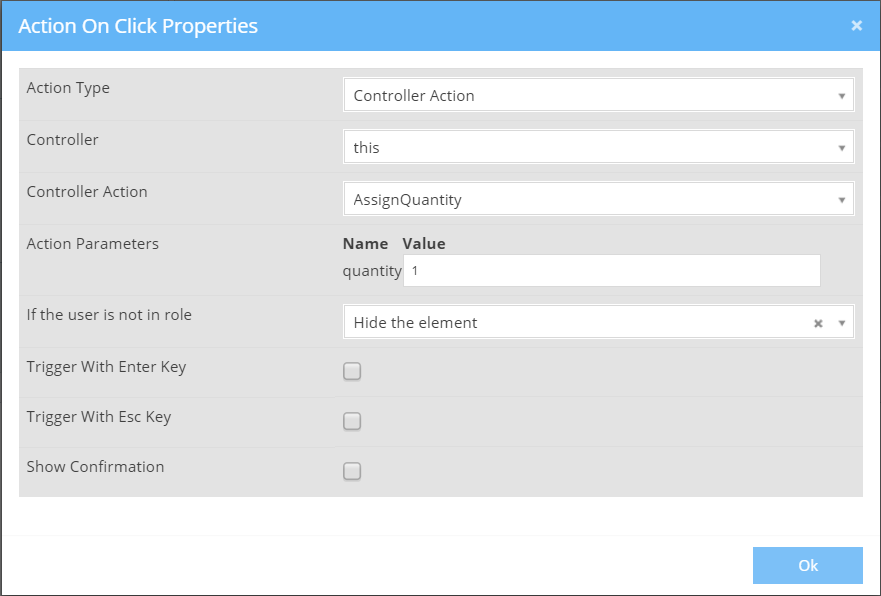
Now, lets do the same for our + icon:
Repeat for + Icon
- Drop an icon onto your Form
- Name it IncreaseQuantityIcon
- Set its Icon to the plus-sign (just as we did earlier with the minus-sign)
- Set is Color Role to Success
- Set its On Click controller Action to AssignQuantity
- Type 1 into the Action Parameters of this Action
"Add to Cart" Button
Finally,
Todo
- Drag and drop a Button onto your Form.
- It should already have a Label on top of it. Select it and rename it to AddToCartLabel. Then,
- Select the Button itself
- Set its On Click controller Action to AddToCart
- Set its Color Role to Primary
Conditional Formattings
Now, its time to apply your Logic to the User Interface. So, open the Logic panel and create a new Conditional Formatting. Then, follow my lead:
Todo
- Rename this Conditional Formatting to AlreadyInCartConditionalFormatting
- Set is Condition() body to
return Model.Added; - Go to the THEN panel and click on Add to add a new Action
- Select Disable from the Drop Down Menu
- Open the Components Selector and select the Quantity Textbox (txtQuantity) and the Button
- Next, add another rule by clicking on Add again
- Select Hide for this second rule
- Set its components to the DecreaseQuantityIcon and IncreaseQuantityIcon
- Finally, press on the Create Reverse Action… link to create the two reverse Actions
What did we do there? We checked whether the Product has already been added. If yes, we disabled the Quantity Textbox and Button, as well as hid the two icons that Increase and Decrease the Quantity. If the Product has not been added, they will all be visible and clickable!
Calculated Expressions
We just enabled/disabled, showed/hid the elements of our Form. Lets also change their Texts, with regards to our Logic. First stop: Setting the Button’s Label to Add to Cart if the user can add this Product into his/her cart, or to Added! if it has already been added.
Todo
- Create a new Calculated Expression
- Rename it to AlreadyInCartCalculatedExpression
- Set its CalculatedExpression() function body to:
if (Model.Added) { return "Added!"; } else { return "Add to Cart"; } - Finally, select the AddToCartLabel as the Component for the APPLY TO panel (it’s the Label of the Button)
Finally, add another Calculated Expression and:
Todo
- Rename it to YearCalculatedExpression
- Uncheck the Submit and Change events of its execution
- Set its CalculatedExpression() body to
return "("+Model.Product.Year.Year()+")"; - Apply it to the YearLabel we added previously
After all these steps, you will now have a fully functional, ready to go Form. I don’t know how you drew its View layout, but mine looks like this:
Hint
I used tables and some CSS to make it compact and elegant. Could do the same with Layouts, but went with Tables for fun
Refining the HomePage
At this point, we have almost everything we need in place. Time to create our actual Store and present our Music Records. To do that, we will change the (already created for us) Home Page. (We could add our own Form here, but why bother, when a Home Page is already existent?)
So, go to your Form Models, find the APP_Default Pages folder and open the HomePage form. (Alternatively, just type Home into the Search textfield at the top of the Models tree and open the HomePage form).
Now, you will see that the HomePage form already has some components. Delete them all and start fresh.
Model
Go to the Model tab (at the right side of your View). We will create a Model that will hold the data of this page. You should already know how to add items in the Model, so just go ahead and add:
Todo
- One collection of Products, named Products. This will hold all of our Products, regardless of their details
- One element named FilterByRelease, having the Release enumeration as its data type. This will help us create a Search Filter, to filter by Release
- One element named FilterByFormat, having the Format enumeration as its data type. This will allow us to Filter the Products per Format
- One element named FilterByName of a string data type. With this, we will search for Records by Name
- One element named FilterByPerformer of a string data type. With this, we will be able to track Records based on their Performer(s).
In the end, your Model should look like this:

DataSets
Todo
Next, create two Datasets for our two Enumerations:
- FormatDataSet for the Format Enumeration
- ReleaseDataSet for the Release Enumeration
Controller
Now that we have our Model in place, its time to fill it with Data, as well as add logic for the Search.
Todo
- First, go to your Render Action and add the following line into its body:
This will fill our Products, with all the records of our Database.
Model.Products = Domain.Product.GetAll(); - Next, create a new Controller Action named Filter and set its body to:
So now, every time any of our filters has a value, we will use it to filter our Products.
Model.Products = Domain.Product.GetAll(); if(!string.IsNullOrWhiteSpace(Model.FilterByName)){ Model.Products = Model.Products.Where(x => x.Name.Contains(Model.FilterByName, true)); } if(!string.IsNullOrWhiteSpace(Model.FilterByPerformer)){ Model.Products = Model.Products.Where(x => x.Performers.Any(y => y.Name.Contains(Model.FilterByPerformer, true))); } if(Model.FilterByRelease != Domain.Release.Default){ Model.Products = Model.Products.Where(x => x.Release == Model.FilterByRelease); } if(Model.FilterByFormat != Domain.Format.Default){ Model.Products = Model.Products.Where(x => x.Format == Model.FilterByFormat); } - Finally, create a third Controller Action named ClearFilters that will clear all the components that the user has set and re-fetch all Products from the Database:
Model.Products = Domain.Product.GetAll();

Model.FilterByFormat = Domain.Format.Default;
Model.FilterByRelease = Domain.Release.Default;
Model.FilterByName = "";
Model.FilterByPerformer = "";
And just like that, we have all the logic we need to make our Home Page functional. Next stop: the UI
View
Here we will create a form that will have a Search area as well as our Products neatly stacked at the remaining space of the page, showing a Record’s Name, Price and Image. Every time we click at a Record, a Modal will appear presenting its Details (remember the ProductDetails form we created earlier? That’s it.)
Todo
- Add a Layout component onto the Form
- Open its Properties and find the Features tab
- Select 2 10 as its Layout
- The 2-width column will hold our Search filters
- The 10-width column will have our Products
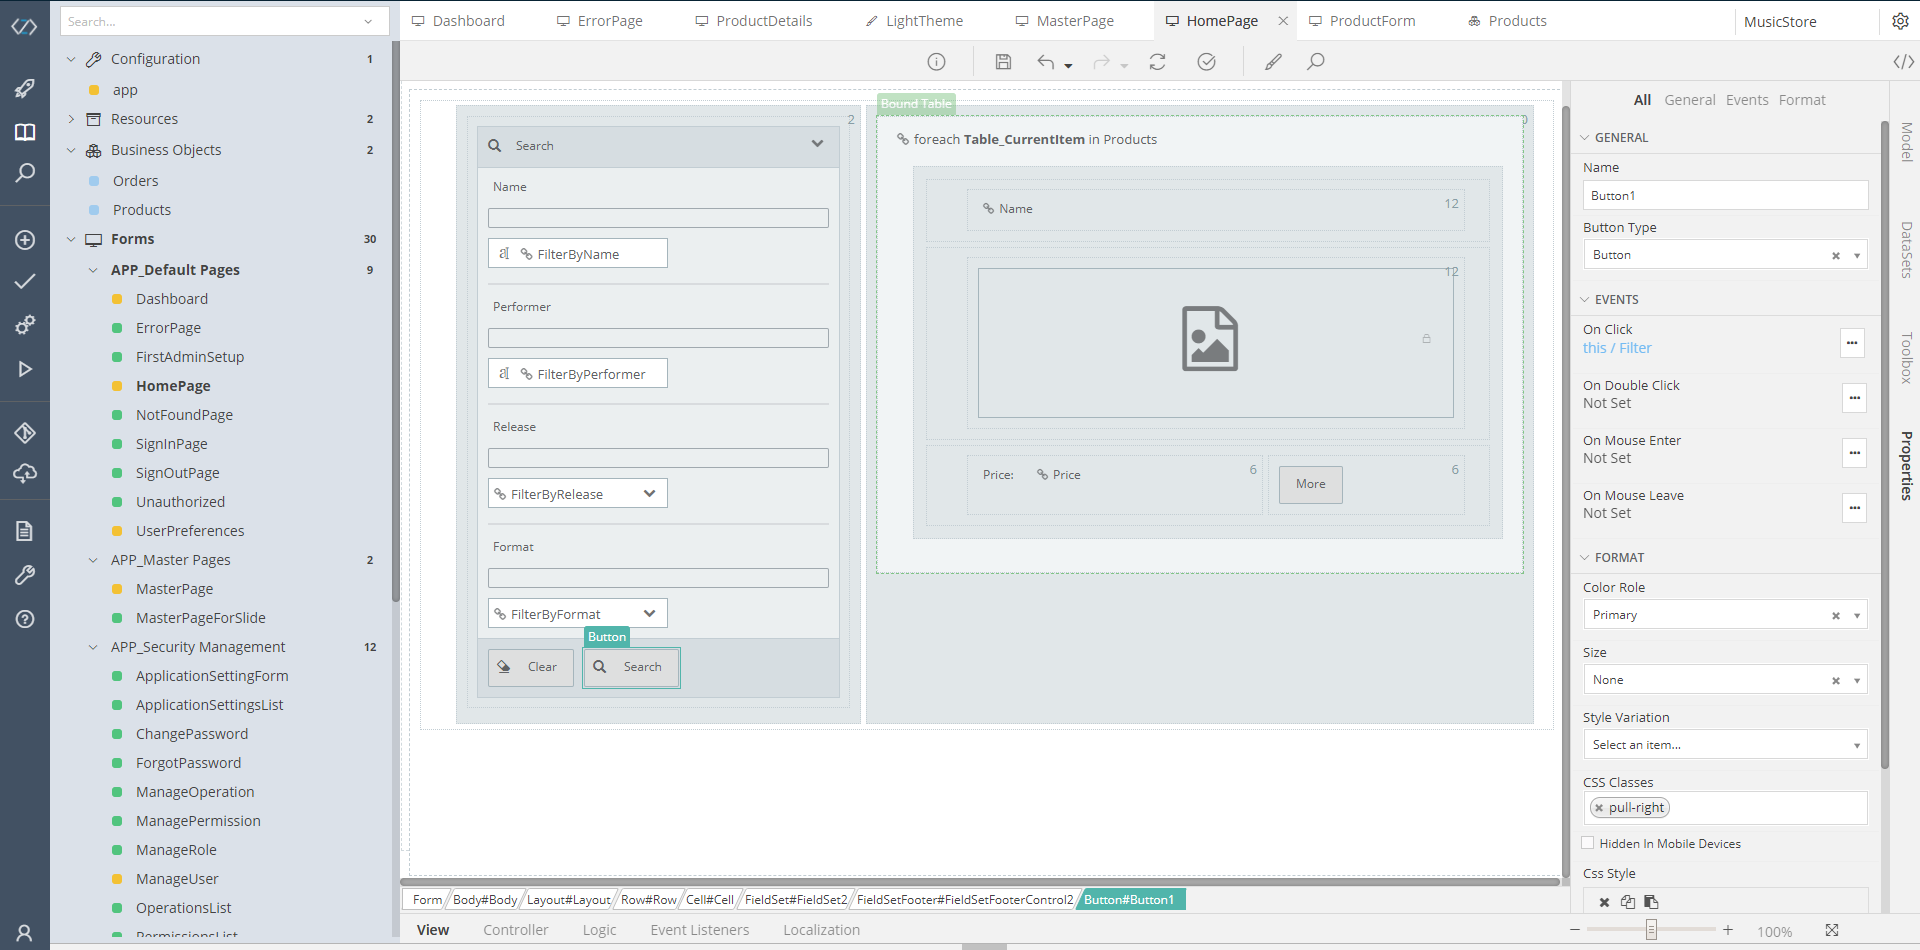
- Drop a Bound Table onto the 10-width Layout Column
- Bind the Table to the Products
- Find the Features checkboxes. Uncheck them all, except for:
- Draw rows side by side
- Include Paging
- Set the Pager Position to Bottom
- Add a products-table class into the CSS Classes. We will add this CSS rule later, using our Theme Editor
- Select the first Row of this Table by clicking on the arrow placed at the far left side of the row and delete it
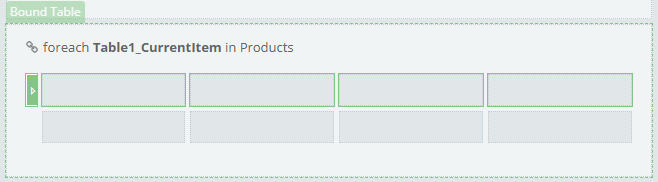
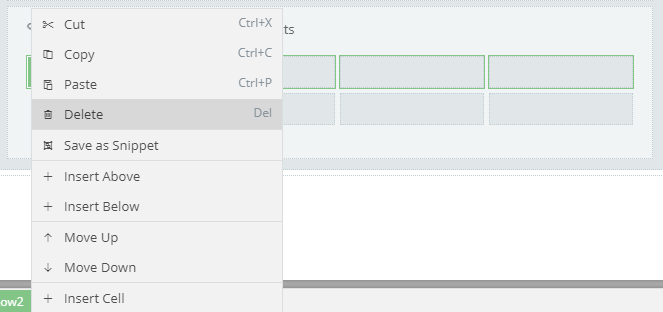
- Go to the remaining Row and delete all cells except for one. In this remaining cell, we will show the Name, Image, Price and a Button for each of our Products
- Add a Label into this Cell, bound to the Name attribute. Sets is CSS to:
font-weight: bold; font-size: large; - Add an ImageBox bound to the Image attribute. Make it Bound with a DataBaseBinary type. Finally, set it as Read Only with a Height of 250
- Add a Label bound to the Price. Set its Format String to $1,000.23
- Add a Button. Set its Label caption to More. Find its Format properties to set its Color Role to Info and its size to Extra Small.
- Add an On Click Controller Action for this Button that will open the selected Product’s details in a Modal, like to:
- Open the Action Properties
- Select ProductDetails as the Controller
- Select Execute as the Action (remember, Execute() is the one that fetches the Product’s Data from the Database)
- Write Table_CurrentItem.Id into the Action Parameters. This will pass the Id of the current Item, clicked on our Table, as the Id to the Execute() function
- Select Modal Dialog in the Render In section
- Select Pop Up as the Modal Mode
- Select Medium – 50% as the Modal Size
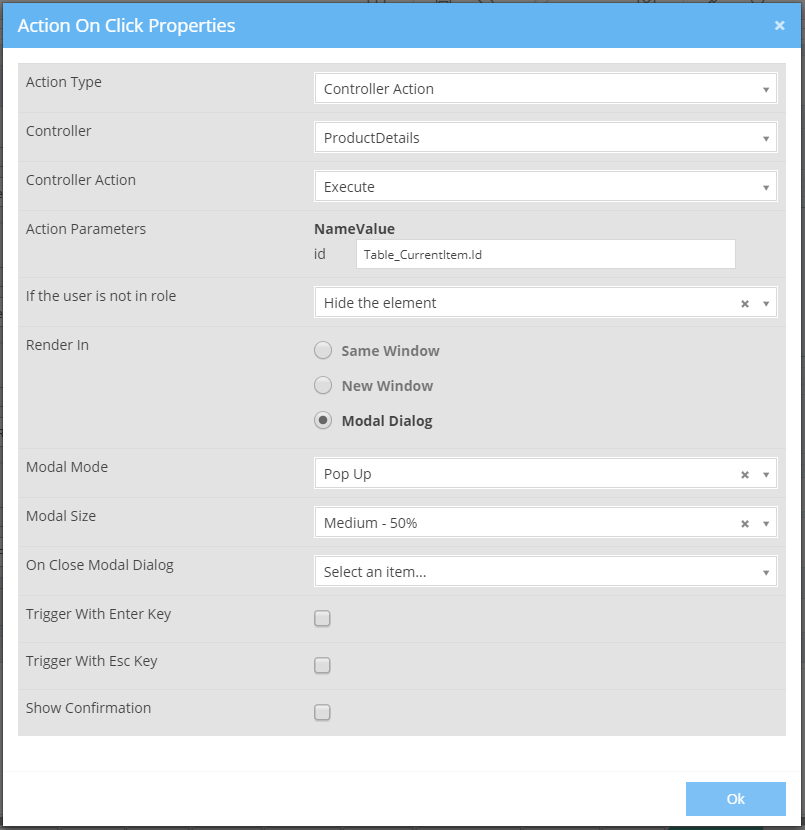
And just like that, our Button is set and ready. Now, select the Cell of the Table and do the exact same thing for its On Click action.
Finally, add the filters for our Search options onto the 2-width Column of the Layout we created during the very first steps of this section:
Todo
- Drag and drop the FilterByName and FilterByPerformer items of the Model
- Drag and drop the FormatDataSet and ReleaseDataSet DataSets. Bind their Drop Downs to the FilterByFormat and FilterByRelease items of the Model
- Add a button with a Clear Label. Its On Click Action will execute the ClearFilters Action of this form’s Controller
- Add a button with a Search Label. Its On Click Action will execute the Filter Action of this form’s Controller
At this point, you have all you need. Functionality, Data, UI. Feel free to play around with the Form, set the components any way you like, add styles and CSS Classes to them. For example, my Form (with line breaks, horizontal lines, some more icons etc.) looks like this:
Refining the MasterPage
All of our Forms, with the exception of ProductDetails that was designed to be displayed in a Modal, run on a Master Page named MasterPage. You will find it in your Forms, inside the APP_Master Pages folder. In this section, we will learn how to:
- Add items visible from any Page (in our case, we will display the Cart of a Customer)
- Change the CSS of our items, using the Theme Editor
Model
First, we will add the Data that we will display for our Cart. All we will need here is: the Total number of Items added, as well as the Total Amount that the Customer is to pay. So:
Todo
- Add an Item named TotalItems into the Model. Set it up as an int
- Add an Item named TotalAmount into the Model. Set is up as a float
View
Next, check out the UI of the Master. It already has some Components. Find the Layout that keeps the Title and the Unsaved Changes! label

Todo
If you check its Properties, you will see that it is set as a 10 2 Layout. Lets change it to 4 4 4.
Thus, we will have 4 equal columns:
- The first column will have the Title of the Page
- The middle column will have the Unsaved Changes! Label. Drag and Drop it there, if you find it in the 3rd column
- The 3rd column will have our Cart
So, now that we have our 3 columns at the top of the page,
Todo
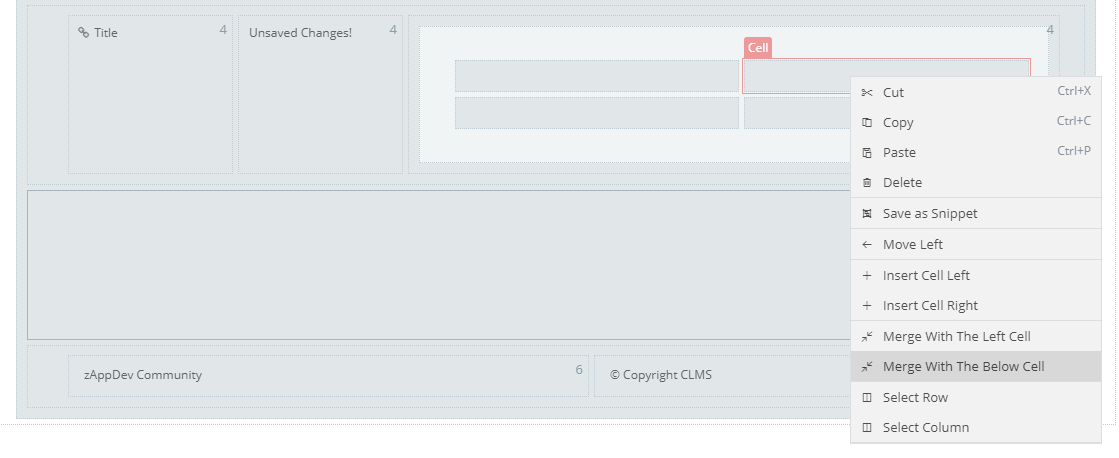
- Select the 3rd one (right) and:
- Drop a Table, setting it up as a 2x2
- Select the top right Cell, right click on it and click on Merge With The Below Cell
- Add a Label on the top left cell, named ItemsCountLabel, bound to the TotalItems property of our Model
- Add another Label just next to the ItemsCountLabel and set its Caption to Items
- Add a Label on the bottom left cell, named TotalAmountLabel, bound to the TotalAmount property of our Model. Set its Format String to $1,000.23
- Drop an Icon onto the large cell we created earlier, like so:
- Set its icon to shopping-cart
- Set its Size as Extra Large
- Finally, select the whole Table component and add the following classes into the CSS Classes holder: pull-right and cart-table
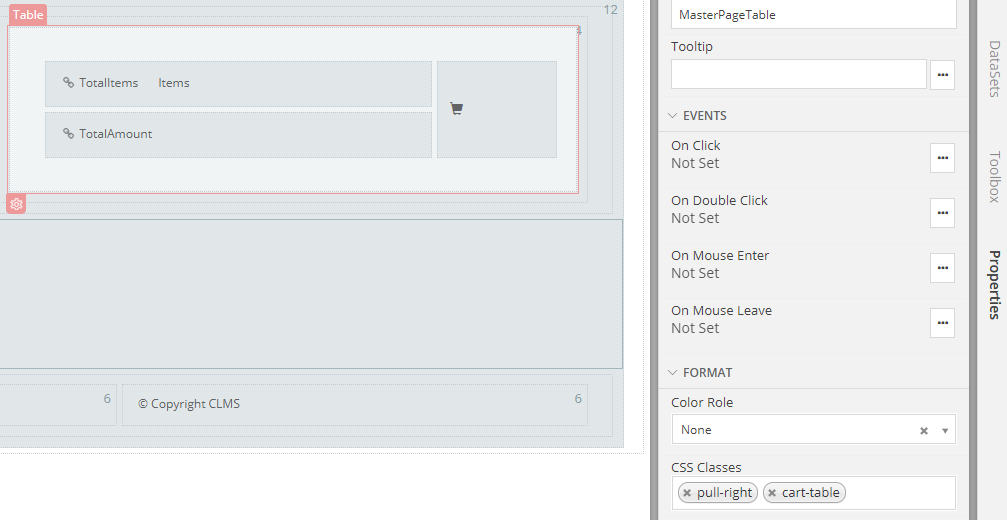
The pull-right class will push the whole table to the far right of our screen. The cart-table will be a custom CSS Class, that will style the table a bit. We will set it later, using the Theme Editor.
Controller
RefreshCart
Todo
- Go to your Controller and add a new Action named "RefreshCart". This action will retrieve the Cart-related Data, for the signed-in Customer, and update the Model we created earlier.
- Set its body to:
try { Domain.Order ongoingOrder = Domain.Order.GetOngoingOrder(false); if(ongoingOrder != null){ Model.TotalItems = ongoingOrder.Products.Sum(x => x.Quantity); Model.TotalAmount = ongoingOrder.Products.Sum(x => x.Product.Price * x.Quantity); } } catch Exception x { DebugLib.Logger.WriteErrorLine(x.Message); DebugLib.Logger.WriteErrorLine(x.StackTrace); } - Open this Action's Properties and Set up its Permissions:
- Uncheck the Available To All Anonymous checkbox
- Uncheck the Available To All Authenticated checkbox
- Add the following Permissions:
- CreateOrder
- EditOrder
- EditProductInOrder

Render
Todo
Open the Render Action and add the following line in its body (anywhere):
Controller.RefreshCart.Execute();
Conditional Formatting
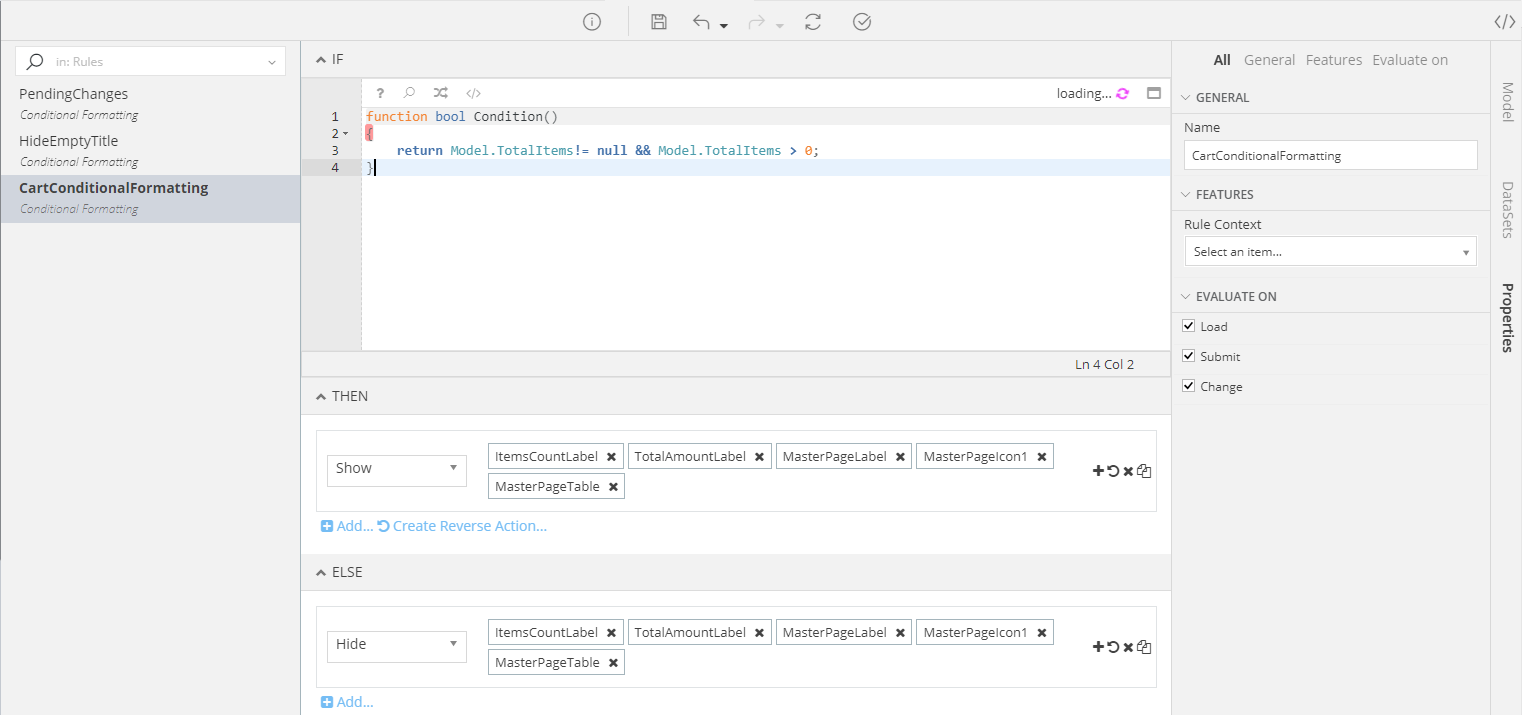
Next task: hide the Cart if its empty.
Todo
- Create a new ConditionalFormatting named CartConditionalFormatting
- Set its Condition() function body to:
return Model.TotalItems!= null && Model.TotalItems > 0; - Add a Show Action in the THEN panel and select all of the Items in the Table we created, along with the table itself
- Click on Create Reverse Action… to create its Hide
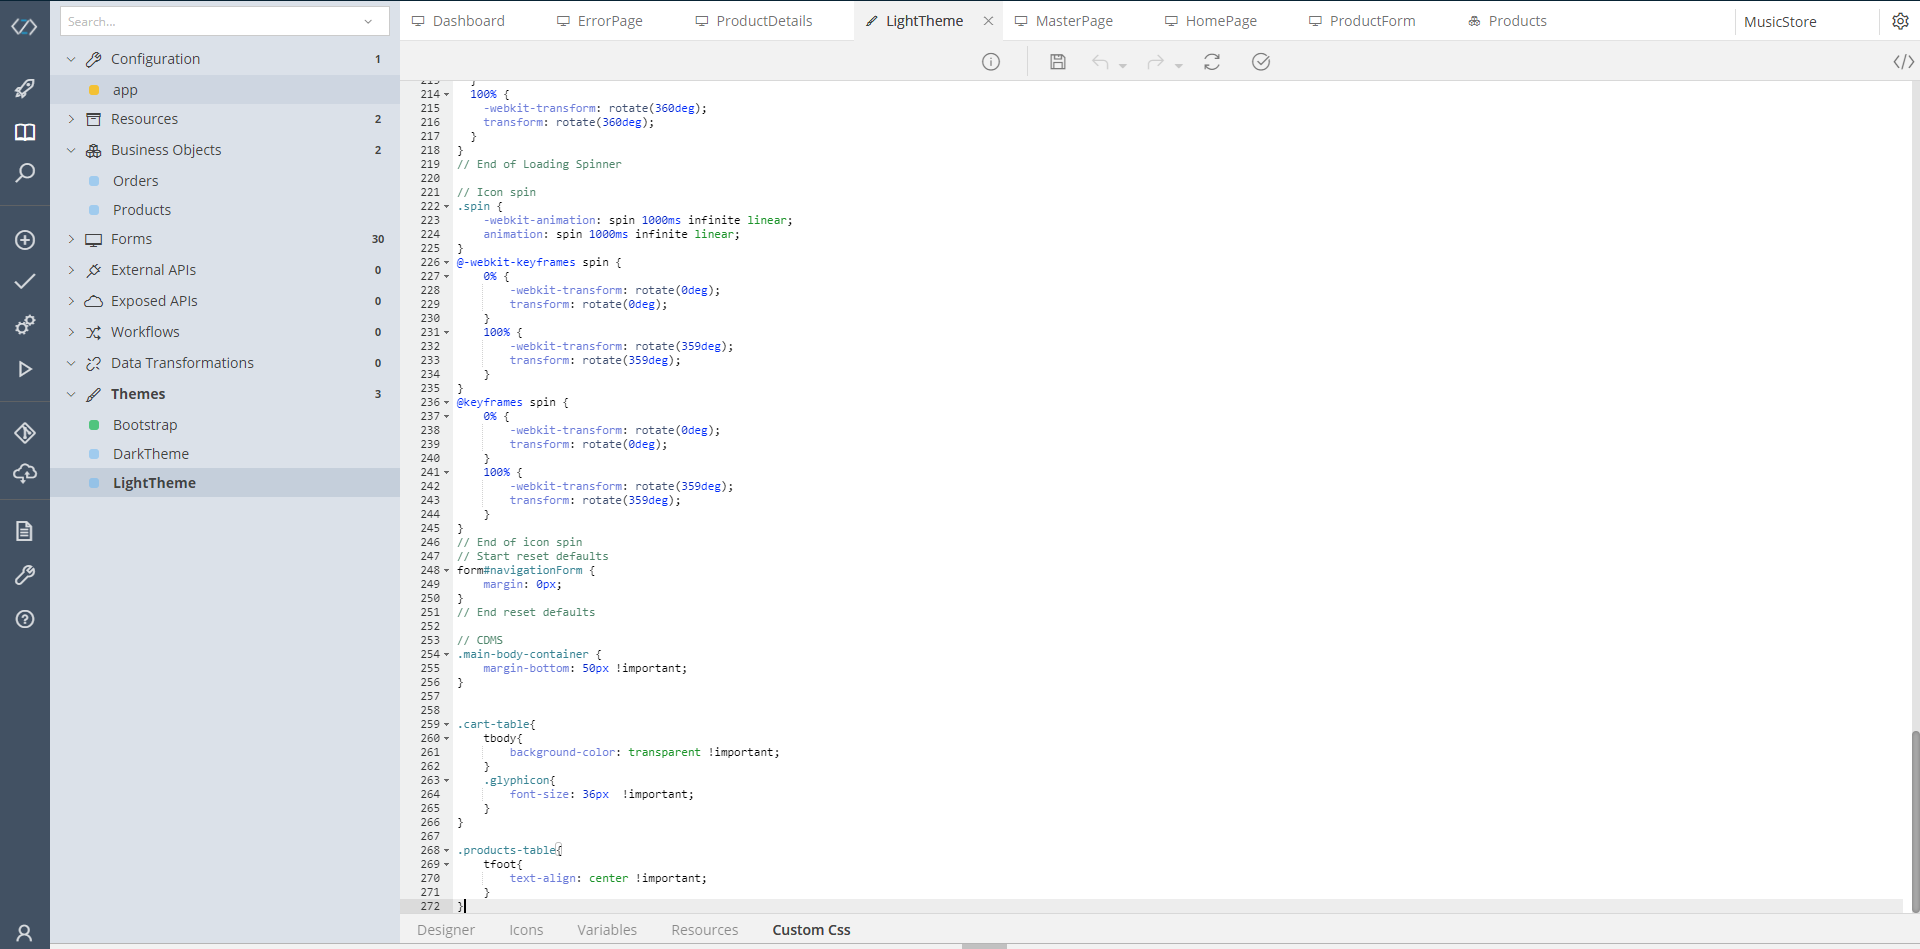
Theme Editor
Now our Master Page does everything its supposed to do. The only thing left is make the Cart Table a bit prettier, using that cart-table class we added earlier. So,
Todo
- Go to the Model Tree and find the Themes section
- Open the LightTheme
- Go to the Custom Css panel (you will find it at the bottom panels)
- In the CSS Editor that you will see, scroll at the end and add the following rules:
.cart-table{
    tbody{
        background-color: transparent !important;
    }
    .glyphicon{
        font-size: 36px  !important;
    }
}

.products-table{
    tfoot{
        text-align: center !important;
    }
}
Creating the Orders Forms
On your own
Following the steps you should aready be familiar with, create two Header-Detail forms (Data Entry and List Form) for the Order Class
Refine the OrderList
This is the List form, presenting all Orders fetched by a DataSource. Here, we want the following:
- Show this page only to Authenticated Users
- If the User is an Administrator or a Clerk, show all available Orders
- If the User is a Customer, show only his/her Orders
Todo
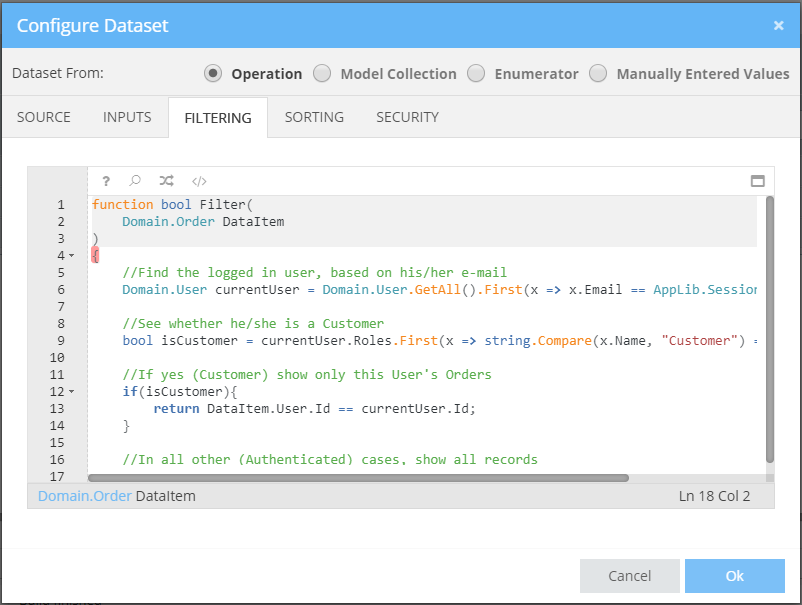
To do that, first, make sure that the Retrieve Controller Action generated for you is Available To All Authenticated. The Anonymous users must be prohibited. Next stop: filter the presented Records based on the Role of the logged-in user:
- Go to your DataSets and open the OrderDataSet (double-click)
- A Modal will Appear, allowing you to configure it
- Select the FILTERING panel
- In the Code Editor, you will see a filter that returns all values (return true). We will need to change it so that if the User is a Customer, then only his/her orders are visible. Thus, enter the following into the code editor:
    //Find the logged in user, based on his/her e-mail
Domain.User currentUser = Domain.User.GetAll().First(x => x.Email == AppLib.Session.GetCurrentUser().Email);

//See whether he/she is a Customer
bool isCustomer = currentUser.Roles.First(x => string.Compare(x.Name, "Customer") == 0) != null;

//If yes (Customer) show only this User's Orders
if(isCustomer){
    return DataItem.User.Id == currentUser.Id;
}

//In all other (Authenticated) cases, show all records
return true;
At this point, you should have all the required knowledge to finish up with the OrderList and OrderForm Forms: change their UI to your preference, set up their functionalities, configure their logic etc. You don’t need me anymore, so, go ahead 
Hint
Did you know? You can copy whole Components as well as Controller Actions from one form to another. Why not copy some useful stuff from the Cart form into this one?