Security
OS Authentication
Before you Begin
Before you begin using the OS Authentication mode in your Application, do nothing. Absolutely nothing. Do not create a user using your Windows username in a Form-Authentication mode. Do not give him/her password. This is not how OS Authentication works and you will end up troubleshooting your application for hours before you give up and realize that you did not have to add a new user. Just follow the steps described in the next sections and you’ll be fine.
Selecting OS Authentication
Navigate to your Application’s Configuration and choose the Authentication option under Security
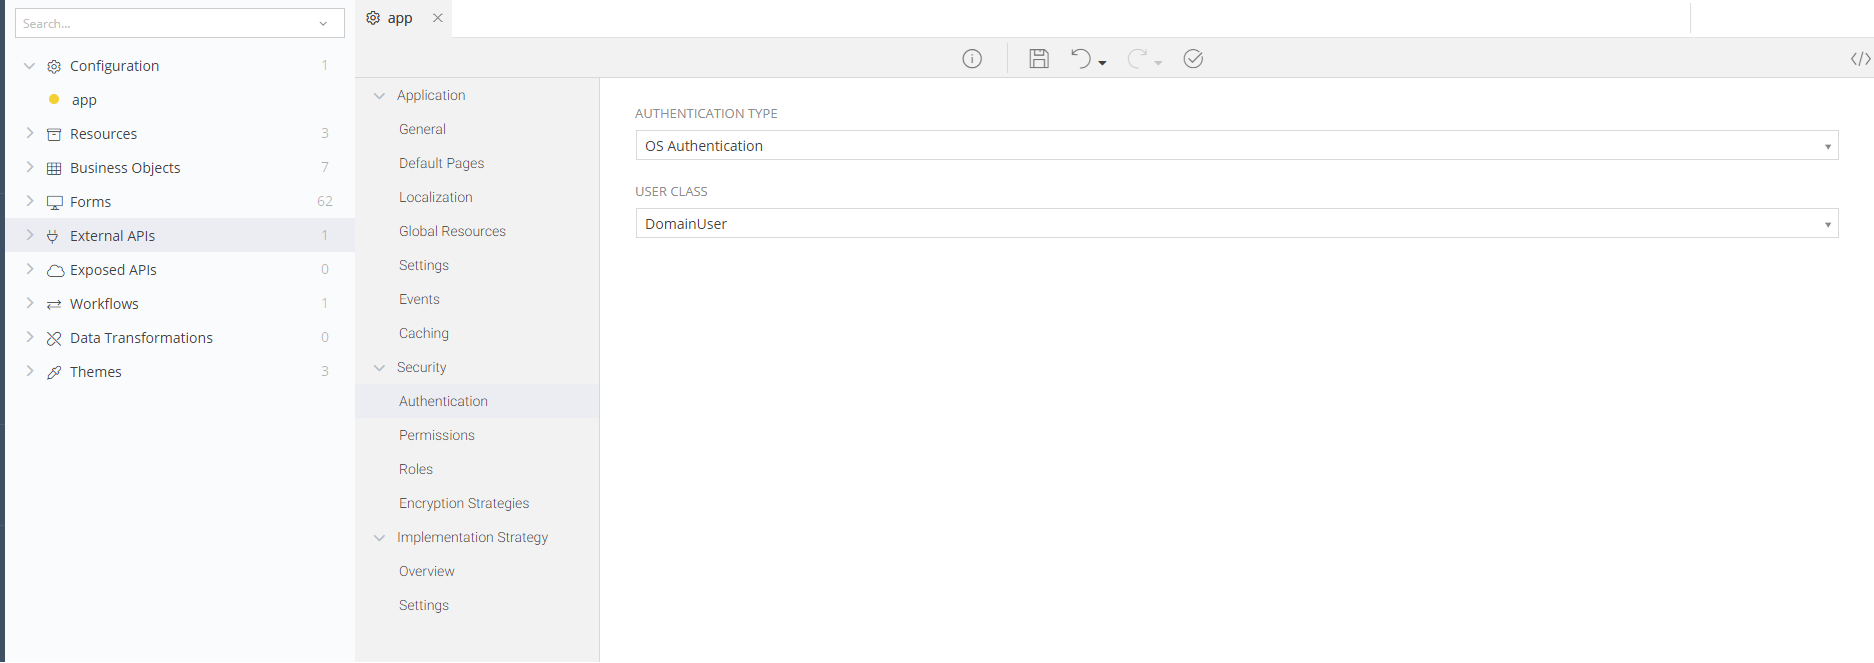
Set your Authentication type to OS Authentication
Selecting the User Class
Any zAppDev Application has a pre-defined ApplicationUser class that models the user running and using the generated Application. You cannot alter that class (add, remove or change its Properties), since it's a system class. However, you can inherit it from your own classes and then use your own class (having its Base Class set to ApplicationUser or any of its other inheritors) and then add any other property you might want.
If you have your own User classes, inheriting from the ApplicationUser one, you might want to use them in the OS Authentication process. For example, imagine that you have a class named DomainUser, extending the ApplicationUser class, that keeps information such as the Department where the user is working on, his/her Manager and more. And you want to use this class in your Application to either differentiate from other users (e.g. FacebookUser, ApplicationUser) or to just use your own class in any form you might have.
To make the Application take into account your own user class, when a user is logging into your Application using OS Authentication, all you have to do is to select the class to be used within the process.
For example, the screenshot presented above:
- Sets the Authentication Type to OS
- Makes the Generated Application use the DomainUser class as its user class (instead of the default ApplicationUser) whenever a user loggs into the Application or is added
Warning
The default class to be used in OS Authentication is the standard ApplicationUser. So, if you have selected a wrong class or left the field blank, the ApplicationUser will be used
Warning
If the Authentication Process is faulted in any way, during the execution of the Generated Application, the ApplicationUser class will be used as the "current user" and the exception will be logged. So, if you cannot see all your users in an operation that, for example, fetches all the DomainUsers, then check your log file: maybe an exception was thrown silently and the system defaulted to the ApplicationUser
Enabling the First Administrator Setup
It can be pretty obvious that with OS Authentication you will no longer be able to use the "CreateAdmin" form to create an administrator account. You will want, however, to have an Administrator that will grant roles and permissions to other users. Here’s how to do that.
Find the FirstAdminSetup form and make sure that you have its latest version. Your “Render” controller action should look like this:

Now, after re-building your Application you will be able to use the FirstAdminSetup/Render? Page to set your Application User as the Administrator.
Running the Application
In order to apply all changes, make sure to rebuild your Application. Remember: just building it is not enough.
After the rebuild is finished, you will be able to run the app and see that it identifies you by your Windows Username (domain-name\username)
If you followed the Enabling the First Administrator Setup steps, you will be able to navigate to the /FirstAdminSetup/Render? Page and set yourself as the Administrator.
Remember: after granting yourself the “Administrator” role, you will no longer be able to use the FirstAdminSetup form.
Troubleshooting
IIS
Sometimes, even though the re-build finishes successfully and the web.config of your Application shows the correct mode of Authentication, you might see that your Application is still in its previous mode. Thus, even though zAppDev did everything perfectly, IIS decided to have a tantrum and completely ignore your wishes.
If this is the case, here are some things you can do.
Re-Build
Try to re-build your Application. If once is not enough, do it again. Twice, three times, as many times as you need to either make IIS respect you or just give up.
Manual Setup
If during the Re-Build step you opted for the “give up” option, you can open your IIS Server (or ask someone to do that for you, if you do not have access) and open the Authentication panel of your Application.
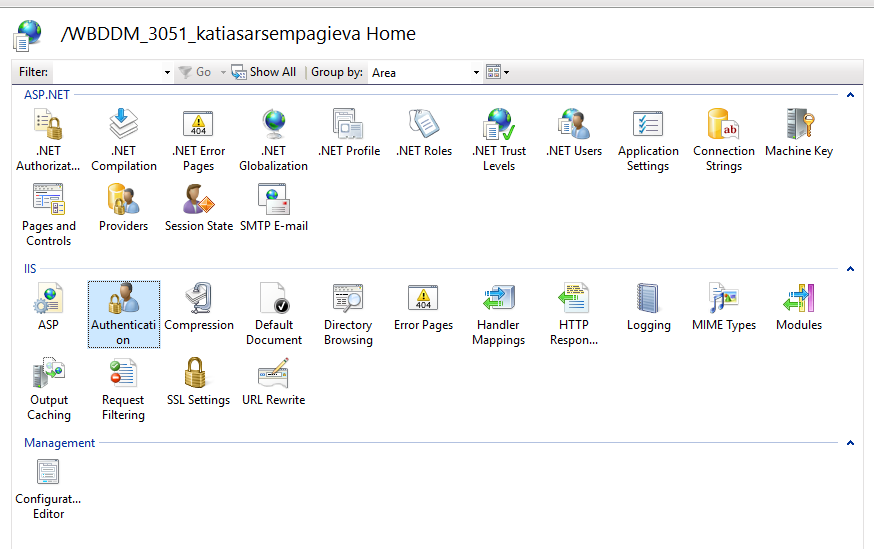
The Authentication settings will show you some available modes for you to choose from. If what you need is a Windows Authentication, then - Enable the “Windows Authentication” setting - Disable the “Anonymous Authentication” setting
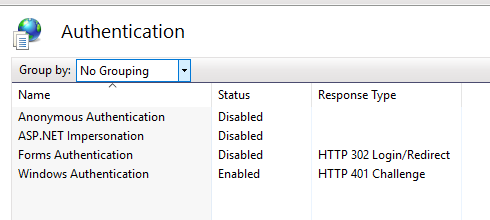
After opening your Application again, you should be seeing the correct Authentication Mode.
Authentication
If all went well and your Application runs in an OS Authentication mode, but no matter what you do your Application won’t Authenticate you, here are some reasons and their solutions.
Invalid User
An invalid User might be the case if you ignored the “do not add a user” warning and did it anyway.
The only way for an OS Authentication to work with an already created (via form-auth) user is if the username and the password are exactly like the ones you use to login to your domain. So, if you have a username-pass like the following, to login to your computer: - Username: DEV-GR\username - Password: MyP4ssword1@ you will have to use the exact same username and password (lowercases, uppercases, everything). Nothing else will work.
At this point, if you did add a user before changing to OS Authentication and tried to make him look like a domain user, I would suggest you just delete him and start over.
Wrong Domain
In some cases, the OS Authentication will not authenticate you if your user’s domain and the application’s domain are different.
Example:
- You are a Windows user with a name: DEV-GR\username
- You try to login to an application that runs in a domain named CMP
- The CMP domain does not trust the DEV-GR domain
In this case you will have to speak with your Administrator that will either change the cross-domain security settings to trust your DEV-GR domain, or that will create a new user for you in the CMP domain (e.g. CMP\username)
First Admin Setup
This section provides information regarding anything that could go wrong with the First Admin Setup page.
Deployed Application
If you have Deployed your Application using the OS Authentication for the very first time, then your First Admin Setup will throw an exception if you have not enabled the “Seed Security Tables” option.
Thus, change the “Seed Security Tables” to “true” in your web.config and re-run your Application.
Changed from Forms-Authentication
If your Application was running with Forms Authentication and you changed it to OS Authentication, then the whole “roles and permissions” logic might not work until you have thoroughly cleared your browser data.
Thus, is the First Admin Setup was successful, but you do not see yourself as an Administrator, try to delete everything from your browser history: cookies, session etc.
Extended Domain.ApplicationUser
zAppDev does not allow associations between the Domain.ApplicationUser and other objects. Thus, many Applications extend the Domain.ApplicationUser class and use that extension in associations with other objects.
Now, the thing with the OS Authentication is that it will create a new Instance of the Domain.ApplicationUser, without knowing about its inherited classes. However, when creating your First Administrator, you want your inherited user class to be granted the role (e.g. Domain.ActualUser) - not the base one.
In order to surpass this restriction, Vasilis Vasilopoulos has suggested a hack:
Warning
This is not the best practice. Please, use it only if absolutely necessary and try not to spread it through your applications
Danger
Do not proceed if you do not want ALL your Domain.ApplicationUser objects to be extended
Danger
Do not try to create an instance of the extended Domain.ApplicationUser class using his “username” via Mamba Code (as you would normally do)
- Open your UsersList controller and navigate to its Entry Point
- Add the following code to the Entry Point action of step 1
var sqlQuery = “
insert into YOUR_EXTENDED_TABLE (UserName)
select a.UserName
from security.ApplicationUsers a with(nolock)
    left join YOUR_EXTENDED_TABLE b  with(nolock)
    on a.UserName = b.UserName
where b.UserName is null
“;
CommonLib.DataContext.RunSqlQuery(sqlQuery, null);
- Run your Application
- Visit the FirstAdminSetup/Render? Page
- Mark yourself as the Administrator
- Navigate to the UsersList page
Let’s clear our what will happen.
The UsersList page will be extending (if needed) all your Domain.ApplicationUser classes. Thus, if you open it right after becoming an Administrator, you will be extended as well. Thus, your Domain.ApplicationUser and its Domain.ActualApplicationUser (that inherits the former one) will both be assigned the Administrator role.